So, you are trying to figure out how water damage restoration in Utah fits into your home renovation plans, especially if you care about flooring and finishes. The short answer is: fix the water problems first, fix them thoroughly, and only then invest in new floors, walls, or cabinets, otherwise you are almost guaranteed to redo that work later.
You deal with the source of the water, fully dry the structure, check what can be saved, remove what cannot, treat for mold, and only then move into rebuilding and design choices. That process sounds simple, but on a real renovation project it can get messy, especially in Utah with its mix of older basements, slab-on-grade homes, snow melt, and sudden summer storms.
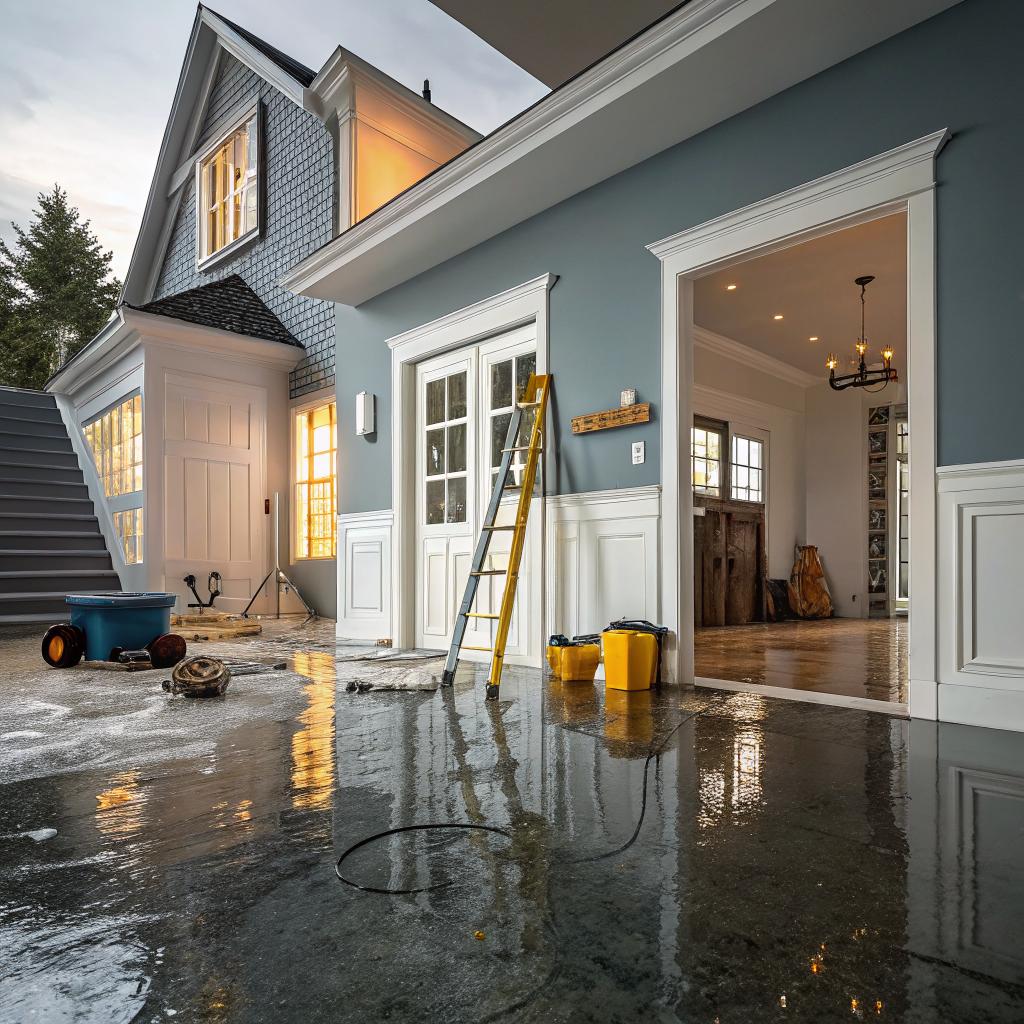
You might be thinking about hardwood or new tile right now, not about pipe breaks or flooded basements. But water and renovation are closely connected. If you ignore moisture readings, or skip proper drying just so you can move ahead with new flooring, you will trap problems under your fresh work. That is how cupped planks, loose tiles, and musty smells show up three months after you finished everything.
Here are some key things you need to know before we go deeper.
- Water damage cleanup should come before any serious renovation work, especially before installing new flooring.
- In Utah, snow, ice, irrigation, and old foundations are just as risky as obvious plumbing leaks.
- Drying is not just “waiting a few days.” It needs equipment, time, and actual moisture readings.
- Different flooring types respond very differently to water, and some can be saved while others cannot.
- Insurance can help, but only if you document carefully and avoid unplanned demolition.
- You do not have to do everything yourself. Sometimes calling a local pro is cheaper than guessing.
You can read a lot about water damage remediation Salt Lake City, but I want to walk through it from a renovation and flooring point of view, step by step, like you would actually experience it in a real house.
What “water damage restoration” really means during a renovation
Water damage restoration sounds like a technical term, but if you strip it down, it covers four basic stages that sit right in the middle of any renovation plan.
- Stop the water.
- Dry the structure.
- Clean and remove damaged material.
- Repair and put things back together.
That sequence collides with normal remodeling tasks. You want to move forward with new flooring, trim, maybe even an open concept layout. Water damage forces you to slow down and think about what is behind and under those finishes.
Water work is “invisible” work, but it protects every visible upgrade you pay for later.
If you skip that invisible stage, you are just decorating a damp box. That sounds harsh, but I have seen people repaint over bubbled drywall, then complain when it peels again a month later. The paint was not the problem.
Let us break this down in a way that matches how you would actually move through a project in Utah.
Step 1: Figure out what kind of water you are dealing with
Not all water problems are equal. What you do next depends a lot on where the water came from. Before you pull up any flooring or cut drywall, spend a few minutes classifying the water.
Common water sources in Utah homes
| Source | Typical Utah situation | Risk level | What it means for renovation |
|---|---|---|---|
| Clean supply line leak | Broken pipe, fridge line, washer hose | Lower at first | Faster response can save drywall and some flooring |
| Roof or ice dam leak | Snow melt, wind-driven rain | Medium | Watch insulation and ceiling sagging, check attic framing |
| Groundwater / seepage | High water table, poor grading, spring runoff | Medium to high | May need drainage fixes before finishing basements |
| Sewer backup | Older city lines, heavy storms | High | Often requires removal of porous materials and disinfection |
| Appliance overflow | Dishwasher, tub, toilet tank (clean), water heater | Variable | Fast cleanup can save cabinets and some subfloors |
Clean water can turn into contaminated water if it sits. So time matters. That is one reason why restoration companies move fast. They are not just in a hurry for no reason. Bacteria start growing, and materials soak up more water hour by hour.
If you are planning new flooring, treat any standing water like an emergency, even if it “looks clean.”
Step 2: Stop the source before thinking about flooring
This sounds obvious, but I still want to say it clearly, because during renovations people sometimes push forward even when they have not solved the cause.
If you have:
- Recurring seepage in a basement
- A roof leak that “only shows up during big storms”
- Plumbing in an old wall that has leaked twice
Then installing premium hardwood or elaborate tile without fixing those issues first is almost guaranteed to waste money.
You need to:
- Shut off the main water if a pipe is broken.
- Get a roofer to at least patch an opening.
- Address grading, gutters, and downspouts for exterior water.
- Check for failed caulking or flashing around windows and doors.
Think of it like this: every dollar you put into design and finishes sits on top of your plumbing and envelope. If the base is unstable, the pretty parts lose.
Step 3: Assess the damage before demo fever hits
When something floods, the first instinct is often to start ripping things out. Sometimes that is needed, but not always. During a renovation, you want to be careful. Demolition can affect your budget and insurance claim, and it can even make drying harder if you do it without a plan.
Here is what to look at.
Check your flooring type first
Different floors respond very differently to water.
| Flooring type | How it reacts to water | Can it be saved? |
|---|---|---|
| Solid hardwood | Swells, cups, may gap when dry | Sometimes, with fast drying and sanding, if not badly distorted |
| Engineered wood | Plywood layers swell, top veneer can delaminate | Often no, if water sits more than a short time |
| Laminate | Core swells and puffs up, loses shape | Usually no, most needs replacement after soaking |
| Vinyl plank (LVP/LVT) | Planks mostly water resistant, but water can get under | Many times yes, if you dry subfloor and reinstall correctly |
| Ceramic / porcelain tile | Tile is fine, but subfloor and grout lines can hold water | Often yes, if subfloor remains solid and you dry cavities |
| Carpet | Holds a lot of water, pad often ruined | Maybe, if clean water and very fast drying; pad often replaced |
In Utah, I see a lot of basements with carpet and pad sitting on concrete, plus LVP on the main level. That combination can be both good and bad. LVP usually survives better than laminate, but trapped water under it can still cause mold on the subfloor.
Before you rip up any flooring, ask a practical question: “Can this be dried and saved, or am I destroying something that insurance would have covered to replace later?”
Sometimes you are eager to get to “fresh starts” during a renovation, but tearing out material without photos and documentation can complicate your claim.
Use tools, not just your hands and eyes
If you walk on the floor and it feels mostly dry, that does not mean it is safe for new flooring installation.
Basic tools that restoration companies use:
- Moisture meters for drywall, wood, and concrete.
- Infrared cameras to spot cold, damp areas behind finishes.
- Hygrometers to measure humidity in the air.
You can rent or buy simple meters if you want to double-check your contractor. Dry to the touch is not the same as dry inside. Concrete slabs and wood framing can hold moisture for weeks.
This matters because many flooring manufacturers require subfloors to meet certain moisture levels before installation. If you ignore that, you may void warranties on expensive materials without realizing it.
Step 4: Drying, and why Utah climate is both friend and enemy
People sometimes assume that Utah is dry, so water will just “air out” quickly. That is only half true.
Yes, the desert climate and low humidity help with evaporation. But basements, crawl spaces, and interior wall cavities do not always benefit from that natural dryness. They need air movement and sometimes dehumidification to actually dry out.
The basic elements of proper drying
For a typical Utah home, proper drying usually includes:
- Extracting standing water with pumps or wet vacs.
- Pulling up wet carpet and pad, or at least detaching it, to dry the slab or subfloor.
- Setting up air movers to keep air flowing across wet surfaces.
- Running dehumidifiers so the moisture leaves the house instead of just sitting in the air.
- Possibly drilling small holes in baseboards or drywall to let wall cavities dry.
Time frames vary, but 3 to 7 days of active drying is common, sometimes longer for heavy saturation in thick materials. Utah concrete, especially in older homes, can hold water for quite a while.
If you are eager to keep your renovation schedule, it is tempting to rush this stage. That is where problems start.
Ask your contractor or restoration company to:
- Show you daily moisture readings, not just say “it is dry.”
- Explain what level they are targeting for wood or concrete.
- Confirm that they checked behind cabinets or wall sections that were near the wet area.
Step 5: Mold concerns in renovation homes
Nobody likes to talk about mold, but ignoring it during a big remodel is risky. Renovations open up walls and floors. Once you start tearing things apart, you can disturb growth that was quietly hiding.
Mold growth depends on three things:
- Moisture
- Organic material (drywall paper, wood, dust)
- Time
If water sits for more than 24 to 48 hours, mold can start growing. That is not panic time, but it should push you to act with some urgency.
When you open up wet areas during your remodel, look for:
- Black, green, or white patches on paper, wood, or insulation.
- A musty, damp smell that lingers even after surfaces look dry.
- Soft, crumbly drywall or rotted framing.
At that point, cleaning might involve:
- Removing affected drywall back to clean, solid material.
- Cleaning wood framing with appropriate products and proper drying.
- Possibly using containment and filtration if the growth is larger.
You do not need to be terrified of any visible mold, but you should not ignore it or just paint over it either. If you are already renovating, you are in a good position to fix it while walls are open.
How water damage changes renovation and flooring decisions
Once you have addressed the source, dried the structure, and handled mold, you still face real choices about what to put back. Water history should affect those choices, especially in Utah basements and ground-level rooms.
Flooring choices for areas that have been wet
If a room has flooded before, be honest with yourself. It could flood again. That does not mean you should never finish it, but it does suggest using materials that tolerate moisture better.
Good options for risk-prone areas:
- Luxury vinyl plank or tile with a good locking system.
- Ceramic or porcelain tile over a properly prepared and waterproofed substrate.
- Polished or stained concrete with area rugs you can remove.
More sensitive options, where you should be cautious:
- Solid hardwood near exterior doors without good drainage.
- Cheap laminate in basements.
- Thick carpet and pad directly on slabs that sometimes sweat or wick moisture.
You might really want the warmth of wood. Many people do. Some choose engineered wood with a better tolerance to moisture on upper levels, and use more resilient options in basements. That sort of compromise feels realistic to me, rather than pretending the house will never see water.
Subfloor and underlayment choices
If you are renovating after water damage, this is a chance to upgrade what sits under your finished flooring.
For example:
- Using moisture resistant subfloor panels in basements.
- Adding proper underlayments that allow some airflow.
- Checking for vapor barriers under slab-installed flooring, and correcting if they are missing.
These are not exciting upgrades. You will not show them off to friends. But they change how your new floors handle the next minor leak or spill.
Coordinating restoration work with your renovation schedule
This is where many Utah homeowners get frustrated. You have a project plan. Maybe you coordinated with a general contractor, ordered custom flooring, lined up trades. Then water damage shows up and throws everything off.
You cannot always avoid that disruption, but you can handle it in a way that keeps the project under some control.
Sequence that works better in real life
A practical order of work might look like:
- Emergency water mitigation: stop source, remove standing water, start drying.
- Assessment: document damage, talk to insurance adjuster if covered.
- Controlled demolition: only what is needed to remove unsalvageable material and expose wet areas.
- Structural repairs: framing, subfloor, insulation, rough plumbing or electrical corrections.
- Verification of dryness: moisture readings and visual checks.
- Close-up work: drywall, texture, primer.
- Flooring installation and trim.
- Painting, cabinets, and final finishes.
Notice that flooring comes toward the end. Sometimes people schedule hardwood sand and finish right in the middle, before the rest of the wet work is done. That can expose your new floors to humidity and dust.
If you are acting as your own general contractor, try to protect that sequence, even if it is annoying. Finishes want a clean, dry, stable environment.
Utah-specific issues that affect water and renovation
Utah is not all the same, of course, but there are a few recurring themes that interact with water damage and remodeling.
Basements and high water events
Along the Wasatch Front, basements are common. Many are half-finished or recently remodeled. When a big storm hits or spring melt ramps up, sump pumps can fail, or ground water finds the path of least resistance.
If you are planning a full basement renovation in Utah, ask yourself:
- Has this basement ever had water, even a little?
- Do I see staining on baseboards or on the lower part of the walls?
- Is there a musty smell even when surfaces look fine?
If the answer is yes to any of those, build some mitigation work into your renovation budget, such as:
- Improving exterior grading and extending downspouts.
- Checking foundation cracks and sealing where needed.
- Installing or upgrading sump pumps, with battery backup.
You might feel like this delays your fun design choices, but it can keep that new basement family room from becoming a regular project.
Snow, ice, and roofing details
In areas with more snow, ice dams can push water under shingles and into attics or walls. You often only find this when you see staining on ceilings.
During a renovation, especially if you are already messing with the roofline or insulation, you can:
- Add proper attic venting.
- Check insulation depth and patterns to reduce heat loss spots.
- Repair flashing around chimneys, skylights, and vents.
Those steps are not just about energy. They also reduce the chance of slow leaks that lead to interior damage.
Working with pros vs DIY in a renovation context
Some homeowners can handle minor water issues themselves. Others prefer to bring in local restoration companies.
So where is the line?
You can think about hiring help when:
- Water has affected multiple rooms or multiple levels.
- You see water wicking up walls more than a few inches.
- The source involves sewage or contaminated water.
- You are already deep into a renovation with other trades scheduled.
Professionals bring equipment and experience, but they also help with documentation for insurance. That matters because insurance companies often want proof that reasonable steps were taken to prevent further damage.
You do not need to hand over every small leak to a company. Still, on larger events, trying to “save money” with DIY can sometimes end up costing more, especially if drying is incomplete or if you throw away materials that might have been covered.
Insurance questions that affect your renovation choices
Water damage and insurance in Utah can be confusing. Coverage often depends on the cause of the water, how quickly you respond, and what your policy says about finished basements, sewer backups, and so on.
A few renovation-related tips:
- Take photos and videos before you remove anything.
- Keep samples of flooring or cabinets that are damaged.
- Save receipts for all mitigation and repair work.
- Do not do major demolition before speaking with your adjuster, except what is needed for health and safety.
Insurance might pay for restoring your home to “pre-loss condition.” That might not match your renovation dreams. Some people use the claim payment to cover part of a larger upgrade, but you need clear estimates to separate what is covered from what is elective.
Planning future renovations with water in mind
If you have gone through one water event during a remodel, you probably do not want a repeat. So you can use this as a design signal, not just a setback.
Ask yourself as you plan future work:
- Where does water move in and around my house when it rains or snow melts?
- What mechanical systems (water heaters, washers) could leak, and what can I do to limit damage if they do?
- Am I installing finishes that make sense for the room’s true risk level?
You might choose:
- Floor drains or small curbs in certain utility spaces.
- Pans under water heaters or washing machines with sensors.
- Harder flooring near entries and wet rooms, carpets kept to drier areas.
These small decisions add up. They make future water problems less destructive, which makes your next renovation phase easier, not harder.
Good water planning does not remove risk, but it turns potential disasters into manageable repairs.
Common questions about water damage and renovation homes in Utah
How long should I wait to install new flooring after water damage?
You should wait until subfloors and slabs are within the moisture range recommended by your flooring manufacturer. That can be as short as a few days for minor surface wetting, or several weeks for heavy saturation, especially on concrete. Use moisture meters, not guesses. Whoever installs the flooring should check and document those readings.
Can I keep my existing hardwood if it got wet?
Sometimes, yes. If water was from a clean source and you acted quickly, cupping and minor distortion can improve as boards dry. After full drying, a professional can often sand and refinish. If boards are heavily warped, buckled, or split, then replacement is more realistic. Each case is a bit different, and timing is crucial.
Is it safe to finish my basement again after a flood?
It can be, but only if you treat the flood as a warning. Fix the cause first, then choose materials and layouts that accept some risk. That might mean more resilient flooring, removable baseboards, or keeping expensive built-ins out of the most vulnerable corners. If you skip that planning, you will likely repeat the cycle.
Do I really need professional drying if the water is already gone?
Not always. Small spills and quick cleanups on hard surfaces are usually manageable. Larger events with soaked walls, insulation, or multiple rooms call for more than towels and fans. One realistic check is this: if you would be upset about redoing your new renovation because hidden moisture showed up later, then spending a bit more upfront for proper drying is worth it.
What is the single smartest thing I can do if I want to renovate and I just had water damage?
Pause the design talk for a short time and get clarity on moisture. Ask for readings, understand how long drying will take, get rough repair estimates, then rebuild your renovation plan around that information. It feels like a delay, but it protects your time, budget, and the floors and finishes you care about.