So, you are trying to figure out sanded vs. unsanded grout and how to seal it without wrecking your tile job.
You pick the grout based on your joint width and tile material, then you seal it with the right sealer after it has cured.
You are not alone. Most people spend hours picking tile, then rush the grout decision in five minutes. Then they regret it when hairline cracks, stained joints, or chipped glass tile show up. Grout feels like a small detail, but it controls how your tile looks, how long it lasts, and how hard it is to keep clean.
Here is the short version: sanded grout works better for wider joints and most floors, unsanded grout works better for narrow joints and softer or scratch-prone tile. Both need proper mixing, good application, and then sealing with a product that matches the room and the tile.
Things you need to know:
- Sanded grout is for joints about 1/8 inch to 1/2 inch, especially on floors.
- Unsanded grout is for joints 1/8 inch and smaller, and for glass, polished stone, and delicate surfaces.
- Joint width and tile hardness matter more than personal preference.
- Grout color changes how “busy” or calm the tile looks.
- You must let grout cure before sealing, usually 48 to 72 hours for cement grout.
- Penetrating sealers soak into the grout; film-forming sealers sit on top.
- Wrong sealer on natural stone can cause blotches or dark spots.
- Over-sealing or leaving sealer on the tile can cause haze that is hard to remove.
- Showers and kitchen backsplashes need more frequent re-sealing than low-traffic areas.
- Good prep and cleanup make more difference than buying the most expensive product on the shelf.
Now let us walk through this from the ground up, like you and I are standing in front of a tile aisle, trying to make an actual choice instead of guessing.
What grout really does (and why it matters)
You are not just filling gaps between tiles. Grout has a job.
- It locks tiles in place and shares some of the load when you walk on them.
- It keeps dirt and water from working their way down into the thinset and subfloor.
- It shapes the visual grid of your tile; thick dark lines feel different from thin light ones.
- It affects maintenance; some grout setups fight stains better than others.
Quick example:
Take a white subway tile backsplash in a kitchen. If you use white grout, the wall looks cleaner and simpler. If you use dark gray grout, the pattern pops, but every tiny uneven cut in the tile stands out. Same tile, different grout, very different feel.
> Grout is not just “the stuff between tiles”. Think of it as part of the design and part of the waterproofing strategy.
You are balancing three things:
- Looks
- Durability
- Maintenance
Sanded vs. unsanded grout touches all three.
Sanded vs. unsanded grout: what is the real difference?
What is sanded grout?
Sanded grout is cement-based grout with fine sand mixed in. The sand gives the grout body and reduces shrinkage as it dries.
Key traits:
- Feels textured and gritty when you rub it between your fingers.
- Holds up better in wider joints because the sand helps bridge the gap.
- Resists cracking from shrinkage in larger joint widths.
- Costs slightly less in many brands than unsanded versions.
Use sanded grout when:
- Joint width is roughly 1/8 inch to 1/2 inch.
- You are grouting floors (ceramic, porcelain, some natural stone).
- You need more strength in high traffic zones: entryways, kitchens.
> If your grout lines are wide, sanded is usually the safe default unless the tile surface can scratch.
What is unsanded grout?
Unsanded grout is also cement-based, but without the sand. It feels smoother, almost like thick peanut butter when mixed.
Key traits:
- Better for thin joints because it can pack tightly into small gaps.
- Adheres well to vertical surfaces like walls.
- Less risk of scratching glass or polished stone.
Use unsanded grout when:
- Joint width is 1/8 inch or less (many pros prefer 1/16 to 1/8 inch range).
- You are working with glass tile, metal tile, marble, or other polished stone.
- You have narrow joints on a shower wall or backsplash.
> Unsanded grout is not just for walls. It is for narrow joints and delicate tile, whether floor or wall.
The 1/8 inch “gray zone”
You will see this debated in forums: sanded or unsanded for 1/8 inch joints?
Here is a practical way to think about it:
- For floors with 1/8 inch joints: sanded often holds up better long term.
- For walls with 1/8 inch joints: unsanded is easier to smooth and less likely to slump.
- For delicate or polished tile at 1/8 inch: unsanded helps avoid scratches.
> When tile can scratch, that factor beats the joint width rule.
If you stand in the aisle and cannot decide for 1/8 inch joints, ask yourself one simple question:
“Is scratching the tile a bigger risk, or is cracking grout a bigger risk?”
Pick the side you care more about.
How to choose based on your tile type
Ceramic and porcelain tile
These are the common tiles in bathrooms and kitchens.
- Floors with 1/8 inch to 1/4 inch joints: sanded grout.
- Floors with super narrow joints (1/16 inch): unsanded or a specialty grout labeled for narrow joints.
- Walls with 1/16 to 1/8 inch joints: unsanded for easier work and smooth joints.
Example:
Standard 12×24 inch porcelain floor tile with 3/16 inch joints in a bathroom.
Go with sanded grout for strength and less shrinkage.
Natural stone: marble, travertine, limestone, granite
Many of these surfaces scratch more easily than porcelain.
- Polished marble or limestone: unsanded grout for joints up to 1/8 inch.
- Honed (matte) stone with small joints: often still unsanded, to be safe.
- Tumbled stone with wide joints: sometimes sanded, but test first on scrap pieces.
> With stone, test the grout on a spare tile before you commit. Once you scratch it, there is no quick fix.
Glass tile
Glass is very scratch-prone.
- Use unsanded grout almost every time.
- Avoid hard, gritty grout and aggressive scrubbing during cleanup.
Many glass tile makers list grout types they approve in their technical sheet. That page is worth reading.
Metal, mirrored, or specialty tile
These surfaces can be unpredictable.
- Check the box or manufacturer website for grout recommendations.
- When in doubt, small joints with unsanded grout are safer.
> Tile manufacturers often test grout on their own products. Their instructions can save you from guessing wrong.
Grout types beyond sanded vs. unsanded
Since you are already thinking hard about grout, it helps to know there are a few main categories.
Cement-based grout
This is the standard product at home centers. It comes in sanded and unsanded versions.
- Needs mixing with water or a liquid additive.
- Porous when cured, so it needs sealing.
- Can stain from coffee, wine, soap scum, and dirty mop water.
Epoxy grout
Epoxy grout mixes resin and hardener. It is more resistant to stains and chemicals.
- Great for shower floors, commercial kitchens, and areas that see a lot of spills.
- Harder to install and clean up; working time is short.
- More expensive than cement grout.
> Some people skip sealing when they use epoxy grout, because it already resists stains. That can work, but check your brand’s instructions.
Pre-mixed or “ready-to-use” grout
These come in a tub and do not need adding water.
- Handy for small projects or DIY jobs.
- Some are stain resistant from the start.
- Check the label to see if the maker still recommends sealing.
For this article, we will focus mainly on cement-based sanded and unsanded grout, since that is what most homeowners end up buying.
How to match grout to your joint width and room
You can think of proper grout selection as a simple checklist.
Step 1: Measure the joint width
Do not guess. Use a small ruler, calipers, or even a coin as a reference.
- 1/16 inch: hairline, almost tight joints.
- 1/8 inch: common for larger format tiles.
- 3/16 to 1/4 inch: often seen on floors and rustic tiles.
The joint width sets the first rule:
- Up to 1/8 inch: unsanded is usually allowed.
- 1/8 to 1/2 inch: sanded.
Step 2: Look at tile surface hardness
Ask yourself:
- Is the surface glossy and soft, like glass or polished marble?
- Or is it hard and tough, like most porcelain?
If scratching is a risk, tilt toward unsanded, even if that bends the joint width rule a little.
Step 3: Consider room use
For each area:
- Shower walls: Narrow joints, lots of water. Unsanded or fine joint grout, then careful sealing.
- Shower floors: Smaller tiles, more joints, constant water. Sanded or epoxy, then seal if cement-based.
- Kitchen floors: Spills, traffic. Sanded with a good penetrating sealer.
- Backsplashes: Steam, splatter, but low wear. Either sanded or unsanded, depending on tile and joint size.
> If you want less scrubbing over the next 10 years, spend more thought on gradation, sealer, and color right now.
Grout color: light, medium, or dark?
You already know your type: sanded or unsanded. Now the next big choice is color.
How color changes the look
The relationship between tile color and grout color can do three main things:
- Blend: Tile and grout close in color; joints “disappear”, surface looks more continuous.
- Frame: Darker grout with lighter tile, or vice versa, to make each tile stand out.
- Balance: Tone that is in between to soften the grid effect.
Example:
White subway tile with light gray grout gives a gentle outline. White with charcoal grout draws bold lines and shows any uneven cuts.
Stains and maintenance vs. color
Light grout shows dirt and stains faster, especially on kitchen floors and heavily used entries.
Rough guide:
- Very light grout: Clean look, but regular scrubbing needed in high traffic zones.
- Medium tones: Good balance between looks and stain resistance.
- Very dark tones: Hides some stains, but can show soap residue and efflorescence (white powder).
> When in doubt for floors, pick a medium neutral that roughly matches the tile’s mid tone. That usually hides the most day-to-day mess.
How to mix and apply grout the right way
You can pick the perfect product and still get poor results if the mixing and application go sideways. This is where jobs often fail.
Mixing cement grout
Most cement grout comes as a powder.
- Read the bag for the exact water ratio.
- Pour measured water into a clean bucket first, then add powder slowly.
- Use a margin trowel or drill with a mixing paddle on low speed.
- Mix until it is creamy, no dry clumps, almost like thick toothpaste.
- Let it sit (“slake”) for about 5 to 10 minutes, then remix without adding water.
> Too much water weakens grout and causes extra shrinkage and color variation. This is a common DIY mistake.
Applying grout
You will need:
- Rubber grout float
- Bucket with clean water
- Cellulose sponge
- Microfiber cloth
Basic process:
- Hold the float at about a 45 degree angle.
- Push grout diagonally across the joints to force it deep into the gaps.
- Scrape off extra grout from the tile surface with the float held more upright.
- Work in manageable sections so grout does not dry before you clean it.
Cleaning grout haze during install
After the grout firms up a little (you can press it and it does not stick to your finger), you start cleaning.
- Use a damp, not soaking wet, sponge.
- Wipe diagonally across joints, rinsing the sponge often.
- Avoid digging into the joints.
- After the first pass, wait a bit and do a second, lighter pass.
Later, a light haze often remains. A dry microfiber cloth or cheesecloth can polish that off once the grout has set more.
> If you leave too much haze and it hardens, you may need a grout haze remover chemical later, which adds more work.
Why you need to seal grout
Cement-based grout is porous. It acts like a sponge.
- Water can soak in and carry soap, minerals, or dirt.
- Kitchen spills like wine, oil, coffee, or tomato sauce can stain the joints.
- In wet zones, constant moisture can support mold and mildew on the surface.
Sealing grout does not make it waterproof in an absolute sense, but it slows down absorption so you have time to wipe spills before they soak in.
> Think of sealer as a raincoat. The grout will still get wet in a long storm, but it will not soak up everything at the first drop.
Epoxy and some pre-mixed grouts have different chemistry and already resist stains. Cement grout usually needs help in the form of a sealer.
Types of grout sealers
You will see a few main categories on store shelves.
Penetrating (impregnating) sealers
These soak into the grout, lodge in the pores, and repel water and some oils.
- Leave a natural, matte look; the surface does not get a shiny film.
- Common choice for most indoor floors and showers.
- Often labeled as breathable, which helps moisture escape from below.
Use these for:
- Cement grout on porcelain or ceramic tile.
- Most natural stone floors and showers, when the label says it is safe for stone.
Topical (film-forming) sealers
These sit on the surface and form a thin layer.
- Can add sheen (satin or gloss) to grout or tile.
- Sometimes used on decorative concrete or certain tiles.
- Can peel or wear unevenly in heavy traffic zones.
Use with care around smooth tile, because they can change traction.
Spray-on vs. brush-on vs. applicator bottle
Same kind of chemistry, just different ways to put it on.
- Brush or roller bottle: Good control on narrow grout lines.
- Spray: Faster on large floors, but more risk of getting sealer all over the tile surface.
> When you can, pick a sealer that says clearly: “For cement grout and porcelain/ceramic tile” or “Safe for natural stone”, based on your project.
When to seal grout
Timing is more critical than it looks.
Let the grout cure first
Cement grout needs time to cure. If you seal too early, you trap moisture and can cause issues with color or adhesion.
Typical guidance:
- Wait at least 48 to 72 hours after grouting for many cement grouts.
- Some brands recommend up to 7 days before sealing.
Always check the bag or data sheet for your exact product.
> If the grout still looks dark and feels cool and damp, it is probably not ready for sealer yet.
Make sure the surface is clean
Do not seal in dirt or soap film.
- Vacuum or sweep the floor.
- Clean with a pH-neutral cleaner suitable for grout and tile.
- Rinse well and let everything dry fully.
For showers, give the area time to dry out, often 24 hours without use, before sealing.
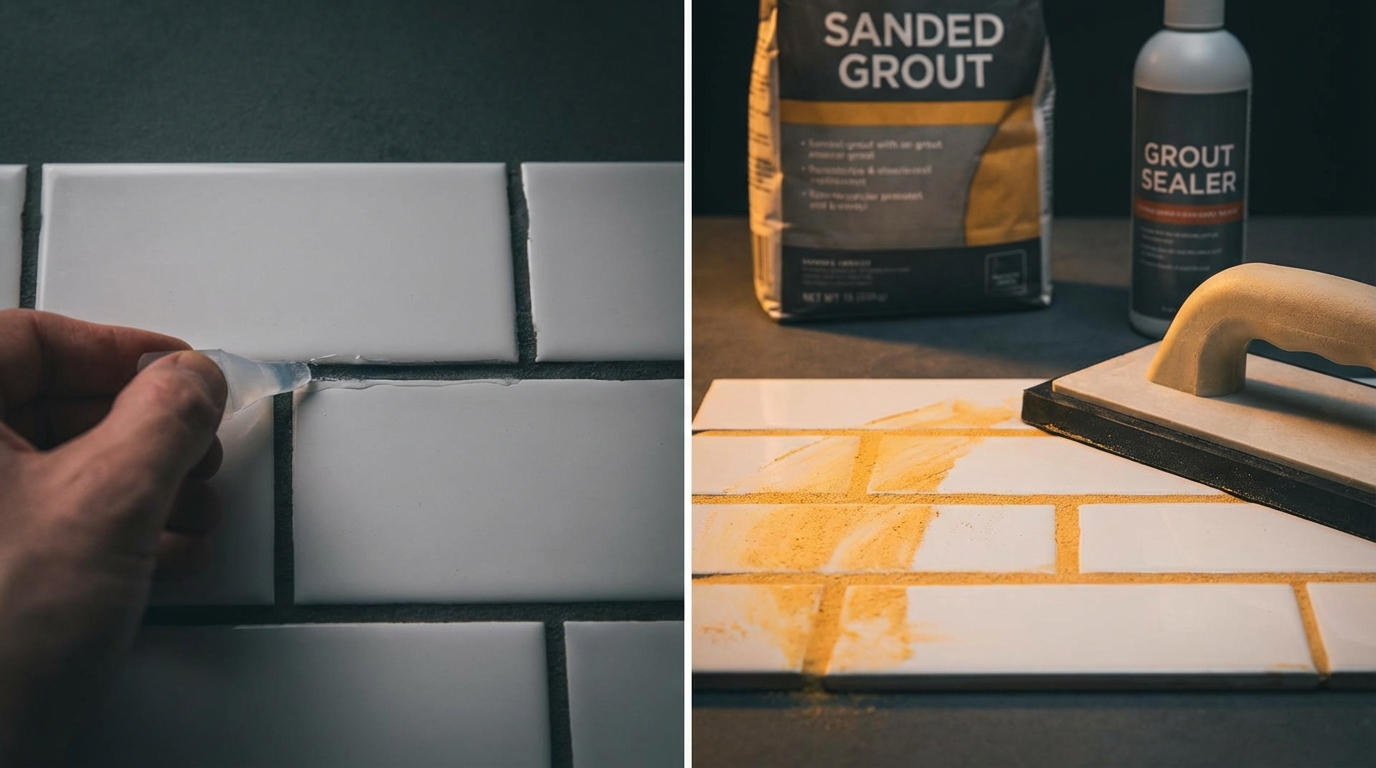
How to seal grout step by step
This is the part most people rush. Slowing down a bit here can save you scrubbing and re-grouting later.
Step 1: Choose the right sealer
Ask four questions:
- Is the grout cement-based? If yes, it probably needs sealing.
- Is there natural stone nearby? You need a sealer that is safe for that stone.
- Is this area high moisture (shower) or high spill risk (kitchen)?
- Do you want the grout to look the same, or a little darker/wetter?
Many “natural look” penetrating sealers change the color very little. Some deepening is normal. Test in a corner first.
Step 2: Protect surrounding areas
- Tape off metal trims or wood thresholds if needed.
- Open windows or turn on a fan for ventilation.
Step 3: Apply sealer to the grout lines
How you do this depends on the tool:
- Brush or applicator bottle: Run the tip or brush along the joint, letting the sealer soak in. Slight overlap onto tile edges is fine.
- Small foam brush: Cheap and works well for narrow lines.
- Spray bottle: Spray over the surface, then spread with a microfiber cloth, making sure the joints are well saturated.
> The goal is to fully wet the grout joints, not flood them into puddles.
Many products suggest leaving the surface wet with sealer for 3 to 5 minutes, sometimes up to 10 minutes. Check the directions on the bottle.
Step 4: Wipe off excess sealer from tile
After the soak time:
- Wipe the tile surface with a clean, dry microfiber cloth.
- Do not let sealer dry on the tile face; it can leave a residue.
- If you see streaks forming, lightly dampen a cloth with sealer and buff them off before they dry.
Step 5: Repeat if needed
High traffic zones or very porous grout might need a second coat.
- Wait the time suggested on the label between coats, often about 1 hour.
- Apply the second coat the same way as the first.
Step 6: Let it cure before use
Most sealers need a cure window:
- Light foot traffic: sometimes after a few hours.
- Full cure: often 24 to 72 hours.
Showers often should not be used for at least 24 hours after sealing, sometimes longer. That gives the sealer time to set up in the pores before water hits it.
> Rushing this step can wash away part of the protection you just worked to apply.
How can you tell if grout needs to be resealed?
You do not need to guess. Use the water drop test.
The water drop test
- Put a few drops of clean water directly on the grout line.
- Watch for 3 to 5 minutes.
What you are looking for:
- If water beads on top and stays beaded, the sealer still has life.
- If water soaks in quickly, darkening the grout, the sealer is wearing off.
> Do this test in a few areas: close to the shower head, near the door, and in low traffic corners. High wear spots often fail first.
Typical reseal timelines
These are rough, and product labels will vary, but to give you a sense:
- Kitchen floors: every 1 to 3 years, depending on traffic.
- Showers: every 1 to 2 years, sometimes more often near heavy splash zones.
- Low traffic walls or backsplashes: every 2 to 4 years.
Cleaning habits change this. Strong cleaners and scrubbing can strip sealer faster.
Common grout and sealer mistakes to avoid
If you can stay away from a handful of problems, your tile work will last much longer and look better.
Using unsanded grout in joints that are too wide
What happens:
- Grout shrinks as it dries.
- Joints can crack or pull away from the tile edges.
For joints over 1/8 inch, sanded makes more sense in most cases, unless the tile surface rules it out.
Using sanded grout on scratch-prone tile
Problem:
- Sand in the grout acts like fine sandpaper as you float and wipe.
- Glass or polished stone ends up with tiny scratches that catch light.
Test on a spare tile. If any scratching shows, step back and switch to unsanded or a grout type the tile maker recommends.
Adding too much water when mixing or cleaning
Over-watering is sneaky.
During mixing:
- Weakens grout.
- Causes more shrinkage and possibly more cracking.
During cleaning:
- Can wash pigment out of the joints, leading to blotchy color.
> Use a damp sponge, not a dripping one. When you squeeze it, just a little water should come out.
Skipping the cure time before sealing
Sealing grout that is still curing can trap moisture, create a blotchy look, or weaken the top layer.
Follow the time window given on the grout bag. Waiting an extra day is better than sealing too early.
Letting sealer dry on the tile surface
Dried sealer film can look streaky or hazy, especially on polished or glossy tile.
To avoid this:
- Work in smaller sections.
- Watch the clock on dwell time.
- Keep a clean microfiber cloth handy and buff the tile face as you go.
If you do get a haze, many sealers can be softened by applying more of the same sealer to the haze area and then wiping quickly. Some cases need a special remover, though.
Ignoring grout maintenance
Sealed grout is not maintenance free.
Basic habits that help:
- Clean spills quickly, especially oil, wine, coffee, and colored sauces.
- Mop or wipe with a pH-neutral cleaner made for tile and grout.
- Avoid harsh acids or strong bleach on a regular basis, which can wear grout and strip sealer.
> A little routine cleaning extends the life of both the grout and the sealer, so you do not need to re-grout early.
Grout care in showers vs. kitchens vs. floors
Different rooms stress grout in different ways. You will get better results if you match your care to each space.
Showers and tub surrounds
Main stress: constant water, temperature swings, soap, shampoo.
Good practices:
- Use a penetrating sealer suitable for wet zones.
- Apply sealer thoroughly, including corners and niches.
- Use a squeegee on walls and glass after each shower to cut down on water sitting on the joints.
- Ventilate the room to let surfaces dry.
Watch for:
- Dark spots in grout that stay wet long after the rest has dried.
- Cracks or gaps in corners, which often need flexible caulk instead of grout.
Kitchen floors
Main stress: foot traffic, grit from shoes, food and drink spills.
Good practices:
- Do a good penetrating seal on grout soon after curing.
- Put mats at entrances to reduce grit tracked inside.
- Clean spills promptly with a mild cleaner.
- Vacuum or sweep often so sand and dirt do not grind into grout lines.
> A medium-tone sanded grout on kitchen floors, sealed well, often hides everyday mess better than very light or very dark tones.
Backsplashes and low traffic walls
Main stress: cooking splatter, grease, coloring agents like tomato sauce.
Good practices:
- Seal grout once it has cured; it will resist stains much better.
- Wipe splatters soon with a mild cleaner.
- Avoid abrasive pads on delicate tile or unsanded grout joints.
In these areas, unsanded grout is very common because joints are narrow and surfaces might be delicate.
Quick comparison table: sanded vs. unsanded vs. epoxy
| Grout type | Best joint width | Best uses | Scratch risk | Needs sealing? |
|---|---|---|---|---|
| Sanded cement | About 1/8 to 1/2 inch | Most floors, wider joints, high traffic | Higher on glass/polished stone | Yes, usually with penetrating sealer |
| Unsanded cement | Up to 1/8 inch (especially 1/16 to 1/8) | Walls, narrow joints, glass, marble, delicate tile | Lower, smoother texture | Yes, usually with penetrating sealer |
| Epoxy | Varies by brand, often 1/16 to 1/4 inch | Showers, commercial kitchens, stain-prone areas | Moderate, follow tile maker guidance | Often no, stain resistant by design |
Putting it all together on a real project
Let us walk through a quick scenario so you can see how this plays out step by step.
Scenario: new bathroom with porcelain floor and subway tile walls
Details:
- 12×24 inch matte porcelain floor tile with 3/16 inch joints.
- 3×12 inch glossy white subway tile on walls with 1/16 inch joints.
- Standard cement-based grout chosen for budget reasons.
What you pick:
- Floor: sanded grout, medium gray, cement-based.
- Walls: unsanded grout, matching or slightly lighter gray to keep the pattern calm.
What you do:
- Install and grout floor and walls, keeping joint widths consistent.
- Let cement grout cure for at least 72 hours with good ventilation.
- Clean all surfaces with a pH-neutral cleaner, let them dry fully.
- Apply a penetrating sealer rated for porcelain and cement grout.
- Use a narrow applicator on the wall grout lines to control drips.
- Use a mop or sponge method on the floor, then buff off excess from tile faces.
- Let sealer cure 24 hours before shower use and heavy traffic.
Long term:
- Test grout every year with a water drop test.
- Reseal floors and shower walls as needed, usually every 1 to 3 years depending on use.
> Setting the right grout type and sealer on day one means you are mostly doing light upkeep, not repair, later.
One simple habit that keeps grout looking better
After you get through picking sanded or unsanded, mixing, grouting, and sealing, there is one small habit that quietly protects all that work:
Squeegee or towel-dry wet surfaces.
For showers, that means taking 60 seconds after each use to run a squeegee over the walls and floor, then letting the fan run.
For kitchen floors, it means wiping spills as soon as they happen instead of letting them sit.
Both give your sealed grout time to do its job and cut down on the deep stains that are hardest to remove.