So, you are trying to decide between floating vs. glue-down floors for your DIY project and do not want to regret it later.
The direct answer is: floating floors are usually better for DIY homeowners, while glue-down floors fit best for permanent, stable installs where sound and feel matter more than speed.
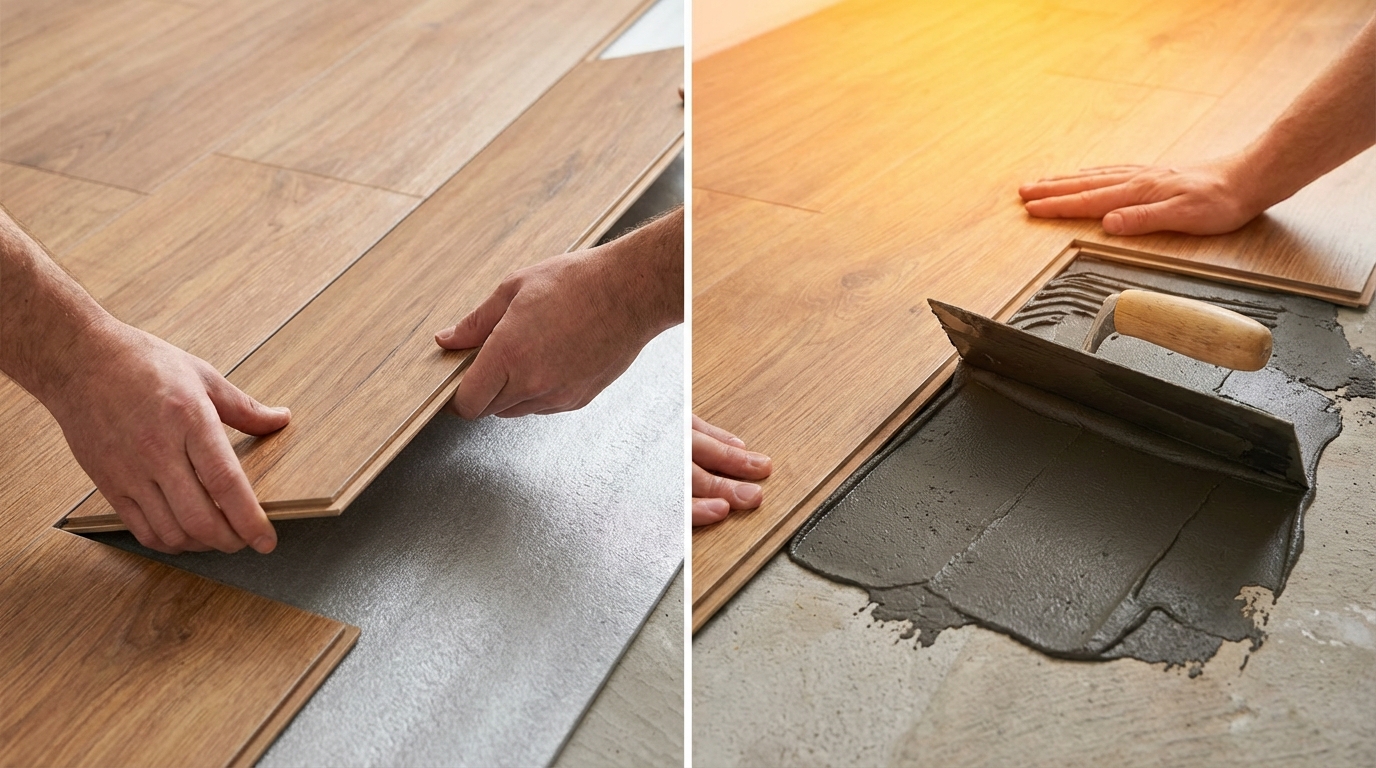
You are really picking between convenience and permanence. Floating floors click together above your subfloor, mostly with no glue. Glue-down floors get bonded directly to the subfloor with adhesive. That changes how they feel, how they sound, how long they last, how hard they are to repair, and even how your room handles moisture and temperature swings.
Things can get confusing fast, so let me break it down in a way that helps you actually decide, not just read theory.
- Floating floors are faster and easier for DIY install.
- Glue-down floors feel more stable underfoot and often perform better in high-traffic areas.
- Moisture, subfloor type, and room size matter more than most people think.
- Material choice (laminate, vinyl, engineered wood) changes what is possible for each method.
- Sound, comfort, and resale value play a big role in picking the right system.
- Repair and replacement are usually simpler with floating floors.
- Glue-down installs demand better prep and more tools, and they are harder to undo.
What is a floating floor, really?
So, you are trying to understand what a floating floor actually is.
A floating floor is a floor that locks to itself but does not get glued or nailed to the subfloor.
The planks connect with a tongue-and-groove or click system and “float” over an underlayment. The weight of the floor and the friction of the underlayment hold it in place.
You still cut planks, trim around doors, and leave expansion gaps at the walls, but the floor is almost like one large panel resting on top of your current floor.
Common floating floor materials:
- Laminate
- Engineered wood (most click systems)
- Luxury vinyl plank (LVP) / luxury vinyl tile (LVT) click-lock
- Some bamboo products
> Think of a floating floor as a giant jigsaw puzzle that sits on top of your old floor. No glue bonding it down, just precision and gravity doing the work.
Key traits of floating floors
- Connection method: Click-lock or tongue-and-groove.
- Attachment: Not attached to the subfloor.
- Underlayment: Often a foam or cork layer for cushioning and sound.
- Movement: Expands and contracts as a single unit.
Because the entire floor is one continuous “sheet,” expansion gaps around the edges are not optional. If you skip them, you can end up with buckling or lifted boards when humidity changes.
What is a glue-down floor?
So, you are wondering what a glue-down floor is and why people still bother with it.
A glue-down floor is a floor where each plank or tile is bonded directly to the subfloor with adhesive.
You spread a thin layer of adhesive using a trowel and press each piece into it, following a layout pattern. As the adhesive cures, the floor becomes fixed in place.
Common glue-down floor materials:
- Engineered hardwood (glue-down variety)
- Glue-down LVP/LVT
- Rubber and some cork floors
- Certain bamboo and parquet products
> A glue-down floor feels more like a traditional hardwood install. Firm, solid, quiet underfoot, with less “give” and less hollow sound.
Key traits of glue-down floors
- Connection method: Adhesive to the subfloor, sometimes plus tongue-and-groove.
- Attachment: Fully bonded to concrete or plywood.
- Underlayment: Often none; sometimes adhesive doubles as sound or moisture barrier.
- Movement: Individual boards move less, overall floor is more stable.
Glue-down floors are less forgiving. If your layout is off or you smear adhesive on the surface and let it dry, you live with that mistake or you scrape and repair.
Floating vs. glue-down floors: quick comparison table
| Factor | Floating Floor | Glue-Down Floor |
|---|---|---|
| DIY difficulty | Lower, good for first-timers | Higher, needs more skill and patience |
| Install speed | Fast, especially in clear rectangular rooms | Slower, adhesive setup adds time |
| Cost (materials + typical DIY tools) | Generally lower | Often higher, adhesive and prep add cost |
| Feel underfoot | Can feel slightly hollow or softer | More solid, closer to nailed hardwood |
| Sound | More noise without good underlayment | Quieter, less movement noise |
| Moisture tolerance | Varies by product, needs good vapor control | Can perform better on concrete with right adhesive |
| Subfloor prep | Needs flat, reasonably clean surface | Needs very smooth, clean, dry surface |
| Repair / replacement | Generally easier, sections can be lifted | Harder, often requires cutting and scraping |
| Longevity | Good if installed right, but more dependent on movement | Often longer in commercial or high-traffic use |
| Large room performance | Needs expansion breaks; movement can be a problem | Handles large areas better, with right layout |
When floating floors make more sense
So, you are probably thinking: “Is a floating floor enough for my space, or will I regret not doing glue-down?”
Floating floors make the most sense when you want a balance of speed, flexibility, and reasonable performance.
1. You are a DIY homeowner, not a pro installer
Floating systems are built for non-installers. You still have to measure and cut carefully, but you are not racing against drying adhesive.
Why floating is friendlier for DIY:
- You can dry-fit rows before committing.
- Mistakes often mean unclipping and redoing a few boards.
- You can spread the work over several evenings.
- Tools are simple: saw, spacers, tapping block, pull bar, measuring tape.
> With floating floors, time pressure drops. You can pause mid-room, close the door, pick up tomorrow. Glue does not give you that luxury.
If you are installing alone, that breathing room helps a lot.
2. You want to go over an existing floor
Floating floors often go right over:
- Old tile
- Vinyl sheet or vinyl tile
- Old hardwood (if flat and well attached)
- Concrete with correct underlayment
This saves demolition costs and the mess. You still check that the old floor is level, not crumbling, and free of moisture issues.
Glue-down, on the other hand, usually needs a more direct, clean bond. Old flooring often has to come out.
3. You are in a rental or you might remodel again
Floating floors are more reversible. They are not usually removed and reused, but they are easier to pull up if:
- You move and want to leave the subfloor closer to original.
- You plan to change the design in a few years.
- Your building rules limit permanent changes to concrete slabs.
Glue-down installs lock you in. Removing glued vinyl or engineered wood from concrete can mean heavy scraping, grinding, or new underlayment over the top.
4. You care more about convenience than absolute “solid” feel
Many floating floors feel great, especially with good underlayment. But if you tap them with your heel, you might hear a slight hollow tone in some spots.
Is that wrong? Not really. It is just different. Many people accept this trade for easier installation.
Glue-down installs feel more “planted” because they move less.
When glue-down floors make more sense
So, you are asking when glue-down is actually worth the extra work and cost.
Glue-down floors make sense when you want a permanent, quiet, and stable floor, especially over concrete or in very high-traffic areas.
1. You are dealing with heavy traffic or commercial use
If you have:
- Retail or office space
- Busy entryways
- Rolling chairs and carts
- Gym-type rooms
Glue-down floors tend to hold up better. Movement between boards is reduced, which cuts down on:
- Click-system wear
- Gaps opening over time
- Edge chipping on some laminates or vinyl
> Many commercial LVP products are designed almost entirely around glue-down install because of that stability under constant use.
For a living room in a small home, that difference might not matter. For a busy lobby, it can.
2. You want the most “real wood” feel you can get
Glue-down engineered wood often feels closer to solid hardwood underfoot. Less flex, less echo.
If your priority list looks like:
- Natural look
- Firm feel
- Long-term value
Then glue-down engineered might beat a floating laminate or click vinyl, assuming moisture is managed.
3. You are installing over concrete where moisture is controlled
Concrete slabs bring two big concerns:
- Moisture migration from below
- Surface flatness
High-quality glue-down systems often use adhesives that provide some moisture protection and strong bond to properly prepared concrete.
If you live in a region where slab moisture is known and tested, glue-down LVP or engineered can give a very reliable surface.
Floating floors over concrete still work, but you rely more on underlayment and vapor barriers. If any piece of that stack is wrong, movement problems can show up.
4. Sound and height are critical
Glue-down floors usually add less height than floating floors that need an underlayment. In tight spaces with low doors or fixed cabinetry, every millimeter matters.
Also:
- Less hollow echo under steps.
- More direct contact with subfloor, so vibrations spread differently.
- Sometimes easier to meet strict sound transmission rules in multi-family buildings (with the right products).
Floating floors can hit sound ratings too, but often with thicker underlayments. That extra thickness changes height transitions between rooms.
Subfloor and moisture: the hidden decision maker
So, you are thinking about style and cost, but the subfloor under your feet might decide for you.
The surface you are installing over, and how dry it is, will shape which system is safer.
Concrete slabs
For concrete, you should think through:
- Moisture tests (simple plastic sheet test or meter readings).
- Existing cracks or uneven areas.
- Any past water issues (flooding, leaks).
Floating over concrete:
- Use a vapor barrier underlayment if the product needs it.
- Levels from 3/16″ over 10 feet are common targets (check your product).
- Good for basements if the manufacturer says the product is suitable.
Glue-down over concrete:
- Needs flatter, smoother surface, sometimes skim-coated.
- Must match adhesive type to moisture conditions and floor product.
- Often better for ground-level slabs that are dry and well prepared.
> Concrete is tricky not because it looks bad, but because you cannot see its moisture behavior at a glance. Read the product specs, not just the box front.
Plywood or OSB subfloors
On wood subfloors, both floating and glue-down are available options, but each has its own requirements.
Floating over wood:
- Check for squeaks and screw down loose panels first.
- Sand high spots and fill low ones.
- Use the underlayment your floor manufacturer recommends.
Glue-down over wood:
- Needs clean, dust-free surface.
- Adhesive must be compatible with wood subfloors.
- Extra movement in the wood can affect the floor; stiff subfloor is key.
For older homes with not-so-perfect framing, floating floors can be a bit more forgiving, as long as you correct major dips and humps.
Existing flooring
Floating floors often go over old flooring that is:
- Firmly attached
- Relatively flat
- Not a thick, soft surface like plush carpet
Glue-down is more restrictive:
- Adhesive does not bond well to many old finishes.
- You might trap issues under a permanent layer of glue and boards.
If you want to skip demolition, floating is usually your friend.
Cost comparison: materials, labor, and hidden expenses
So, you are trying to figure out which option fits your budget without cutting too many corners.
Floating floors usually have lower total cost for DIY, while glue-down installs often cost more in prep, adhesive, and time.
Material and accessory cost
Floating floors:
- Floor planks or tiles.
- Underlayment (sometimes attached backing).
- Trim and transition pieces.
Glue-down floors:
- Floor planks or tiles (often slightly different product lines).
- Adhesive (can be a big line item).
- Primers or moisture barriers where needed.
- Trim and transitions.
Glue-down adhesives can run from modest to surprisingly high, especially for moisture-resistant or sound-rated products. On large areas, that adds up fast.
Tool and time cost
Floating:
- Fewer specialty tools.
- Less cleanup.
- Easier for a single person to manage.
Glue-down:
- Trowels, sometimes rollers.
- Solvent or adhesive removers for cleanup.
- More detailed layout and timing.
> Many people underestimate the time cost of glue-down. Spreading adhesive, waiting for tack, placing boards carefully, cleaning squeeze-out; it all adds friction.
If you value your weekends, that friction might matter as much as money.
Comfort, sound, and daily living
So, you are not just thinking about installation, you care about how the floor feels and sounds every day.
Floating and glue-down floors differ in underfoot feel, acoustics, and temperature comfort.
Underfoot feel
Floating floors:
- Underlayment adds a bit of cushioning.
- Can feel slightly springy in wider spans or over imperfect subfloors.
- Good for kids who sit on the floor or for people with joint issues.
Glue-down floors:
- More direct contact with the subfloor.
- Firm, stable feel, less flex under heels.
- Some people prefer this for an “upscale” sensation.
Neither is right or wrong. It comes down to what you want to feel when you walk across the room.
Noise and sound transmission
Noise shows up in two ways:
- Sound within the room (clicking, echo).
- Sound transmitted to rooms below (impact noise).
Floating floors can be noisier if you skip a decent underlayment or if your subfloor is not very flat. Footsteps might feel louder or more “clicky.”
Glue-down floors can reduce that floating resonance because each board is anchored.
That said, high-quality underlayments under floating floors are engineered to handle sound transmission as well as, and sometimes better than, thin glue-down setups.
> If you live above someone, ask your building about required sound ratings. Your choice of underlayment or adhesive system might be decided for you by those rules.
Temperature and comfort
Over radiant heat, both floating and glue-down floors can work, but you must check the product guidelines.
Many engineered wood and vinyl ranges are tested over radiant heat specifically. Some floating systems handle expansion from temperature swings better, but glue-down can spread heat more evenly.
If your basement is cool, a floating floor with proper underlayment can feel warmer than bare concrete plus glue-down vinyl.
Durability and repair over time
So, you want to know which one will look better after years of use and which you can fix without tearing your hair out.
Durability is not just about the flooring surface; it is about the way the floor moves and how easy it is to repair sections.
Movement and wear
Floating floors:
- Can shift slightly when walked on, especially in larger rooms.
- Click joints carry more stress if the subfloor is not flat.
- Expansion and contraction are absorbed at the perimeter.
Glue-down floors:
- Boards are more anchored, so joints can stay tighter over time.
- Often better where temperature and humidity vary within the product’s spec range.
For a kitchen in a stable climate-controlled house, both can last years. The difference shows up more in tough conditions or poor prep.
Scratches, dents, and water damage
The surface finish matters more than the install method here. For example:
- A tough wear layer on LVP will resist scratches whether floating or glued.
- Engineered wood will dent from heavy impacts either way.
Where install type matters is when you have to replace damaged pieces.
Floating floor repair:
- You can often unclip boards from one wall toward the damaged area, swap pieces, and reassemble.
- Cuts are mostly at board joints, not the subfloor.
Glue-down repair:
- You cut around the damaged board with a saw.
- Scrape old adhesive from the subfloor.
- Glue a new board in, sometimes with temporary weights.
> A single pet accident that gets under the boards is usually easier to handle on a floating floor. A big water leak is a problem either way.
If your home is busy with kids, pets, and frequent rearranging of furniture, that repair difference can matter.
Room-by-room guidance
So, you want direct guidance for actual rooms, not just general theory.
Here is a practical way to think about floating vs. glue-down based on room type.
Living room / family room
- Typical choice for DIY: Floating laminate, LVP, or engineered wood.
- Why: Large area, but often not as wet or harsh as kitchens or baths. Floating systems give enough durability and comfort.
- Glue-down case: High-end engineered wood in a forever home where feel and permanence are high priorities.
Bedrooms
- Typical choice: Floating floors for easier install and softer feel.
- Why: Less traffic, more desire for comfort and quicker install around furniture.
- Glue-down case: Upper floors in multi-family with strict sound rules and specified glue-down systems.
Kitchen
- Floating: Click LVP or engineered wood with manufacturer approval for kitchen use.
- Glue-down: Glue-down LVP in busy kitchens, especially on concrete, where water spills are frequent.
Pay attention to:
- Dishwasher and fridge areas where leaks can go unnoticed.
- Thresholds to adjoining rooms that may have different heights.
Bathroom
- Floating: Some waterproof LVP products allow floating install in bathrooms, with careful sealing around tubs and toilets.
- Glue-down: Often preferred for small baths where you want less movement and a tight bond to the subfloor.
Always check manufacturer approvals for “bathroom” or “full bath” use. Not every product works for every wet area.
Basement
- Floating on concrete: Very common with LVP or laminate, using moisture-rated underlayment.
- Glue-down: Possible with dry, tested concrete and suitable adhesives, but risk rises if moisture conditions change.
> Basements are where moisture surprises show up. Floating floors create a bit of a buffer; glue-down is less forgiving if conditions are marginal.
Home office
- Floating: Works well under rolling chairs with a mat.
- Glue-down: Better if you expect many rolling loads or heavy furniture moving often.
Chairs with hard casters can wear any floor. The install method just changes how joints and edges respond over time.
Installation overview: floating vs. glue-down
So, you probably want a simple picture of what you are signing up for with each method.
Here is a side-by-side look at how a typical install day feels.
Floating floor install snapshot
- Acclimate the flooring as required (boxes in the room for 24 to 48 hours if the manufacturer requires it).
- Prep the subfloor: clean, vacuum, level obvious high and low spots.
- Roll out underlayment and tape seams where needed.
- Snap a straight line or use a straight wall to start your first row.
- Cut the first and last boards in each row to maintain staggered joints.
- Click rows together, using spacers at walls for expansion gaps.
- Trim around door frames and transitions as you go.
- Install baseboards or quarter round to cover the perimeter gap.
If you hit a difficult cut, you can stop, think, and come back. The floor is not curing under you.
Glue-down floor install snapshot
- Acclimate the flooring, check moisture in subfloor if required.
- Prep subfloor more aggressively: patch, sand, grind as needed for smoothness.
- Layout chalk lines to keep rows straight.
- Spread adhesive over a small area with a trowel, following coverage guidelines.
- Wait for the right tack time if the adhesive requires it.
- Set planks into adhesive, press or roll them for full contact.
- Clean off any adhesive that sneaks onto the plank surface before it sets.
- Work row by row, staying aware of working time before adhesive skins over.
You plan your breaks around adhesive, not just your energy level.
Common mistakes to avoid
So, you want to skip the classic DIY errors that make floors fail early.
Here are the pitfalls that show up again and again with both systems.
Floating floor mistakes
- No expansion gaps: Boards press against walls and buckle when humidity rises.
- Ignoring flatness: Dips and humps cause click joints to move and wear out.
- Wrong underlayment: Either too soft, not compatible, or lacking vapor control when needed.
- Huge continuous areas: Installing across long distances without expansion breaks where the product requires them.
> The floor does not care whether the room felt “fine” to you. If the spec says leave a 3/8″ gap, it means it.
Glue-down floor mistakes
- Wrong adhesive: Picking a cheaper or incompatible adhesive that fails under moisture or does not bond well.
- Dusty or dirty subfloor: Adhesive sticks to dust, not concrete or wood, leading to loose spots.
- Too much or too little adhesive: Trowel size matters for coverage; too much gives squeeze-out, too little gives hollow spots.
- Poor cleanup timing: Dried adhesive on plank surfaces is very hard to remove cleanly.
Planning and reading the data sheet for adhesive sounds boring, but it saves you from expensive fixes.
How to decide: a simple step-by-step path
So, you are still torn and want a clear way to pick the right install method.
Use this simple path to reach a decision that fits your space, budget, and skill set.
Step 1: Define your room conditions
Ask yourself:
- Is this over concrete or wood?
- Is moisture or past water damage an issue?
- How big is the space (length and width)?
- Is it a high-traffic or light-traffic room?
Write those answers down. They guide product filtering more than you think.
Step 2: Decide your priorities
Rank these from most important to least:
- Ease of DIY install
- Cost
- Permanent feel and stability
- Sound and comfort
- Repair flexibility
If “ease of DIY” and “repair flexibility” are high on your list, floating usually wins.
If “permanent feel” and “long-term stability under heavy use” are at the top, glue-down might justify the extra work.
Step 3: Check product guidelines, not just marketing
When you are looking at a flooring you like, read:
- Approved installation methods (floating only, glue-down only, or both).
- Room and moisture limitations.
- Subfloor preparation requirements.
> Let the product narrow your choice. If a flooring is only tested and warranted for glue-down, do not force it into a floating install just because it seems simpler.
Step 4: Be honest about your skill and time
Ask:
- Have you done any flooring before?
- How many hours per day can you dedicate?
- Are you comfortable working against a clock with adhesive open time?
If this is your first flooring project, a floating install is usually a better training ground.
Step 5: Plan transitions and future changes
Look beyond this one room:
- How will this floor meet the next room’s height?
- Are you planning to redo that neighboring room next year?
- Could you rent or sell the property soon and need flexibility?
Floating floors give you a bit more room for future planning. Glue-down is best when you are settled on this look and level for a long time.
One practical tip: before you commit, buy one box of your chosen floor, lay out a small test area (even just 4 feet by 4 feet) in a spare space, and actually walk on it. Whether it is floating or glue-down, how it feels and sounds in your real home will tell you more in 10 minutes than any brochure.