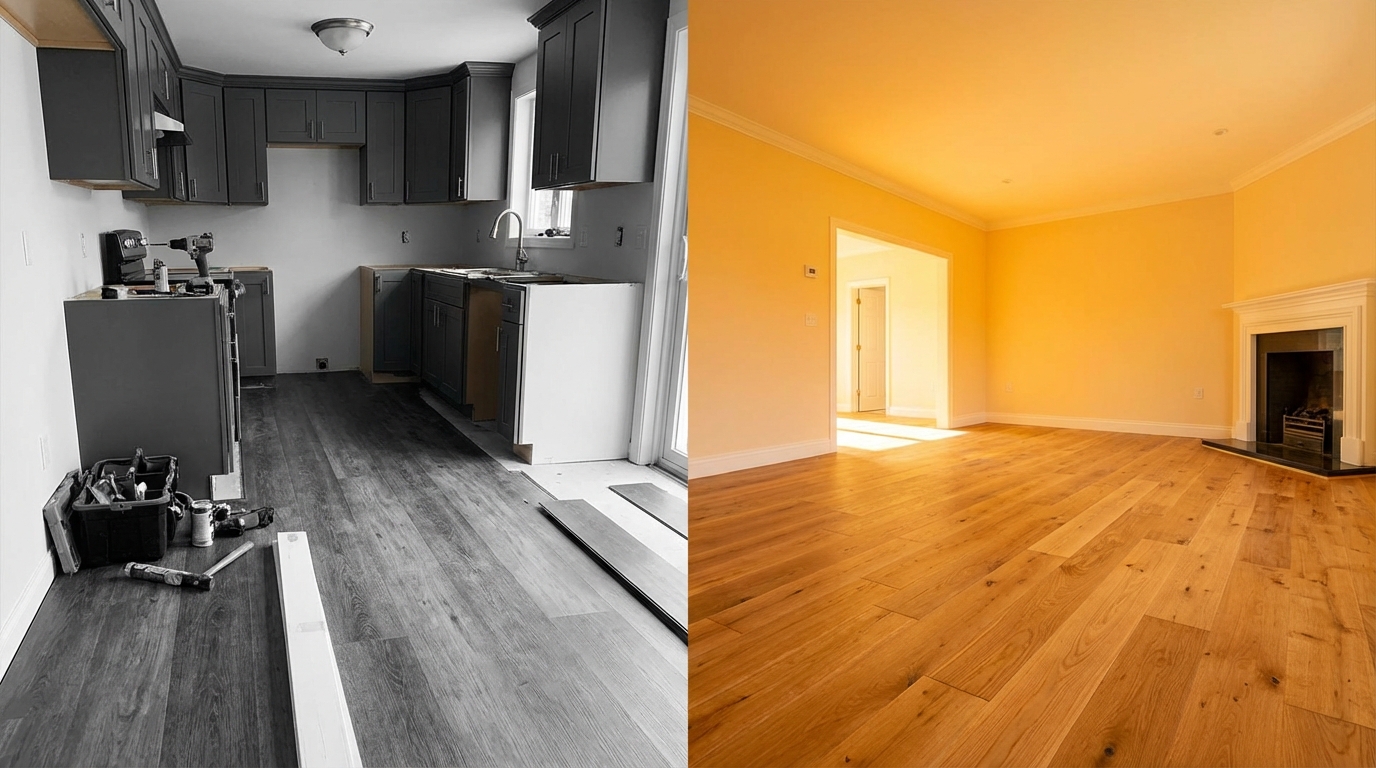
So, you are trying to figure out where to save and where to splurge on floors when flipping houses. You should splurge on floors in kitchens, living areas, and entryways, and save in secondary bedrooms and less visible spaces, while choosing materials that match the price point of the neighborhood.
You are not picking floors. You are managing perception, appraisals, and buyer psychology. Floors cover more visual space than almost anything else in a house. Bad floors quietly kill offers. Great floors make buyers forgive other flaws. The trick is not to buy the most expensive option. The trick is to buy the smartest option for that house, at that price, in that zip code.
Things you need to know:
- Buyers judge the whole house within 10 seconds of stepping onto the main floors.
- Kitchens, main living spaces, and entries deserve better flooring than secondary bedrooms.
- Neighborhood price point should control your flooring budget, not your personal taste.
- Durability matters more for flips than you think, because cheap floors show damage during showings.
- Material choice affects appraisals, not just buyer emotions.
- Labor costs can exceed material costs, so “cheap” floors can become expensive mistakes.
- Consistency across the main level usually beats fancy patterns or mixed materials.
- Moisture and subfloor issues can erase your profit if you ignore them.
- Good photos sell flips, so think about how the floor photographs.
Flippers do not get paid for what they spend. They get paid for what buyers notice.
Where floors actually make or break your flip
Let us break this down house by house, room by room, instead of staying abstract. Floors are not equal across the property. Some square footage sells, and some square footage just fills the MLS sheet.
High impact rooms where you should splurge
These are the spaces where buyers react emotionally and where photos do most of the selling.
- Entry / foyer
- Main living room / great room
- Kitchens
- Main hallway on the first floor
- Primary bedroom (sometimes, depending on price point)
Why splurge here?
Because this is where buyers stand, turn their heads, and decide if the house “feels” updated. If the floor looks cheap or busy, they assume everything else is cheap too, even if your cabinets and appliances are better.
In most flips, 60 to 70 percent of your flooring budget should go to the main level and primary traffic areas.
Low impact areas where you can save
You do not have unlimited budget, so you need planned “quiet” choices.
- Secondary bedrooms
- Kids playrooms
- Guest rooms
- Basements in entry-level flips
- Laundry rooms and utility closets
You still need these spaces to look clean and cohesive, but they do not have to carry the “wow” factor. Matching tone and style with the main areas is more critical than material price.
Match your floors to your price bracket, not your personal taste
Before talking about vinyl or hardwood, we need a basic rule:
The flooring standard for a flip should match the expectation of a typical buyer in that neighborhood, at that price, today.
Here is a simple guide based on sale price ranges in many markets. Adjust the numbers for your city, but the relationship tends to stay similar.
| ARV Range (Approx) | Main Areas (Where to splurge) | Secondary Areas (Where to save) | Notes |
|---|---|---|---|
| $150k – $250k | Good quality LVP (luxury vinyl plank) | Carpet or lower-cost LVP | Focus on durability, simple colors, low material cost. |
| $250k – $400k | Mid to high quality LVP or engineered wood | Carpet in bedrooms; LVP in hallways | Buyers expect “wood look” in main areas. |
| $400k – $650k | Engineered hardwood / premium LVP | Carpet only in secondary bedrooms | Watch appraisals; hardwood can help value. |
| $650k – $1M | Engineered or solid hardwood | Carpet in few rooms; maybe hardwood in primary suite | Most buyers expect real wood in main level. |
| $1M+ | High-end hardwood or wide-plank engineered | Selective carpet in kids rooms only | Material choice must fit the rest of the finishes. |
If your flip is a $260k starter home, installing exotic hardwood can just reduce your profit. You will not get paid back. The buyer probably just wants clean, durable, and modern-looking floors, not rare oak from Europe.
Material choices: when to save and when to splurge
Now let us talk about what you put on the floor. Not every project needs hardwood. Not every project can get away with cheap carpet.
LVP (Luxury Vinyl Plank): your default workhorse
For most flips under $500k, LVP is usually the smartest play for the main living areas.
Where to splurge with LVP:
- Step up from big box bargain lines to a mid-tier brand with solid wear layers (20 mil or more).
- Choose a color that hides dirt and wear: medium tones, light oak, or muted greige.
- Use it across the entire main level, including kitchen and hallways, for continuity.
Where to save with LVP:
- Avoid the highest tier luxury lines that will not increase your ARV.
- Use the same SKU across multiple flips to get volume discounts.
- Skip fancy patterns like herringbone unless your comp houses also use them.
Why LVP works so well for flippers:
- Water-resistant, great for kitchens, entries, and sometimes even small bathrooms.
- Easier and cheaper to install than hardwood in most cases.
- Looks like wood in listing photos from 5 to 10 feet away.
- Handles a lot of showings without obvious damage.
Where LVP can hurt you:
- High-end neighborhoods where buyers expect “real wood” and will call you out during showings.
- Flips above the market ceiling, where appraisers will compare you to homes with hardwood.
If you are flipping below the median price in your city, default to good LVP in the main areas until you have a clear reason not to.
Engineered hardwood: when you are playing in the mid to upper range
Engineered hardwood gives you the look and feel of solid wood with better stability. Buyers will often just call it “hardwood” anyway.
Where to splurge with engineered hardwood:
- Main level of flips above roughly $400k in many markets.
- Open concept living / kitchen / dining where the floor is visible from every angle.
- Primary suite in higher price brackets.
Where to save with engineered hardwood:
- Use standard widths (e.g., 5 to 6 inches) instead of extra wide premium boards if the comps do not demand them.
- Pick prefinished products to reduce labor and finishing time.
- Use engineered hardwood only where buyers will notice: main areas, not closets or secondary rooms.
Compared to LVP:
| Factor | LVP | Engineered Hardwood |
|---|---|---|
| Visual appeal in photos | Very good | Excellent |
| Buyer perception | “Nice update” | “Upgrade / higher-end” |
| Moisture resistance | High | Moderate |
| Cost (material) | Low to medium | Medium to high |
| Impact on appraisal | Moderate | Higher, in some markets |
If your comps show hardwood in listing descriptions and your flip has only vinyl, buyers will mentally discount your property, even if they do not say it out loud.
Solid hardwood: niche flips, bigger risk, higher reward
Solid hardwood can make sense for certain flips:
- Historic homes where buyers expect authenticity.
- Upscale neighborhoods where comps clearly highlight “solid hardwood floors.”
- Projects where you already have existing hardwood and only need to refinish or patch.
Where to splurge with solid hardwood:
- Refinishing original hardwood in older homes instead of tearing it out.
- Color choices that match modern taste: natural, light, or neutral stains.
Where to save:
- If the existing hardwood is structurally sound, refinish instead of replacing.
- Patch with matching species and then refinish the whole area rather than mixing materials.
Many beginners rip out hardwood to install cheap LVP. That usually burns profit instead of creating it.
If you walk into a flip and see old, scratched oak floors, get a quote to refinish before assuming you have to replace. Often, that is your showpiece, not your problem.
Carpet: still useful, but use it strategically
Carpet is not dead. It is just not your star anymore.
Where to splurge a bit with carpet:
- Secondary bedrooms in mid-range flips.
- Basements that are dry but need warmth and comfort.
- Stairs, if your budget does not support hardwood or LVP there.
Where to save with carpet:
- Choose a durable, low to medium pile, neutral tone that hides footprints.
- Skip very light colors that show everything during open houses.
- Do not overspend on premium padding in budget flips, but do not go to the absolute bottom either.
Carpet is not where you sell the flip. Carpet is where you avoid losing money.
Tile: use carefully in flips
Tile has its place, but in flips, it can become a budget trap.
Good uses of tile:
- Shower walls and bathroom floors.
- Small entry pads in wet climates.
- Laundry rooms if the comps justify it.
Where to splurge:
- Primary bathroom floors and shower areas in mid to high price flips.
- Pattern or feature tile in one or two focal spots, not the whole house.
Where to save:
- Use simple, large format tiles (like 12×24) with clean lines instead of tiny mosaics that drive up labor costs.
- Avoid tile in main living areas of lower to mid price flips because buyers often prefer the warmer wood look.
Tiny tiles are not expensive because of the material. They are expensive because of the labor.
Where not to cut corners: hidden flooring costs that kill profit
It is tempting to focus only on what buyers see. Floors have a hidden layer: everything under the surface.
Subfloor repairs
You cannot just cover serious issues with vinyl or carpet. Appraisers, inspectors, and even buyers walking will notice the bounce, squeaks, and soft spots.
Where to splurge:
- Fix squeaky or spongy subfloors in the main living areas and hallways.
- Replace any water-damaged or rotted subflooring, especially near bathrooms and kitchens.
- Correct uneven areas that will telegraph through LVP or hardwood.
Where you can be more conservative:
- Small irregularities in closets or utility rooms that do not affect safety or walking comfort.
- Cosmetic imperfections that will be fully covered and not felt.
If an inspector reports “uneven floors” or “excessive squeaks,” buyers mentally assume the entire house is low quality. That can cost you far more than the repair would have.
Underlayment and sound
Especially in multi-story homes or townhomes, sound can kill the perceived quality of your flip.
Where to splurge:
- Use a decent underlayment under LVP or laminate to reduce hollow sounds.
- Pay attention to sound transfer on second-floor bedrooms and hallways.
Where to save:
- You do not need the most premium acoustic membranes in entry-level flips.
- Skip fancy sound underlayment in garages, basements used for storage, and utility spaces.
The line you want to avoid hearing from buyers is “The floors feel cheap.” Underlayment is a quiet fix for that.
Color and style: what helps flips sell
Price and material matter, but color and style are what buyers experience. This is where many investors lose money by being “creative.”
Floor color: neutral, but not boring
For flips, your floors are not where you express your personality. They are the background that lets buyers imagine their stuff in the house.
Safer choices:
- Light to medium wood tones.
- Natural oak looks: not too yellow, not too red.
- Soft greige that works with both warm and cool walls.
Risky choices:
- Very dark floors in smaller homes (show dust, shrink the space).
- Strong red or orange tones that feel dated.
- Busy patterns that compete with cabinets and countertops.
If you need to ask “Is this color too bold for most buyers?” the answer is usually yes for a flip.
Consistency vs. mixing materials
Buyers like flow. Every material change is a visual stop sign.
Where to splurge on consistency:
- Use the same LVP across the whole main floor: living, dining, kitchen, and hallways.
- Limit transitions. Fewer threshold strips look cleaner.
Where you can mix and save:
- Switch to carpet in bedrooms while keeping LVP everywhere else.
- Use tile only in bathrooms while maintaining wood or LVP elsewhere.
Too many different floor types make the house feel patched together, even if each material alone is nice.
Budgeting: how much should you spend on floors in a flip
You do not pick floors in isolation. They sit inside your full rehab budget.
A rough starting rule that many investors use:
- Floors often take around 10 to 20 percent of your total rehab budget, depending on the condition and house size.
Example:
- ARV: $300,000
- Total rehab budget: $45,000
- Flooring allocation (say 15 percent): about $6,750
Now, let us see how that splits:
| Area | Material | Approx Share of Flooring Budget |
|---|---|---|
| Main living areas + kitchen + hallway | Mid-range LVP | 60% |
| Bedrooms | Carpet | 20% |
| Bathrooms | Tile | 15% |
| Subfloor/underlayment/repairs | OSB/plywood/underlayment | 5% |
You can tweak those percentages, but the pattern is similar across many flips: main areas eat most of the money, and that is where it should go.
How floors affect appraisals and comps
You are not just trying to impress buyers. You also need the appraiser to agree with your sale price.
Appraisers look at flooring quality relative to comps
Here is what tends to matter:
- Type: hardwood vs LVP vs carpet in main living spaces.
- Condition: new, worn, or mixed-age floors across rooms.
- Coverage: where the better material is used.
If the comparable homes in your area mostly feature hardwood in living and dining rooms and you use basic laminate there, your appraised value may lag. Even if your kitchen is better.
Where to splurge for appraisals:
- Match or slightly exceed the comp flooring in the most visible rooms.
- Highlight flooring upgrades in your agent remarks and feature sheets.
Where to save:
- Do not overbuild. Putting high-end hardwood in a low comp neighborhood rarely changes the appraisal enough to justify the cost.
Common flooring mistakes that shrink your profit
Sometimes the biggest gains come from what you avoid.
Mixing too many flooring types
You walk through the front door and in 30 seconds you step on:
- Tile in the entry
- LVP in the hallway
- Laminate in the living room
- Carpet in the dining area
Even if each piece is fairly new, the house feels disjointed.
Try to keep it simple:
- One main material for public spaces.
- One material for bedrooms (often carpet).
- One material for bathrooms (usually tile).
Using bargain-bin floors in high-traffic areas
Cheap laminate or super thin LVP near entries, kitchens, or staircase landings will often show wear and damage before you even list the property. Then you either discount the price or rush to repair.
Spend more per square foot where:
- People track in water and dirt (entry).
- Kids run and drop things (family room, halls).
- Chairs slide (dining area).
Ignoring transitions and details
Buyers do not always point to transitions, but they sense the quality.
Things to avoid:
- Obvious height differences between rooms.
- Cheap metal strips used everywhere.
- Uneven cuts around doorways and vents.
Spending a little extra time or money on clean door thresholds and transitions makes the whole project feel more finished.
Process: how to decide your flooring plan for each flip
Let me walk through a simple, repeatable workflow you can run for each project.
Step 1: Study the comps
Before you pick a single plank, go through:
- Sold listings in the last 3 to 6 months.
- Active competitors right now in your area.
Look at:
- What floors they are highlighting in photos and descriptions.
- Where they use hardwood, LVP, or tile.
- What buyers respond to if you can get feedback from agents.
Your goal is not to design your dream house. Your goal is to stay near the top of the pack for that price range, not out of range.
Step 2: Map the house by impact zones
On a simple floor plan, mark:
- High impact zones: entry, living, dining, kitchen, main corridor.
- Medium impact zones: primary bedroom, stairs.
- Low impact zones: secondary bedrooms, closets, utility rooms.
Decide where you will splurge and where you will save before you look at samples.
Step 3: Set a flooring budget envelope
Using your rehab budget, set:
- Total flooring budget (materials + labor).
- Target price per square foot for higher impact areas.
- Target price per square foot for lower impact areas.
Do not pick a material that forces you to cut back on critical bathroom or kitchen work. Those rooms usually bring better returns than a fancy plank.
Step 4: Choose a “system,” not random pieces
You need a system that you can reuse:
- 1 or 2 LVP SKUs that fit 80 percent of your flips.
- 1 neutral carpet choice.
- 1 or 2 go-to tiles that work with many styles.
By standardizing, you:
- Get better pricing from suppliers.
- Help crews install faster and with fewer mistakes.
- Make design decisions faster on each new project.
Step 5: Walk the property with your installer
Bring your flooring contractor early:
- Check subfloor condition.
- Check moisture-prone areas.
- Verify transitions and height differences.
Ask them:
- Where are you expecting extra work or costs?
- What material will install faster in this layout?
Sometimes a slightly more expensive material with faster install reduces your overall cost.
Small details that make your floors sell harder
At this point, you know where to save and where to splurge. The final layer is presentation.
Baseboards and trim
Fancy floors with tiny or beat-up baseboards look off.
Where to splurge a bit:
- Replace damaged or mismatched baseboards in main living areas.
- Use simple, taller base if the house and budget support it (e.g., 4 to 5 inches).
Where to save:
- Paint existing baseboards clean white if they are in good shape.
- Keep more basic trim in closets and secondary spaces.
Direction of planks
It seems minor, but the way you run planks affects how the house feels.
General rule:
- Run planks parallel to the longest wall or down the main hallway.
- Try to keep the direction consistent across open spaces.
This helps the space feel larger and more connected.
Staging and photos
Floors photograph differently depending on light and staging.
Practical tips:
- Avoid heavy rugs that hide most of your new flooring in listing photos.
- Make sure windows and lights do not create harsh glare on glossy surfaces.
- Have your photographer capture angle shots along the length of the planks.
Buyers often first “feel” your floors through photos, not in person.
Concrete examples: 3 flip scenarios
Let me tie this together with quick scenarios.
Scenario 1: Entry-level flip, ARV $220k
House:
- 3 bed, 1.5 bath, 1,100 sq ft.
- Buyers are first-time owners, budget conscious.
Flooring plan:
- Main areas (living, small hallway, kitchen): mid-grade LVP.
- Bedrooms: budget-friendly, neutral carpet.
- Bathrooms: simple ceramic tile, 12×24, light color.
- Save on: using one LVP color only, basic underlayment.
- Splurge on: better wear layer for LVP in living and kitchen.
Scenario 2: Mid-range family flip, ARV $375k
House:
- 4 bed, 2.5 bath, 2,000 sq ft.
- Buyers are move-up families, care about finishes.
Flooring plan:
- Main floor (living, dining, kitchen, hall): higher-end LVP or entry-level engineered hardwood, one color throughout.
- Stairs: carpet to save budget.
- Second-floor bedrooms: carpet.
- Primary bedroom: consider LVP or engineered hardwood if comps show it.
- Bathrooms: tile floors.
You splurge in the open areas they see first and save upstairs where they expect carpet anyway.
Scenario 3: Upper range flip, ARV $750k
House:
- 4 bed, 3.5 bath, 3,000 sq ft.
- Buyers are more selective; they walk plenty of similar homes.
Flooring plan:
- Main floor: engineered hardwood throughout, including study and dining.
- Primary suite: hardwood with a nice area rug for staging.
- Secondary bedrooms: quality carpet.
- All bathrooms: tile, upgraded styles in primary bath.
- Save by: choosing quality but not ultra-premium hardwood, avoiding complicated patterns that spike labor.
- Splurge by: finishing details, transitions, and matching stair treads to main floor wood.
In this house, vinyl on the main level would send the wrong message and hurt value.
Your flooring strategy should change as your exit price changes. A one-size-fits-all approach quietly cuts your profit across the year.
One practical tip you can apply on your next flip
Before you order anything, walk your flip from the front door to the back with your phone camera on, recording video at buyer eye level. Every time you feel a “this area really stands out” moment, mark that as a splurge zone for better flooring, and treat all the rest as save zones. Then price and pick your materials around those marked spots, not around the whole house as if every square foot is equal.