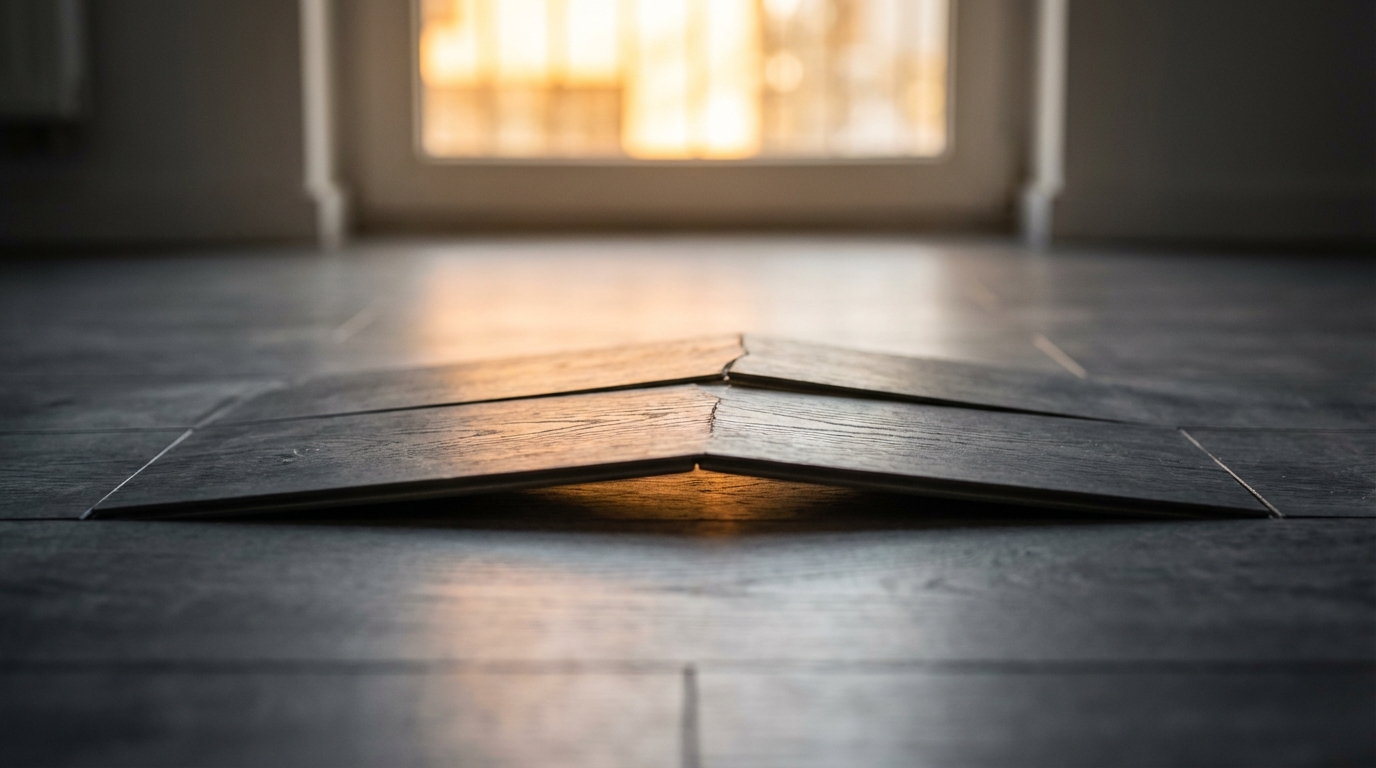
So, you are trying to figure out why your floor buckled in the summer and what expansion gaps have to do with it. The short answer is that your floor likely did not have enough room to expand, so when the heat and humidity went up, the boards swelled and pushed against each other until they had nowhere to go except up.
Wood and many synthetic floors react to changes in temperature and moisture. In warmer, more humid months, they take in moisture and grow. If the installer did not leave the right expansion gaps around the edges, under door frames, or at transitions, the floor acts like a compressed spring. At some point, it releases that pressure by lifting, warping, or buckling.
Things you need to know:
- Every floating floor needs an expansion gap around the entire perimeter.
- Wood, laminate, and some vinyl floors all expand and contract with humidity.
- Summer buckling often means blocked or missing expansion gaps.
- Tight trim, cabinets, or walls can “lock” the floor and trap movement.
- Moisture from below (concrete, crawlspace, leaks) can add to the problem.
- You can often fix buckling by releasing pressure and restoring gaps.
- Prevention is cheaper than repair: correct installation and climate control matter.
What expansion gaps actually are (and why they matter so much)
So, what are expansion gaps in the context of flooring? You are basically leaving a small, controlled space between the edge of the floor and anything that will not move: walls, pipes, kitchen islands, stairs, fireplaces, sliding door tracks, and so on.
Most manufacturers call for something in this range:
- Laminate flooring: about 1/4 inch (6 mm) to 1/2 inch (12 mm)
- Engineered wood: about 1/4 inch (6 mm) to 1/2 inch (12 mm)
- Solid hardwood: often more, sometimes 3/4 inch (19 mm) depending on board width and room size
- Floating vinyl/rigid core: usually 1/4 inch (6 mm), but follow the brand’s guide
The reason is simple: floorboards do not stay the same size all year. In your head, think of each plank growing a tiny bit in summer. One board alone is not a big deal. But if you have 25 feet of floor, all those small changes add up across the whole span.
If that line of boards is locked tight between two walls with no room to move, it is like you are trying to fit a slightly longer plank into a fixed box. Since the walls will not move, the only place left is up or sideways. That is buckling.
A quick mental picture
Imagine you lay 100 laminate boards in a row and leave 1/4 inch at each end. In winter, they shrink a bit, and your gap gets a touch larger. No big deal. It hides under the baseboard anyway.
Now it is summer. Humidity is high, the boards swell a little. That 1/4 inch gap fills. If you never had the gap, or something closed it later, that extra length has to go somewhere.
So the boards start to press into each other, tongues and grooves jam tight, and at the weakest point you see a hump, ridge, or full-on buckle.
Why your floor buckled more in summer than winter
If your floor looked fine in the winter and then lifted in July or August, you are dealing with a mix of temperature and moisture.
Here is why summer hits floors harder:
- Warm air can hold more moisture than cold air.
- In many regions, summer humidity jumps well above 60% indoors.
- AC use can reduce humidity, but not always enough, and not evenly in every part of the house.
- Moisture can also creep from below, through concrete slabs or crawlspaces, and that is often worse in warm months.
Wood and many composites act like sponges. They do not just react to air temperature. They react to relative humidity. That is the percentage that tells you how close the air is to being fully saturated with moisture.
A lot of flooring brands recommend keeping indoor relative humidity roughly between 35% and 55%. When it lives well above that range for weeks, your floor swells more than it was allowed to.
> The floor did not fail because it was “bad.” In many cases it did what wood always does. The problem is the house did not give it enough freedom to move.
Common reasons expansion gaps go wrong
Your floor might have buckled because:
- The original installer did not leave enough gap.
- The right gap was there, but later work closed it off.
- Trim, caulk, or grout bridged the floor to the wall or tile.
- Furniture or cabinets were anchored down through the floating floor.
- A moisture problem made the boards swell far beyond normal.
Let us walk through each.
1. Not enough gap at install
This is common with DIY installs and sometimes with rushed jobs.
People think: “I want it tight and clean, no visible gaps.” So they push the boards right up against the drywall, sliding door channel, hearth, or step. Or they use random items as spacers that are too small.
The problem is the visible “tight and clean” edge at install turns into an invisible tension point later.
> If the floor touches the wall before you install the baseboard or shoe molding, the gap is already too small.
2. The gap was there, but trim or caulk killed it
Sometimes the original installer did it right. They used spacers, left a gap, and the floor floated freely. Then another trade shows up.
Common gap killers:
- Baseboard nailed too low, pinching the floor.
- Quarter-round or shoe molding nailed into the floor instead of the wall.
- Silicone or acrylic caulk squeezed between floor and tile or track.
- Grout filled into the space where a flexible transition strip should be.
The gap is still there physically, but something now bonds the floor to the wall or tile. So it cannot move like it was designed to.
3. Fixed objects sitting on top of a floating floor
Floating floors need to lie under trim, but not under heavy fixed things that you screw or bolt down. That includes:
- Cabinets
- Kitchen islands bolted through the floor
- Built-in bookshelves
- Stair posts anchored through the planks
- Framed walls added after the floor went in
If you trap the floating surface under a heavy, fixed box, that box becomes a wall from the floor’s point of view. Your nice 25-foot run of flooring is now broken into smaller “pinned” sections with no real expansion room.
> A floating floor likes to sit under baseboards, but it does not like to sit under anything that is permanently fastened to the structure.
4. Moisture from below or leaks from above
Expansion gaps are not magic. If your subfloor is wet, or your slab has no vapor barrier, boards can swell past what a normal gap was meant to handle.
Common sources:
- No vapor retarder over concrete when installing laminate or engineered wood.
- High moisture in a crawlspace with no plastic sheeting or poor ventilation.
- Dishwasher, fridge, or ice maker leaks.
- Plumbing leaks inside walls or under tubs.
- Condensation under floors in rooms with poor climate control.
In some of these, the buckling is not only about lateral expansion. Boards can cup or crown from uneven moisture, and that warp contributes to lifting.
How to tell if missing expansion gaps are the real problem
If your floor is buckling in summer, you want to know if expansion issues are the core cause or just part of the story.
Here are signs you are dealing with trapped movement:
- Humps or ridges appear in the middle of long runs, especially across doorways.
- The floor sounds tight or creaky when you walk across the hump.
- You see the floor touching the wall or door jamb where there should be a gap.
- Transition strips are tight, cracked, or lifting.
- Baseboards bow outward in spots as the floor pushes against them.
If you can remove a piece of quarter-round or baseboard carefully, take a look behind it:
- You should see a clear space between the wall and the edge of the floor.
- If the floor meets or touches the drywall or trim, your “gap” is gone.
> When you see floor planks jammed against hard objects on multiple sides of a room, it is almost like watching a balloon pressed into a glass box. One way or another, it will find a weak point.
How different floor types react to expansion gaps
Not all floor materials behave the same way, and they do not all need the same gap rules. Still, the pattern is similar: more natural material usually means more movement.
Here is a simple comparison:
| Floor type | Moves a lot? | Typical installation | Gap needed? | Summer buckling risk |
|---|---|---|---|---|
| Solid hardwood (nail-down) | High with humidity | Nailed or stapled to wood subfloor | Yes, at walls and fixed items | High if humidity swings are large |
| Engineered wood (float or glue) | Medium | Floating, glued, or nailed | Yes (for floating installs) | Medium to high, depends on quality and conditions |
| Laminate flooring | Medium | Mostly floating | Yes, around full perimeter | High if gaps are blocked |
| Rigid core vinyl (LVP/LVT click) | Lower but still there | Floating | Yes, but usually smaller | Medium, especially in sunrooms / big windows |
| Glue-down vinyl | Low | Bonded to subfloor | Small perimeter gap | Lower, more concern about adhesive issues |
| Tile (ceramic/porcelain) | Very low | Mortar and grout | Movement joints in large areas | Buckling likely from substrate issues, not typical expansion |
> If you have any kind of “floating” floor, expansion gaps are not optional. They are part of the design. The floor is meant to move.
Step-by-step: How to fix a floor that has already buckled
You probably care less about theory and more about “What can I do right now?”
Here is a practical process. This will vary based on floor type, but it gives you a solid path.
Step 1: Find where the pressure is trapped
Walk around and identify:
- Where the biggest hump is.
- Where trim or objects might be holding the floor.
Then, in the closest few walls or openings:
- Carefully remove a section of quarter-round or baseboard with a pry bar and a thin putty knife.
- Look for the gap. If the flooring edge touches the wall or is very close, you have a clue.
Also check:
- Door jambs and casings
- Kitchen island edges
- Sliding door tracks
Step 2: Measure gaps and compare to manufacturer instructions
If you still have the original box or paperwork, look up expansion guidance. If not, check the brand website.
Measure the space between plank edge and wall:
- If it is less than recommended, you will need to cut back the flooring edge or relieve pressure another way.
- If it looks fine, start suspecting moisture beneath the floor.
Step 3: Check for moisture or leaks
You do not need lab tools to start:
- Look for staining on baseboards, cabinets, or drywall near the hump.
- Check under sinks, around dishwashers, and around fridge water lines.
- If over a crawlspace, peek under the house and look for wet soil or no plastic vapor barrier.
- If over concrete, think about whether there was a vapor barrier used (usually a plastic sheet or underlayment with a moisture barrier).
If you have a simple moisture meter, test a few spots of the subfloor or floorboards.
> Fix any leak or moisture source before you address the floor itself. Otherwise, the repair may only last one season.
Step 4: Release the pressure
This is the part where you give the floor breathing room again.
Common methods:
- Trim back the edge of the flooring to restore the gaps.
- Remove any caulk or grout that bonds the floor to an adjacent surface.
- Remove fasteners that pin the floor to the subfloor where it should float.
For a standard floating laminate or engineered floor:
- Start at the nearest wall where the gap is too small.
- Carefully mark a new gap line at the correct distance from the wall.
- Use a multi-tool (oscillating tool) with a wood blade to cut the planks back.
- Vacuum the edge and check that the planks can move a bit if you push them.
Sometimes, once you release enough pressure, the hump will relax almost right away. In other cases, boards may have locked tongues or minor damage and need some persuasion or replacement.
Step 5: Replace damaged boards if needed
If a section of boards has permanently warped or the locking system has failed:
- You may need to remove planks back to a wall and re-lay them.
- Or you can cut out one section and patch in from the top with repair techniques.
That part can be technical. If the floor is expensive or the damage is large, consider calling an experienced installer or inspector at this stage. The key point is that replacing boards is pointless if you have not fixed the root cause (gaps and moisture).
Step 6: Put trim back without trapping the floor
When you reinstall baseboard or quarter-round:
- Nail the trim into the wall or baseboard, not the floor.
- Leave a hairline space between the bottom of the trim and the floor surface.
- If you caulk, keep the bead small and just at the trim top or face, not gluing the trim to the floating planks.
> Trim is there to hide the gap, not to close the gap. If trim closes the gap, you are setting up the next buckle.
How humidity and HVAC control tie into expansion gaps
Expansion gaps are the “mechanical” side of the story. Humidity control is the environmental side. You need both.
If your home swings from 25% humidity in winter to 80% in summer, your floor is living on the edge even with decent gaps.
Practical targets many flooring guides suggest:
- Indoor relative humidity: around 35% to 55% most of the year.
- Temperature: usually in a normal human comfort range (about 60 to 80°F).
Some simple ways to keep things steadier:
- Use a hygrometer to actually see humidity levels in the problem area.
- Run your AC not just for temperature, but long enough each day to remove moisture.
- Add a dehumidifier in basements or rooms that always feel damp.
- Seal or upgrade crawlspace vapor barriers.
- Ventilate kitchens and bathrooms with exhaust fans that go outside.
> Floors like stable conditions. They do not have to be perfect, just not wildly different from one season to the next.
How much expansion gap do you really need?
You might wonder if there is a “one size fits all” number. There is not. But there are common ranges and a few rules of thumb.
Standard gap sizes
- Laminate: 1/4 inch around all fixed objects, larger rooms may require 3/8 inch.
- Engineered wood (floating): 1/4 inch to 1/2 inch depending on board width and room length.
- Solid wood: often 3/4 inch at walls for wide rooms, especially over crawlspaces.
- Click vinyl: usually 1/4 inch, sometimes a bit more for large spans and big windows.
Read the manufacturer guide first. Their numbers matter for warranty and real-world performance.
Room size and transitions
In very large rooms or long hallways, you might need expansion breaks with T-moldings or similar.
Example:
- Room width up to 26 to 40 feet: standard gap might be fine.
- Long runs over that: manufacturers often call for breaks so each “field” of flooring can move on its own.
Areas that often need transitions:
- Doorways between rooms.
- Entryways leading to long halls.
- Changes in subfloor (for example concrete to wood).
> A continuous run of floating floor through half a house might look sleek, but without proper breaks, it is much more likely to buckle in summer.
Why some floors buckle even with decent gaps
Sometimes you do everything “mostly” right and still see buckling. That is annoying, but there are a few subtle problems that can cause it.
Problem 1: Heavy sun exposure
Rooms with large south-facing windows or glass doors can get very warm at the floor surface. Combine that with strong UV exposure, and you can see:
- Extra expansion in the sunniest section.
- Localized buckling or cupping near the glass.
This is more common with:
- Dark-colored floors that absorb more heat.
- Rigid core products without enough expansion allowance.
You might have a correct gap at the walls, but the floor in the sun zone tries to grow faster than the rest.
Problem 2: Irregular gaps or tight spots
Sometimes installers leave a good gap on three walls and forget a corner, pillar, or pipe. That one tight spot becomes the anchor, and the whole floor pushes from there.
Check around:
- Columns or support posts.
- Fireplace hearths.
- Door tracks or metal thresholds.
- Stair landings.
If even one of those is tight, your floor’s “average” gap does not help much.
Problem 3: Wrong underlayment or no vapor barrier
You can have a perfect perimeter gap and still get swelling if moisture is entering from below day after day.
Cases that show up in real homes:
- Laminate on concrete where someone used plain foam underlayment with no moisture barrier.
- Engineered wood glued to concrete without proper moisture testing.
- Floors over crawlspaces with no plastic sheeting over soil.
In those, the boards do not just expand sideways; they sometimes change shape. Then they lift in random areas, not always right in the center of the room.
When to fix vs when to replace a buckled floor
You do not always have to rip everything out. The decision usually comes down to:
- How much of the floor is affected.
- Whether planks are cracked, deformed, or delaminated.
- Whether the subfloor or slab has serious moisture issues.
You can often fix with limited replacement if:
- The buckling appears in one or two small areas.
- The boards themselves flatten back once pressure is released.
- The locking edges are still intact after you inspect a few boards.
- Moisture readings are within the range the manufacturer expects.
Replacement is more realistic when:
- The floor has multiple humps in several rooms.
- Boards are visibly cracked, swollen, or delaminated.
- The tongue-and-groove system is heavily damaged from compression.
- There is ongoing moisture that you cannot realistically correct while the same material is down.
> Fixing the movement issue but leaving warped boards is like fixing the road but never patching the potholes. You stop new damage, but the old scars are still visible.
How to prevent buckling the next time you install a floor
If you are planning a new floor or replacing a damaged one, you can set yourself up for a much calmer next summer.
1. Start by testing and stabilizing your environment
Before you even bring the floor into the house:
- Use a hygrometer to log humidity for a week or two.
- Check the condition of crawlspaces or basements.
- If over a slab, ask about or perform moisture tests (calcium chloride, in-slab probes, or at least a basic plastic sheet test).
Make adjustments:
- Install or improve vapor barriers.
- Add dehumidifiers where needed.
- Run HVAC and keep the home at normal living conditions before and during install.
2. Acclimate your flooring correctly
Many wood-based floors need time to adjust to the room.
Common guidance (check your box):
- Store unopened boxes flat in the install area for at least 48 to 72 hours.
- Keep temperature and humidity within the target range the whole time.
This step reduces the shock later when seasons change.
3. Use proper spacers and measure gaps, do not eyeball
When you install:
- Place dedicated spacers between the first rows and each wall.
- Check with a tape measure that the gap is consistent (not just at one point).
- Remember to leave gaps around pipes, columns, and door frames.
Pay attention at tricky spots like:
- Fireplace surrounds.
- Sliding doors where the track must stay fixed.
- Transitions to tile or carpet.
> If you cannot hide a full-size gap with standard trim, rethink the trim or the layout, not the gap.
4. Plan transitions and breaks for larger areas
Do not run a single floating floor unbroken through long hallways, multiple rooms, and weird angles just because it looks clean.
Better to:
- Use T-moldings at doorways between rooms.
- Break up very long spans with transitions that look intentional.
- Follow the maximum length and width guidelines in the instructions.
5. Train anyone working after you
If you are an installer, or even a homeowner who hires other trades, explain to them:
- Baseboards and quarter-round get nailed only to the wall.
- No caulk, grout, or adhesive should bond the floor to surrounding hard surfaces in most floating installs.
- Cabinets, islands, or walls do not sit on floating floors.
This light communication can save you a repeat of the same summer headache.
What about floors that creak but do not buckle?
Creaks and squeaks can be early signs of movement stress, though they can also just be subfloor or fastener issues.
If your summer floor:
- Feels tight underfoot.
- Makes sharper clicking noises when you walk across a certain line.
- Looks flat but sounds like it is rubbing against something.
You might be hearing boards sliding against trim or each other under pressure.
Try:
- Checking for tight baseboards or quarter-round.
- Looking at transitions that may be pinning edges.
- Measuring gaps where you suspect contact.
> A floor that clicks or groans as humidity goes up is often trying to tell you it needs just a little more freedom to move.
When to bring in a professional inspector
Sometimes the source of buckling is not obvious. Or there is an argument between installer, homeowner, and product manufacturer about who is responsible.
In those cases, a certified flooring inspector can:
- Measure moisture in boards and subfloors.
- Check plank construction and any defects.
- Document gap sizes, installation pattern, and fastening methods.
- Help separate product issues from installation or environment issues.
If the floor is under warranty, the manufacturer may even require an independent report before they approve any coverage. The cost of that report is small compared to tearing out or replacing a whole level of flooring.
One small habit that protects almost every floor in summer
If you take one practical habit from all this, let it be this:
> Keep a cheap digital hygrometer in the room with the most flooring, and adjust your AC or dehumidifier whenever the display spends many days above roughly 55% humidity.
That simple feedback loop, paired with proper expansion gaps, gives your floor a much calmer life every summer.