So, you are trying to transform your floors with cozy candle lanterns and actually make the space feel warm, not cheesy or unsafe. The simple answer is to treat floor lanterns like low furniture: plan where they sit, match them to your flooring, use safe candles, and layer them with your lighting and decor instead of just dropping random lights around.
This works well because floors are the largest surface in most rooms. You already think about color, finish, underfloor heating, rugs, or tile layout. Lanterns sit directly on those surfaces and pull attention down, which changes how your flooring looks. They soften hard materials, highlight textures, and create calm corners that make the whole renovation feel more finished.
Here are a few quick things you need to know before you start moving lanterns around your house.
- Think of lanterns as low-level lighting, not accessories you add at the end.
- Pick lantern styles that complement your flooring material and color.
- Use LED candles or covered real candles for safety near wood and rugs.
- Group lanterns in small clusters, not single pieces spread all over.
- Protect floors from heat, wax, and scratches.
- Use lanterns to mark transitions, paths, and awkward corners.
- Plan how you walk through the room so nobody kicks them at night.
Now let us go into real details and link this to renovation and flooring choices, not just “pretty decor.”
How floor lanterns change the way your flooring feels
When you finish new flooring, it often looks a bit flat. Too perfect. You have clean lines, sharp edges, and probably bright overhead lights. Then you turn the lights down at night and the space feels a little cold.
Low, warm light from lanterns changes that. It does three things very clearly:
Soft floor lighting hides small defects, highlights texture, and makes hard surfaces feel more comfortable and lived in.
You might notice it yourself. A scratch in wood is almost invisible in soft side light, but a bit of grain suddenly pops. The same is true for tumbled stone or textured tiles. Even engineered vinyl with a fake grain reads better when a warm point of light hits it from the side.
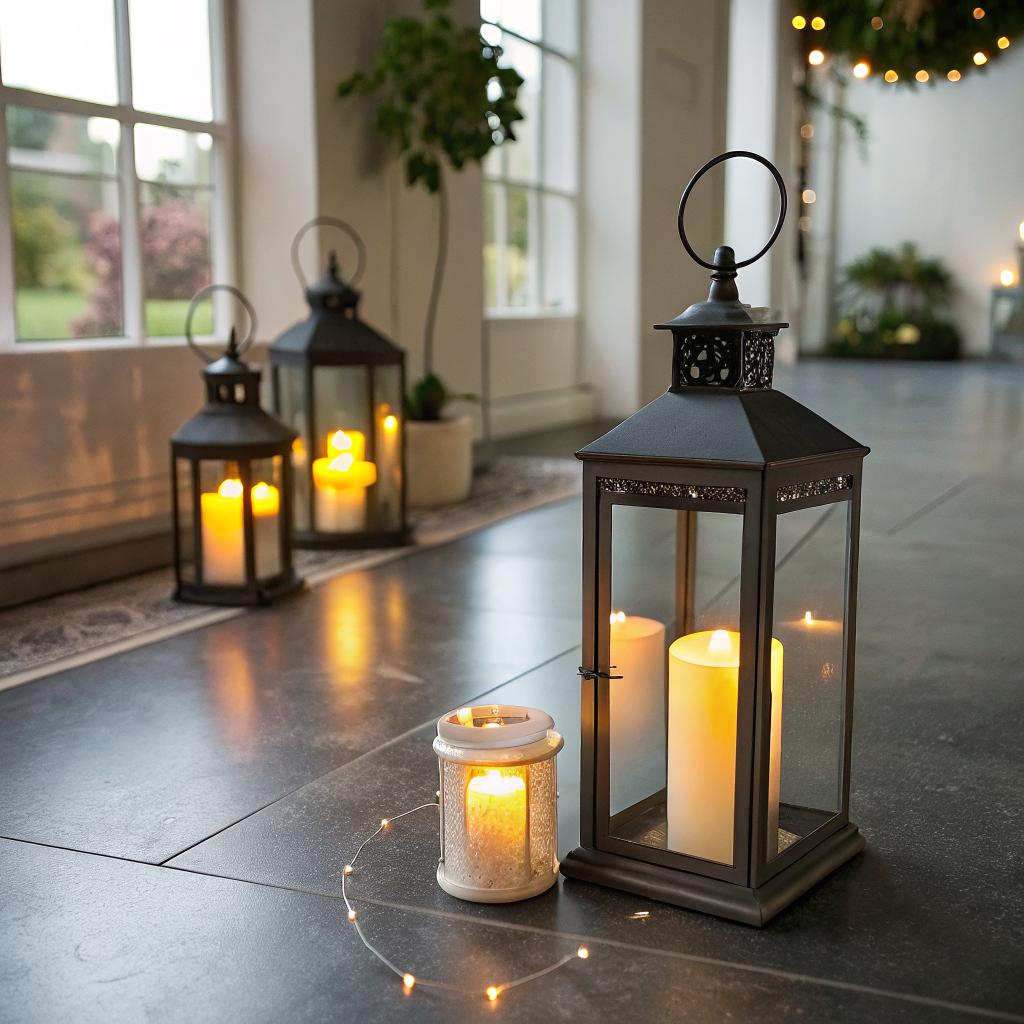
Here is how different flooring types react to floor lanterns.
Wood floors and candle lanterns
Wood and candlelight almost always work together. The color temperature of a flame or warm LED sits close to natural wood tones, so the light feels natural on oak, walnut, maple, or bamboo.
On wood floors, lanterns can:
- Pick up the grain pattern and knots.
- Make color variation look intentional instead of like a mismatch.
- Soften the look of long boards in hallways or open spaces.
They also distract from minor issues. A small gap between planks or a slightly off board is less visible when your eye is drawn to a glow at floor level.
One thing though: wood is still a fire risk. I think real candles are fine if:
- The lantern has a closed base or a thick glass holder.
- You use a tray, tile, or metal plate under the lantern.
- You keep at least a little space between the flame and any wood trim.
If you do not want to worry at all, just go with good quality LED candles. The better ones flicker, have a decent color, and from a few steps away they look convincing.
Tile floors and candle lanterns
Tile floors already feel hard and sometimes a bit clinical. Lanterns can change that feeling without you tearing up anything.
They help with:
- Echo and “bathroom” feeling in large tiled spaces.
- The cold look of gray porcelain or stone finishes.
- Creating zones in open areas like kitchens or entryways.
On tile, you can be a little braver with real candles, because heat is less of a problem. You still want stable lanterns so nothing tips over. Personally, I like larger lanterns on tile, around 18 to 24 inches high. They hold their own against the strong lines in grout and big slabs.
Flame reflections on glossy tile can look nice, but they also show every smear and footprint. If you hate constant cleaning, pick a lantern with frosted glass or metal cutouts. It breaks up the direct reflection.
Vinyl, laminate, and hybrid floors
These floors are popular in renovations because they are cheaper than solid wood and easier over imperfect subfloors. Under soft light, they can look closer to higher-cost materials.
Lanterns help here because:
Warm, low light makes many mid-range vinyl and laminate floors look more expensive, since it smooths out plastic shine and makes patterns feel deeper.
For these floors, protect against scratches. The base of a metal lantern can mark softer materials. A simple fix is to add felt pads or place them on a small rug, mat, or one single stone tile.
One thing that can go wrong: reflective laminates with very cool, blue undertones can look a bit strange next to a very orange flame. If that happens, try a slightly cooler LED “candle” instead of a real one. Test at night before you buy ten pieces.
Concrete floors
Polished concrete is popular in modern renovations. It can look great, but some people find it too harsh.
Lanterns are almost made for this situation. Lined along a wall, they add warmth without fighting the clean look.
On concrete, you can mix:
- Industrial metal lanterns for a modern style.
- Woven or wood lanterns for a softer touch.
Concrete often has hairline cracks or small patch repairs. Under strong overhead light they stand out. At night, once your eyes adjust to lanterns and maybe a floor lamp, those same imperfections pretty much fade into the background.
Matching lantern style to your floors
You do not need a designer for this. Just match weight, color, and texture between the lantern and the surface it sits on.
Here is a simple table you can use when you plan purchases.
| Flooring type | Better lantern styles | Styles that often clash |
|---|---|---|
| Light oak or maple wood | White metal, clear glass, pale wood frames, simple shapes | Very dark, heavy iron with thick bars |
| Dark wood (walnut, mahogany) | Brass, bronze, black frames, warm-toned glass, vintage look | Tiny chrome or silver lanterns that look too “cold” |
| Gray porcelain tile | Black, gunmetal, concrete-look, smoked glass | Very warm red or orange painted metal |
| Patterned encaustic or decorative tiles | Simple clear glass, minimal frames, neutral colors | Lanterns with busy cutouts or bold patterns |
| Vinyl/laminate in “oak” tones | Matte black, warm white, natural basket lanterns | High gloss chrome that highlights any plastic shine |
| Polished concrete | Industrial metal, large glass boxes, mixed heights | Overly rustic “barn” styles if you want a clean look |
None of this is a rule you must follow. It is more of a starting point. Sometimes the unexpected combination is the one that makes a space feel personal.
Planning where floor lanterns go in a renovated room
Think of your space in zones. Where do people walk? Where do they sit? Where do they pause?
If you just place lanterns on any free patch of floor, the room will feel cluttered. If you think about your pathways first, the same number of lanterns can feel calm and intentional.
Here are key zones to consider.
Entryways and hallways
New floors in hallways often look great during the day but turn into dark tunnels at night. Overhead downlights can be harsh or create glare on glossy finishes. Lanterns are a simple fix.
Some ideas:
- Place a medium lantern next to a console table to warm up the entrance.
- Line two or three lanterns along a blank wall to break up a long corridor.
- Use a lantern at the start of a stair to mark the change in level.
Be careful near doors. A swinging door can knock over a lantern if it is too close to the frame. Test this by fully opening doors before you decide on the final spot.
Living rooms and open plan spaces
In many renovations, one large space now holds the kitchen, dining, and living area. Floors run continuously, which is great visually, but you lose a bit of separation.
Lanterns help to:
Use light, not walls or rugs alone, to show where one area ends and another begins.
Concrete examples:
- Put a pair of lanterns at the end of the sofa to “frame” the seating zone on your new hardwood.
- Place a tall lantern next to a plant in a corner that otherwise feels dead.
- Cluster three different heights next to a media unit so the TV wall does not feel flat when the screen is off.
If you have underfloor heating, do a quick check of how warm the floor actually gets where you place your lanterns. Most systems are gentle, but if you are using real candles in metal bases, you do not want extra heat building up under them.
Bedrooms
After new carpet or wood in a bedroom, people often keep lighting too harsh. One ceiling light, maybe strong bedside lamps, and that is it. Floor lanterns around the bed can make the new floor feel like part of a retreat, not just a surface you paid for.
You can:
- Place small lanterns near a reading chair to define that corner.
- Use one large lantern instead of a second bedside lamp if you like softer light.
- Line two low lanterns near a window, especially if you have floor length curtains and a solid floor below.
Here I would go LED almost always, just for safety if you get sleepy and forget to blow anything out.
Bathrooms
If you renovated a bathroom with nice tile, lighting probably made up a big part of your planning. Still, lanterns on the floor can bring that hotel or spa feel without another permanent fixture.
Good locations:
- Beside a freestanding tub.
- At the far corner of a walk-in shower, outside the wet area.
- In a corner where two tiled walls meet to highlight the joints and textures.
Check that your lantern is rated or finished in a way that can handle some humidity. Many are fine, but cheaper ones can rust quickly.
How many lanterns are too many?
This is where people sometimes go wrong. A floor full of lanterns looks like a showroom, not a home.
A simple guideline:
- Small room (up to 120 sq ft): 2 to 3 lanterns.
- Medium room (120 to 250 sq ft): 3 to 5 lanterns.
- Large room (250+ sq ft): 5 to 7 lanterns, broken into clusters.
Those numbers include both floor lanterns and any large lanterns on low furniture. If you already have a big lantern on a hearth, you might not need another right next to it on the floor.
Try this test. Turn on only the lanterns at night, no overhead lights. If your eyes feel strained because the room is patchy and dark, you need either:
- A basic ambient light source (dimmed ceiling light or floor lamp).
- Or fewer lanterns, placed in clearer groupings.
Real candles vs LED candles on your floors
There is a small debate about this. Some people insist only real flames feel right. Others do not want open fire anywhere near wood, kids, or pets.
From a flooring point of view, here is how they compare.
| Type | Pros | Cons |
|---|---|---|
| Real candles | Natural flicker, subtle smell, works in most lanterns | Wax drips, potential scorch marks, fire risk |
| LED candles | Safe, no heat, good for kids/pets, timers | Cheap versions look fake, need batteries, some light is too cold |
From experience, a mix can work:
- Use real candles in a few key lanterns where you sit and can watch them.
- Fill background lanterns with LED candles on timers so the room still glows.
On any valuable floor, especially newly finished natural wood, use lanterns with a sealed base or add a saucer inside to catch wax. It is much easier to clean a small dish than to sand and refinish a board.
Protecting your floors from lantern damage
Renovation is not cheap. Scratching new floors with decor feels painful. A few simple habits avoid that.
Use a buffer under the lantern
Even a high quality lantern can have rough metal edges underneath. Place something thin but protective below:
- Felt pads on each corner.
- A cork mat cut to the lantern base size.
- A stone or ceramic tile that fits the style.
On carpet, you mostly worry about indentations and stability, not scratches, so a slightly larger flat board helps keep the lantern upright.
Think about heat and finish
Some wood finishes react to heat or long term warmth. Candle flames produce heat that rises, not so much down into the floor, but metal can conduct it.
A few checks:
- Do not place a very hot metal base directly on oiled wood for long periods.
- Use LED candles on heat-sensitive vinyl or laminate.
- Keep lanterns away from floor outlets or cable covers.
Plan for cleaning
Dust gathers around lantern bases, especially on darker floors. When you mop, temporary moves are easier if you give each lantern a “home” so it is easy to put back where it was.
I sometimes mark a tiny line on painter’s tape, hidden behind a piece of furniture, to remember a good layout. Not everyone would bother, but it avoids rethinking everything after a big clean.
Using lanterns to highlight special flooring features
If you went to the trouble of installing a border, pattern, or feature area in your floor, you probably want people to see it, not just during the day.
Lanterns are great for this.
Patterned layouts
Think of:
- Herringbone or chevron wood.
- Basketweave tile.
- Medallions or center mosaics.
Place lanterns so light trails along the direction of the pattern, not across it. For example, on a herringbone floor, set a lantern near the end of the “arrows” so the pattern seems to point toward the light.
Transitions between floors
Many homes have a mix: wood in the living room, tile in the hallway, perhaps carpet upstairs. The junctions can look abrupt.
You can place one lantern on each side of a change in flooring to frame that line. It signals that the shift is intentional. It also pulls the eye, so you notice the contrast as a feature instead of a cost-saving choice.
Steps and level changes
For safety and style, a lantern near a step or sunken area helps.
A single well placed lantern can do more to call attention to a step than several bright overhead lights that you no longer notice.
Do not put the lantern on the actual tread people walk on. Place it at the side or on a broader landing.
Linking your lanterns with the rest of your renovation
You probably changed more than floors. Maybe you painted walls, replaced doors, updated trims, or added built-ins. Lanterns can tie those decisions together.
Match metals and finishes
Look at:
- Door hardware (handles, hinges).
- Light switch plates.
- Faucets and kitchen handles.
If you used black handles, black framed lanterns on the floor will feel connected. If you picked brushed brass, try warm brass lantern frames.
The match does not need to be exact, just close enough that your eye groups them.
Use similar shapes
If your renovation has a lot of arches and curved corners, soft rounded lanterns work better than sharp cubes. If your cabinets and tiles are all straight and clean, a simple box shape keeps that language going.
Some mild contradiction can be useful. A very minimal modern space with one heavily detailed vintage lantern in a corner can become a nice focal point. Just do not scatter many different styles in one room or the floor will feel messy.
Think about height and layer
Your new floor is your lowest level. Above that, you might have rugs. Then furniture. Then wall art. Then ceiling.
Lanterns live in the first two levels. To avoid a “bottom heavy” feel:
- Balance floor lanterns with some eye-level lights or artwork.
- Do not put huge, tall lanterns everywhere if the rest of the room is low and light.
Try to have a few vertical “stories” in each sight line: floor, mid, high. It makes the space more comfortable to look at and walk through.
Making lanterns part of daily life, not just decor
Many people buy lanterns, use them twice, then leave them empty because lighting them feels like work. That is a shame, especially after a flooring upgrade where low light really changes the mood.
To make them part of your routine:
- Use LED candles with timers in the least accessible lanterns.
- Keep a lighter or remote in a drawer near your main lantern cluster.
- Decide on “lantern nights” like weekends or specific evenings.
If you have kids or pets who run around, put the most fragile lanterns in corners or behind furniture outlines, not out in open walkways.
For outdoor and indoor crossover, you can also echo your interior floor lanterns on a patio or near the garden door. Some people use stone pavers or Candle lanterns outside to lead from a deck back into a room. The repetition makes the whole path feel intentional.
Buying tips that actually matter for floors
When you shop, it is easy to get distracted by style and forget the practical parts that affect flooring and use.
Here are things to check in person or in product photos.
Base design
Look at the underside:
- Is it flat or does it have sharp metal edges?
- Is there enough space for air to move under a real candle, or will heat pool?
- Is the footprint stable so it will not wobble on slightly uneven floors?
A wider base is usually safer near soft carpet or slightly hollow spots in older houses.
Weight
Too light, and a passing pet or child can send it flying. Too heavy, and moving it around for cleaning becomes a chore.
As a rough guide:
- Small lanterns: 0.5 to 1.5 kg.
- Medium lanterns: 1.5 to 3 kg.
- Large lanterns: 3 to 5 kg.
You do not need to weigh them exactly, but if one feels flimsy, trust that instinct.
Height
For floor use, heights between 30 and 70 cm work in most homes. Taller pieces can look great near tall windows or very high ceilings, but in a standard room they may feel awkward.
Try to imagine the lantern next to your sofa arm or sideboard. If it is taller than those, it moves from “floor decor” into “small piece of furniture” and needs more visual space.
Common mistakes and how to avoid them
You can make a room worse with lanterns if you are not careful. Here are problems I see often.
Lanterns that block walking routes
In plans, people forget that you actually walk from sofa to kitchen, from hallway to bedroom, at night, sometimes half awake. A lantern that looks nice in a photo can be a toe-stubbing nightmare.
Solution:
- Walk your usual routes and mark them in your mind.
- Keep at least a clear two-foot-wide strip free of any lanterns.
Too much mixture of styles
A rustic basket lantern next to a super modern glass box and then a colorful Moroccan style piece all in one cluster creates confusion, especially on a clean new floor.
Pick one main style per room and maybe one contrasting piece if you love it. Do not fill every corner with a different mood.
Wrong candle color
Very white LED “candles” can clash with warm-toned floors. At the same time, very orange real candles can make cool gray tiles look muddy.
If you care about this, buy one candle first, test at night on your actual floor, then decide on a full set.
Quick Q&A: making your floors cozier with lanterns
Q: I have just installed new light oak floors. Where should I start with lanterns?
A: Start small. One cluster of three lanterns in different heights near your main seating area is enough. Choose neutral frames in white or pale wood, use warm LED candles, and see how the floor looks at night. Add more only if you feel there are dark, empty corners.
Q: Are floor lanterns safe with kids and pets?
A: They can be, but real candles on the floor are risky with running children or curious cats. Use LED candles in low lanterns and keep any real flames higher up, out of reach. Also pick sturdy lanterns that do not tip easily.
Q: Will lanterns date my renovation or feel like a trend?
A: Simple, well made lanterns in neutral finishes tend to age well. If you avoid very themed designs, they read more like a classic accessory, similar to a good floor lamp or framed print.
Q: How do I know if I have placed too many lanterns in one room?
A: Turn off all main lights at night and stand at the doorway. If your eye keeps jumping from glow to glow and you feel a bit distracted, remove one or two lanterns, especially the ones far from where you actually sit.
Q: My floors are old and a bit scratched. Will lanterns help or just show that more?
A: Lanterns can actually help by pulling focus towards pockets of warm light and away from general wear. Place them in cleaner areas, not directly on top of the worst damage. Over time you might find you mind the marks less, or you decide later to sand and refinish with a clearer idea of how you like the room lit.