So, you are trying to get some Arvada drain cleaning tips so your floors are truly remodel ready. The short answer is that you need to clear every drain line connected to the remodel area, check for slow flow with simple tests, protect new flooring from future backups, and fix small plumbing issues now instead of after the floors go in.
If you are redoing flooring, especially in kitchens, bathrooms, laundry rooms, or basements, your drains matter more than people think. A tiny clog that only causes a slow sink today can flood a brand new vinyl plank floor next month. Most flooring damage in wet areas comes from water that did not stay where it should. Often that means a drain that is partially blocked, not pitched correctly, or simply ignored for years.
Here are the main things you need to know so your new floors are not ruined by the first surprise backup.
- Test every drain near the remodel area before you touch a single plank or tile.
- Clean the inside of drains, not just the visible parts at the surface.
- Check for hidden issues like old cast iron, roots, or bellies in the line.
- Plan slope, floor height, and drain locations together, not separately.
- Use materials and layouts that can survive minor spills and splashes.
- Have a backup plan for overflows, like pan drains and floor drains.
- Fix the main line before you worry about finishes if there are warning signs.
Why Arvada drains are a flooring problem, not just a plumbing problem
Old neighborhoods around Arvada have a mix of older cast iron or clay lines and newer PVC. Ground movement, tree roots, and years of grease or soap buildup are common. That is normal, but it matters a lot when you are planning new floors.
Flooring installers often focus on level, flat, pretty. Plumbers focus on pitch, venting, and flow. When those two worlds do not talk, you can end up with:
- A low spot in the floor where water pools near a shower.
- A toilet flange set too low or too high after tile is added.
- A washer that shakes and slowly walks toward a weak floor drain.
- A basement floor that hides slow seepage from an overloaded main line.
If a drain backs up one time on an old vinyl floor, you mop it. If it backs up one time on a new wood or laminate floor, you can be ripping it out.
So drain cleaning here is not just about clear pipes. It is your first line of defense for your new floors.
Start with a simple pre-remodel drain check
Before you order flooring or schedule installers, take one afternoon and do some very basic tests. You do not need special tools. Just a bucket, some hot water, and a bit of patience.
Step 1: Identify every drain that can touch your new floor
Think broadly. Not just the visible drains.
- Sinks directly in the remodel area.
- Toilets near the new flooring.
- Shower and tub drains.
- Laundry standpipe and floor drain in laundry areas.
- Basement floor drains near mechanical rooms.
Ask yourself a simple question: “If this drain overflowed badly, where would the water go?” If the answer is “onto my new floor,” then that drain is part of your project whether you like it or not.
Step 2: Run a basic flow test
For each drain:
- Run water at full volume for a few minutes.
- Watch how fast the water level responds.
- Listen for gurgling in nearby fixtures.
Signs you have a problem already:
- Water rises and forms a pool before slowly draining.
- You flush a toilet and a nearby tub or shower gurgles.
- Running the washing machine makes a floor drain bubble or smell.
These are early signals that the line is partially blocked or not vented well.
Step 3: Decide what you can handle and what needs help
Light hair in a bathroom sink or some soap scum? You can often handle that yourself. A laundry drain that overflows when the washer drains, or a basement floor drain that is slow, is different. That often connects to deeper issues.
If you notice anything that affects more than one fixture at the same time, it usually means the problem is further down the line, not just at the surface.
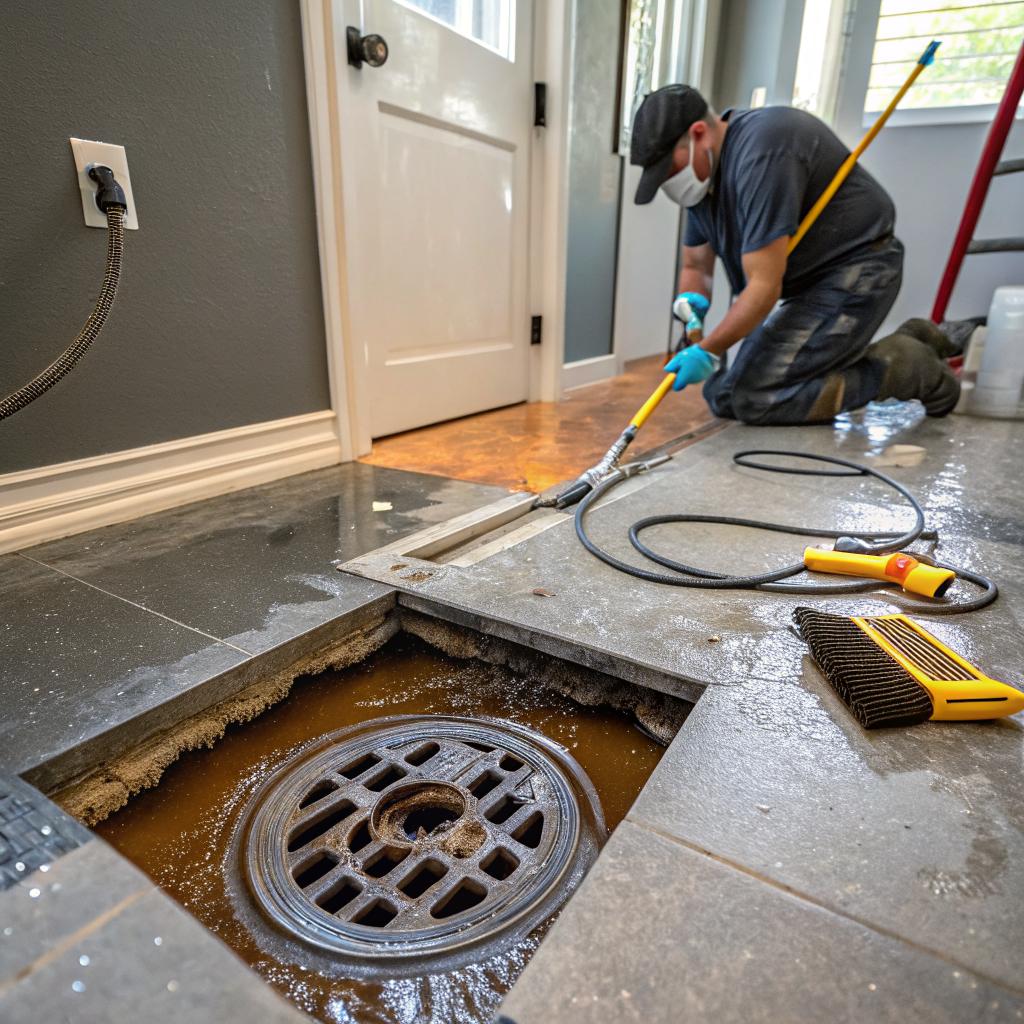
How to clean drains without risking your future floors
You probably know there are dozens of drain products in stores. Some help, some do not. Some can even make things worse for older plumbing that sits under your future floors.
Here is a straightforward rundown.
1. Skip heavy chemical drain cleaners near remodel areas
This is one place where I will push back if you like the idea of “just pouring something in.” Thick chemical cleaners can:
- Eat at older metal pipes and weaken them.
- Get stuck on existing buildup and stay in one area.
- Back up through another fixture and damage finishes.
If you plan to invest thousands in flooring, it makes little sense to save twenty dollars with a chemical that might weaken the pipes under it.
They are tempting because they are easy, but for a remodel, you are better off with mechanical cleaning and safer methods.
2. Use mechanical cleaning methods first
By mechanical, I mean anything that physically moves or removes the blockage.
Common tools you can use:
- Plastic hair snakes for bathroom sinks and tubs.
- A basic drum auger for small drains like sinks.
- A quality plunger for toilets and some floor drains.
Tips:
- Remove drain stoppers and pop-up assemblies so you can see inside.
- Pull out visible hair and gunk before you start plunging.
- Use steady, firm plunges instead of wild, fast ones.
If the clog moves a bit but does not fully clear, repeat the process a couple of times. If you still get slow flow, that is usually a sign the blockage is deeper.
3. Try safe cleaners for maintenance, not emergencies
If drains are just slightly slow, enzyme or bacteria based cleaners can help keep them clear. These products work slower but are generally gentler on pipes.
They are better as a maintenance step, not a last resort when water is already backing up across the floor.
4. Know when the main line needs a professional cleaning
Some issues hint at a bigger problem that you will not fix with any store bought cleaner.
Watch for these signs:
- More than one drain is slow at the same time.
- You smell sewer odors from floor drains.
- Toilets bubble when you run water in sinks or tubs.
- Backups seem worse after heavy rain or snowmelt.
In those cases, a proper main line cleaning or even a camera inspection can save you from a flooded basement or bathroom right after your remodel.
You might even want to talk with a local plumber who handles Arvada drain cleaning if you are not sure how old your lines are or if you have trees near the sewer route.
How drain issues connect directly to flooring choices
Here is where plumbing and flooring meet in a very real way. Every type of flooring reacts differently to water.
| Flooring type | How it handles brief water | Risk if a drain backs up | Drain planning tip |
|---|---|---|---|
| Solid hardwood | Swells and cups quickly | High risk of permanent damage | Keep out of heavy splash and drain zones |
| Engineered wood | Better than solid, still sensitive | Edges may swell or delaminate | Use only in areas with low flood risk |
| Laminate | Surface is okay, edges hate water | Planks can swell and lift | Protect seams and avoid near floor drains |
| Luxury vinyl plank (LVP) | Handles brief water fairly well | Water can still get under and trap moisture | Pair with good subfloor waterproofing |
| Tile | Tile is fine, grout can stain | Subfloor damage if water reaches underlayment | Plan slopes toward drains and good waterproofing |
| Sheet vinyl | Resists surface water | Water can sneak at edges and seams | Seal edges near tubs and drains |
| Concrete (finished) | Handles water fairly well | Risk of staining, mold in nearby framing | Keep drains clear to avoid long standing puddles |
Your drain cleaning choices should match the type of floor you plan to install. If you are going with wood or laminate in a basement that has a history of drain issues, you are taking a bigger chance than in a tiled bathroom with properly sloped floors.
If you are not willing to bet your new floor on your current drains, clean the drains first and pick a floor that forgives small mistakes.
Planning floor slopes and heights around drains
If you are redoing a bathroom, laundry, or basement slab, floor height and slope matter a lot. People sometimes think of slope only for showers, but other areas benefit from careful planning too.
Showers: walk-in vs curbed and drain location
Walk-in showers look great, but they put your main floor and subfloor a bit closer to any drain problem.
Questions to ask your installer and plumber:
- Where is the drain located relative to the highest water exposure?
- Is there consistent pitch from every side toward the drain?
- What waterproofing system is used under tile?
Common mistakes:
- Drains placed too close to the edge, so water pools elsewhere.
- Uneven slopes where water collects in corners instead of at the drain.
- Using the wrong thinset or mortar that cracks and lets water reach the subfloor.
If your drain is clear, but the floor does not send water toward it, you still end up with wet subfloors and loose tiles.
Laundry rooms and pan drains
Washing machines move a lot of water very quickly. If the standpipe is even slightly restricted, floor drains or pan drains become critical.
Think about:
- A washer pan under the machine that drains to a safe location.
- A floor drain graded slightly toward the likely spill area.
- Keeping that floor drain trap from drying out and losing its seal.
If you plan to lay a rigid floor like tile or LVP, make sure the drain height works with it. You do not want a drain that ends up too low to catch high spots of water or too high so that a mop keeps bumping against it.
Basements and main floor drains
Basement floor drains usually connect to either the main sewer line or a sump system. Before you install flooring down there, you should know which you have and whether it is clean.
Do a bucket test:
- Pour a bucket of clean water into the floor drain.
- Watch how fast it disappears.
- Listen for any gurgling up at other fixtures.
Slow drainage here can be an early hint of main line trouble. That is the kind of thing to fix before adding wood subfloors, sleepers, or any flooring that does not like moisture.
Preventive drain cleaning schedule around a remodel
For a remodel that involves new flooring near any water source, think in three stages: before, during, and after the work.
Before you start
This is your best chance to avoid drama.
- Do the flow tests you read about earlier.
- Manually clear hair and grime from accessible drains.
- Have main lines professionally inspected if you suspect age or tree root issues.
- Plan where floor drains, shower drains, and pan drains will be.
If the plumber finds roots or heavy buildup, you can clean and patch lines before flooring goes in. This is so much cheaper than tearing up fresh finishes later.
During the remodel
Here people often forget drain care because they focus on framing, tile, and cabinets.
Things to keep in mind:
- Do not let drywall mud or grout wash down open drains.
- Cover drains during messy work so debris does not enter.
- Confirm final drain heights after underlayment and thinset are down.
Plaster and mortar in pipes cause very stubborn clogs. They do not behave like grease or soap. Once they harden, mechanical cleaning is your only real hope.
Right after the remodel
Before you say the project is done, run another round of tests.
- Fill tubs and sinks, then drain them while watching floor areas.
- Flush toilets a few times and watch for any seepage at the base.
- Run a full wash cycle with the machine draining at full speed.
Think of this as a stress test. If something fails, it is better that it fails now, while installers and plumbers are still around, than six months later when your warranty is almost forgotten.
Special tips for common Arvada remodel areas
Every house is different, but certain zones come up again and again in this region.
Old basement bathrooms
Many older Arvada homes have a basement toilet or shower that someone added years ago. Often these are tied into lines in a way that is not ideal by modern standards.
Signs of trouble:
- Odd toilet angles or very low clearances.
- A raised shower platform to meet a high drain.
- Smells that come and go near floor drains.
Before you finish those floors with nice tile or LVP, it is worth:
- Checking venting and drain sizing.
- Camera inspecting any suspicious tie-ins.
- Replacing old steel or cast iron segments that show heavy corrosion.
A basement bath that “sort of” works is fine with bare concrete but quickly becomes a headache once you close up walls and install nice flooring.
Kitchen remodels near main stacks
Kitchen drains handle grease, food particles, and cleaning chemicals. If your main stack runs behind the kitchen wall, a clog there can show up in both the kitchen and nearby baths.
When remodeling a kitchen:
- Check for proper slope on horizontal kitchen drain runs.
- Clean the line thoroughly, since walls and cabinets will soon hide access.
- Consider adding a cleanout if there is not one already.
If you are laying hardwood or engineered wood across kitchen and dining spaces, any sink or dishwasher overflow reaches a larger area. Clear drains reduce that risk but so does proper dishwasher supply and drain installation.
Small powder rooms and half baths
People sometimes treat these as “simple” remodels: just a toilet and sink, easy. But a slow toilet in a small space can flood a big chunk of flooring quickly if it overflows and you are not home.
For half baths:
- Make sure the toilet has a strong, consistent flush.
- Snake the toilet drain if you suspect past clog issues.
- Check wax ring or seal when reinstalling after new floors.
If you float the floor higher without adjusting the flange height, you might create a weak seal that leaks slowly. Those slow leaks are the ones that rot subfloors under beautiful tile or wood.
What to do if your remodel is done and now the drains act up
Sometimes everything seems fine during the project, and the problems show up only after the dust settles. That happens more often than people admit.
Common triggers:
- Normal use resumes and more water flows through than during the remodel.
- Construction debris that snuck into pipes finally shifts and jams.
- New toilets or fixtures are more water saving and do not push solids as far.
If you notice new drain behavior after the remodel:
- Do not ignore small warning signs like a single gurgle or a faint smell.
- Document where and when you see problems.
- Call your plumber back while the project is still fresh in everyone’s mind.
Explain what changed. For example: you added a low flow toilet, moved a shower drain, or raised the floor. Many times the fix is straightforward, like adjusting venting or clearing one last construction related blockage.
Simple habits to keep drains and floors friendly long term
Once everything works and your floors look great, a few regular habits can keep it that way.
Kitchen and bath habits
- Wipe greasy pans with a paper towel before washing.
- Use hair catchers in shower and tub drains.
- Run hot water for a short time after washing greasy dishes.
These steps reduce buildup so you do not need frequent heavy cleanings.
Laundry and utility spaces
- Clean washer filters as the manufacturer suggests.
- Keep the area around floor drains clear, not buried under storage.
- Pour a bit of clean water into rarely used floor drains every couple of weeks.
That last step helps keep trap water seals intact so you do not get sewer smells that confuse you into thinking you have a bigger issue.
Seasonal checks that take minutes
Twice a year, maybe when you change clocks or filters, walk through and:
- Run water in every sink, tub, and shower.
- Flush every toilet while listening for odd sounds.
- Check around bases and along floor edges for soft spots or staining.
These small checks can catch a slow leak that stains grout or lifts planks long before you face big repair bills.
Common questions about drains and remodel ready floors
Q: My drains are only “a little slow.” Do I really need to worry before new flooring?
A: I think ignoring “a little slow” is one of the bigger mistakes. Slow drains usually mean buildup or partial blockage. Maybe they never get worse. But if they do, it will be when the line is pushed harder, like during a long shower or when several fixtures run at once. That is exactly when water can spread across a new floor. So while you do not need to panic, it is wise to at least clear visible debris and consider a deeper cleaning for key lines.
Q: Can I just rely on my new waterproof flooring instead of focusing so much on drains?
A: Waterproof claims are often a bit optimistic. Many floors resist surface water for a while, but water can still find its way into seams, underlayment, and wall bases. Once that happens, mold and swelling are real possibilities. It makes more sense to treat “waterproof” as a backstop, not the main plan. Good drains plus sensible flooring choices together give you more peace of mind.
Q: If I have to choose, should I spend money on better flooring or on drain cleaning and inspection?
A: This is where people sometimes disagree, but my view is that you should fix the plumbing first. You can always upgrade floors later. If you start with fancy floors over questionable drains, you risk paying twice. Once for the nice upgrade, and again to repair water damage and hidden plumbing issues. Clean, healthy drains under slightly simpler floors are usually the better long term bet.