So, you want to use statement encaustic tiles in a small bathroom without making the space feel cramped or chaotic.
You can absolutely do it, as long as you control color, pattern scale, and where you place the tiles.
You are working with two competing forces: you want impact, but you also have very limited square footage. Encaustic tiles are bold by nature. In a small bathroom, that boldness can either make the room feel stylish and intentional, or like the walls are closing in. The difference comes down to a few design decisions that you can map out before you buy a single tile.
Things you need to know:
- Pick one hero surface (floor or one wall), not every surface.
- Limit the color palette, especially background color and grout.
- Match pattern scale to the size of the room and fixtures.
- Plan tile layout before installation so focal areas land in the right place.
- Balance pattern with plain surfaces, simple fixtures, and clear glass.
- Think about maintenance, slip resistance, and sealer early, not late.
- Small bathrooms need good lighting to let patterned tiles breathe.
- Use mockups, samples, and tape on the floor before committing.
What encaustic statement tiles actually are
Encaustic tiles are patterned tiles where the design is created by different colored clays or cement through the tile, not just a printed layer on top. When people say “encaustic” today, they often mean cement tiles or porcelain tiles that mimic that look.
You see them on Pinterest: strong geometric patterns, often 8 x 8 inches, with a slightly soft, matte surface. They can turn a tiny, boring bathroom into something that feels like a boutique hotel.
But they are not neutral. They grab attention fast.
Patterned encaustic tiles are like putting a headline in your bathroom. You get one headline, not five.
So the way you use them matters more than the tile itself.
Step 1: Decide your “hero” surface
The first big decision is where the statement happens. In a small bathroom, you rarely want pattern on every surface.
You usually pick one of these:
- Floor only
- One feature wall (often behind the vanity or in the shower)
- Half-height wall band (like a wainscot) with simple tile above
- Shower floor only, with plain walls
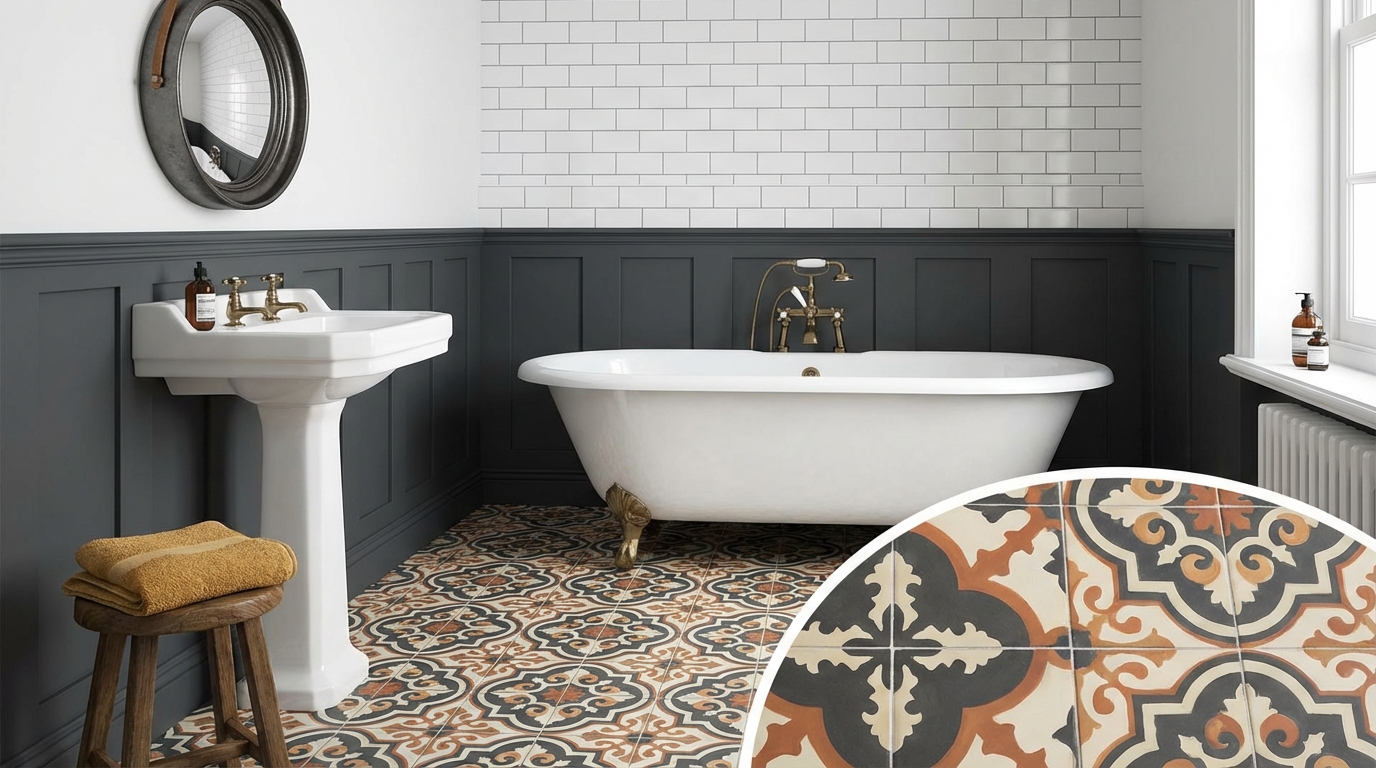
Option A: Encaustic floor, calm walls
This is the most forgiving layout for a small bathroom.
You keep all the impact at the lowest plane. Your eye drops to the floor, reads the pattern, then moves up to clean walls and a simple mirror. The room feels grounded, not busy.
Works well if:
- Your bathroom is narrow or has a low ceiling.
- You already have a busy vanity or visible storage.
- You want to keep future buyers in mind.
Example layout:
- 8 x 8 encaustic tiles on the entire floor.
- White or soft off-white subway tiles in the shower, straight or stacked pattern.
- Painted walls in a color pulled from the tile, but lighter.
If you are unsure where to start with encaustic tiles in a small space, put them on the floor and keep every other surface calm.
Option B: Feature wall, quiet floor
Sometimes a floor is chopped up by many fixtures, so you do not see enough pattern for impact. In that case, a single wall is a better candidate.
Popular choices:
- Wall behind a wall-hung vanity and mirror
- Back wall of a walk-in shower or bath niche
- Short wall you see first when you open the door
Keep the rest:
- Plain porcelain floor tile, neutral color
- Simple paint or basic tile on remaining walls
Since that wall is at eye level, you want to be extra careful with pattern scale and color contrast. Intense, high-contrast patterns can overwhelm very quickly on a vertical plane.
What to avoid
- Patterned floor + patterned shower walls + patterned vanity splashback.
- Tiny room with bold encaustic tile halfway up every wall.
- Dark, heavy encaustic tile covering every surface in a bathroom with one small window.
In a small bathroom, that much pattern can feel like the walls are closing in.
Step 2: Match pattern scale to your small bathroom
Pattern scale is one of the biggest reasons small bathrooms with encaustic tiles either work or fail.
How to think about scale
Look at:
- Tile size
- Size of the repeat (how often the design repeats)
- How busy the pattern feels when you squint
General guide:
| Bathroom type | Suggested tile size | Pattern feel |
|---|---|---|
| Very small powder room (under 20 sq ft floor) | 8 x 8 or 6 x 6 | Medium to large pattern, not tiny |
| Small full bath (20 to 45 sq ft floor) | 8 x 8 or 8 x 10 | Medium pattern, clear geometry |
| Long narrow bathroom | Rectangular or directional pattern | Pattern that runs lengthwise to stretch the room |
Very small, extremely intricate patterns can turn into visual noise in a small bathroom. Your eye cannot resolve the detail from typical viewing distance.
If you cannot see the full repeat when you stand in the doorway, the pattern is too small or too busy.
Use the doorway test
Stand where you enter the bathroom.
Ask:
- Can I see at least 2 to 4 whole tiles without interruption by a toilet or vanity?
- Can I clearly read the pattern from that point?
If the answer is no, you might need a larger pattern or a different layout.
Step 3: Control the color palette
This is where most small bathrooms go sideways with encaustic tiles.
You have:
- Tile colors
- Grout color
- Wall color
- Vanity and countertop
- Fixtures and metals
In a small room, every extra color is louder.
Stick to 2 or 3 main colors in the tile
For small spaces, look for tiles with:
- One background color
- One or two accent colors in the pattern
Examples that work well:
- Warm white background + charcoal + soft gray
- Light gray background + white + muted blue
- Off-white background + taupe + sage green
What gets tricky fast:
- Four or more strong colors in a single tile.
- Very dark backgrounds with high contrast white in a room with poor light.
Link tile color to walls and vanity
After you pick your tile, pull your other colors from it.
Practical approach:
- Use the lightest color in the tile for the wall paint.
- Use the second lightest for vanity or countertop if you are replacing them.
- Keep metals consistent (for example, all brushed nickel or all black).
Avoid picking wall colors in isolation. Bring a sample tile to the paint store. Set it next to large paint swatches under good light.
Think of the tile as the star and everything else as support. Support pieces should echo, not compete.
Grout color is more visible than you expect
In a small room, grout lines can either frame the pattern or fight it.
Guidelines:
- For encaustic floors: choose a grout close to the background color of the tile to avoid extra grid lines.
- For feature walls: go slightly darker than the lightest color in the tile so maintenance is easier.
Light grout on a floor in a small bathroom shows dirt and hair fast. A mid-tone gray often balances cleanliness and appearance.
Step 4: Plan the layout before anyone lays tile
Encaustic tiles often create a larger repeating pattern across several tiles. Layout matters a lot.
Center the pattern where your eye goes first
Common focal points:
- Floor area right in front of the vanity
- Floor you see from the hallway
- Back wall of shower
- Space around a freestanding tub
Talk to your installer about:
- Starting line: where the first full tile will sit.
- Cut tile placement: where the smallest cuts will end up.
- Centering: aligning pattern to the center of the room or a key fixture.
You rarely want a tiny sliver of cut tile right at the doorway or under a very visible edge of a shower screen.
Think about transitions
In small bathrooms, the door threshold and shower entry are close together.
Plan:
- How the encaustic floor meets the hallway flooring.
- How the shower floor meets the main bathroom floor if you use different tiles.
- What trim pieces (metal edging, bullnose) you need for clean edges.
This part is often missed in mood boards but shows up every day in real life.
Step 5: Balance pattern with fixtures and storage
You do not look at tile in isolation. You see it with the toilet, vanity, mirror, and all your stuff.
Keep fixtures simple
To let encaustic tiles stand out without visual overload, aim for:
- Clean-line vanity without ornate panels.
- Plain mirror or a simple framed mirror, not heavy carved styles.
- Basic glass shower screen instead of frosted or patterned glass.
If your vanity is already very busy (grainy wood, strong texture), be careful adding a loud tile under it. In a small room, that mix can feel restless.
Use storage to reduce visual clutter
Pattern + clutter is hard in a small bathroom.
Simple steps:
- Choose a vanity with closed storage instead of all open shelves.
- Use baskets or bins behind doors for small items.
- Limit how many product bottles sit out in the shower.
The more you can clear surfaces, the more space you give the tile pattern to breathe.
If the tile is busy and the countertop is busy and the shelves are crowded, the room does not feel small, it feels stressful.
Step 6: Think about maintenance and performance
Encaustic tiles are not just a look. They behave differently from standard porcelain.
Cement vs porcelain encaustic-look tiles
Here is a quick comparison for small bathrooms:
| Type | Pros | Cons |
|---|---|---|
| Cement encaustic tile | Rich color depth, authentic matte finish, unique look | Needs sealing, can stain, more porous, can be more slippery if very smooth |
| Porcelain encaustic-look tile | Lower maintenance, non porous, often more slip resistant, works well with underfloor heat | Pattern is printed, sometimes looks flatter or more uniform |
For a small bathroom that gets heavy daily use, many people choose porcelain with an encaustic pattern since you get the look with less maintenance.
Sealing and cleaning cement encaustic
If you go with real cement:
- Seal before grouting, so grout pigment does not stain the tile surface.
- Use a penetrating sealer suited for cement tiles, follow manufacturer guidance.
- Use pH-neutral cleaners, avoid harsh acids or bleach.
Ask your installer to test grout on a spare tile first.
Slip resistance
Bathrooms mix water and soap, and in a small room, the wet area is close to everything.
Check:
- Slip resistance rating for floor tiles, especially in the shower.
- Surface texture: a bit of grip is better than glassy smooth for floors.
You do not want a polished, slick encaustic on a bathroom floor. A matte or honed surface is better.
Step 7: Let lighting work for your tiles, not against them
Patterned tiles respond strongly to light.
Natural light
If your small bathroom has a window or skylight:
- Lighter tiles with soft contrast help bounce light around.
- Darker encaustic floors can add depth without turning the room into a cave, but pair them with light walls.
If there is no natural light, be more careful with dark, heavy patterns.
Artificial light
Small bathrooms often have:
- Overhead ceiling light
- Vanity light above or beside mirror
These lights can cast shadows that exaggerate or flatten pattern.
Tips:
- Use warm white or neutral white bulbs, not harsh blue light.
- Balance overhead and vanity lighting, so the tiles do not look dull at the back of the room.
- If you have a bold feature wall, make sure it gets some direct light.
Pattern needs light. The same encaustic tile can look rich and layered in good light, or flat and muddy in poor light.
Step 8: Use visual tricks to make your small bathroom feel larger
Encaustic tiles can actually help a small bathroom feel bigger if you use them with intention.
Stretch the room with direction
For rectangular bathrooms:
- Run a linear or directional pattern along the long axis of the room.
- Use border tiles or patterns that lead your eye toward the far wall.
Example: A repeating geometric pattern that visually flows front to back can make a narrow room feel longer.
Use mirrors and glass with patterned walls
If your feature wall is behind the vanity, a mirror will reflect part of that pattern.
This can:
- Double the visual area of the tile.
- Make the room feel less closed in, if the rest of the space is kept simple.
In showers, clear glass screens let you see the encaustic tile from the rest of the bathroom, which increases the sense of depth.
Frosted or framed glass breaks up that view and can reduce the impact of the pattern.
Step 9: Coordinate hardware and accessories
In a small bathroom, hardware color choices show up right on top of your tile decisions.
Metal finishes
Try to keep metals consistent:
- If tile has cool grays and blues: brushed nickel, chrome, or black works well.
- If tile has warm taupe, terracotta, or cream: brass, bronze, or black can work.
Pick 1 main finish. Black + brass + chrome in a tiny bathroom with patterned tile starts to look chaotic.
Textiles and accessories
Towels, bath mats, and shower curtains (if you use one) can help either calm or amplify pattern.
For statement encaustic tiles:
- Choose solid color towels that match one tile color.
- Use a simple, mostly solid bath mat. Avoid another pattern.
- If you must have a patterned curtain, keep it very subtle and tone-on-tone.
You want most patterns coming from the tile, not from soft goods that you might change every few months.
Step 10: Think about resale and longevity
Encaustic patterns can feel very linked to current trends, but they can also age well if chosen wisely.
Choose patterns with some staying power
Patterns that tend to hold up better over time in small spaces:
- Simple geometrics (squares, circles, diamonds)
- Soft Moroccan or Mediterranean styles in muted tones
- Classic star or cross patterns in two or three colors
Patterns that can date fast:
- Very novelty designs tied to a specific trend window.
- High-contrast black and white with very sharp edges in a room with poor lighting.
Again, small bathrooms give you less space to dilute a strong choice.
Where to be bold vs where to stay neutral
If you plan to sell in a few years, a good compromise is:
- Bold encaustic-look porcelain on the floor.
- Classic white or soft neutral tile in the shower.
- Simple white or wood vanity that a buyer could keep and style differently.
A future owner can change wall color and accessories around your tile without gutting the room.
Practical planning: from idea to install
This is where you take your inspiration board and turn it into a real bathroom plan.
1. Gather 3 to 5 tile candidates, not 20
Too many options makes decisions drag on.
Pick:
- 2 or 3 encaustic or encaustic-look patterns you really like.
- 2 plain field tiles that pair well with each pattern.
Get physical samples of each.
2. Create a simple mood board on the floor
On a clear space, lay out:
- Tile samples (patterned + plain)
- Paint swatch cards
- Vanity finish sample, if possible
- Metal finish sample (a handle or faucet if you have one)
Look at this under daylight and at night under your bathroom lighting.
Ask:
- Does one tile clearly work best with your actual lighting?
- Does anything clash right away?
3. Tape a tile “mock floor” in the bathroom
Cut cardboard or paper to the size of your tile and draw the pattern, or tape down a few real tiles if you have them.
Then:
- Stand at the doorway, at the vanity, and in the shower.
- Check where the pattern feels strongest and where it might get cut off by fixtures.
This gives you a feel for scale that photos cannot offer.
4. Talk to your installer early
Share:
- Your preferred hero surface (floor vs feature wall).
- How you want the pattern centered or aligned.
- What grout color you are leaning toward.
Ask:
- If they have installed that specific tile before.
- What they recommend for edge trims and transitions.
- Anything about your layout that might be tricky in a small space.
Sometimes a small shift in plumbing or door swing can give you a better tile layout.
Common mistakes to avoid with encaustic tiles in small bathrooms
A quick checklist to keep on hand.
- Picking the tile before you think about lighting and wall color.
- Choosing a pattern with five or six strong colors for a tiny space.
- Covering floor and all walls with heavy pattern.
- Ignoring grout color until the installer is on site.
- Skipping sealer on cement encaustic tiles.
- Using a very smooth surface tile on the floor in a wet area.
- Mixing many metal finishes next to a bold tile.
- Buying all fixtures and accessories before you see the tile samples in your actual bathroom light.
The tile carries so much visual weight in a small bathroom that every other choice should react to it, not the other way around.
A few style recipes you can copy
Sometimes it helps to see full combinations that work reliably in small bathrooms.
Recipe 1: Calm monochrome with pattern floor
- Floor: 8 x 8 encaustic-look porcelain, white background with medium gray geometric pattern.
- Walls: Soft white paint, eggshell finish.
- Shower: White 3 x 6 subway tile, stacked pattern, light gray grout.
- Vanity: Flat-front white vanity, simple quartz or solid surface top.
- Metals: Brushed nickel or chrome throughout.
- Textiles: Solid light gray towels, plain white or light gray bath mat.
Effect: The floor feels like a feature without shrinking the room.
Recipe 2: Warm patterned wall with neutral floor
- Feature wall: Behind vanity, cement-look encaustic tile with off-white background and soft terracotta + charcoal pattern.
- Floor: Light warm gray porcelain tile, large format so fewer grout lines.
- Other walls: Warm white paint.
- Vanity: Light wood tone, flat fronts.
- Metals: Brushed brass for faucets and pulls, kept consistent.
- Mirror: Simple frameless or thin brass frame.
Effect: Strong style point at the vanity, but floor and side walls keep the room from feeling tight.
Recipe 3: Tiny powder room with maximal floor
- Floor: High-contrast black, white, and gray encaustic tile with bold star pattern.
- Walls: White paint, maybe in a more scrubbable finish for durability.
- Vanity: Wall-hung small vanity in white or black with simple lines.
- Metals: Black for faucet, handle, and light fixture.
- Extras: No shower, so pattern is limited to floor, easy to handle.
Powder rooms give you more freedom, since they do not have a shower and you are not in them as long.
One last practical tip
Before you place a full order, live with a few sample tiles in the actual bathroom for at least a few days. Put them on the floor, prop them against the wall, walk past them in the morning and at night. Your first reaction on day three is usually more honest than your first reaction on day one.