So, you are trying to figure out if painting your old hardwood floors is a bold DIY you can actually pull off without ruining them. Yes, you can paint hardwood floors, and if you plan well and prep correctly, it can look intentional, fresh, and surprisingly high-end.
You are basically trading some of the traditional “hardwood character” for a cleaner, graphic look that hides damage, plays well with modern furniture, and lets you delay a full refinish or replacement. The catch is that painted floors are only as good as the prep, and they need the right products and expectations.
- Painted floors work best on damaged, uneven, or mismatched hardwood you do not plan to refinish to a clear wood tone.
- Prep is everything: cleaning, sanding, patching, priming, and curing time matter more than brush skill.
- Use floor-rated products (porch & floor enamel or similar), not wall paint.
- Expect wear in high-traffic areas and plan for touch-ups every few years.
- Patterns (stripes, checkerboard, borders) can hide flaws better than one flat color.
- Once painted, going back to natural wood later is possible but labor-heavy.
- Painting can support resale value in some styles, but it can hurt it for buyers who love traditional hardwood.
Painting a floor is not like painting a wall. You walk on every mistake, every shortcut, every day.
Why painted hardwood floors are even worth talking about
You are looking at your old floors and thinking: do I live with the scratches, the orangey stain, and that one dark patched area, or do I pay thousands to refinish everything?
That gap is where painted floors make sense.
When painting hardwood floors actually makes sense
Painted floors are not a fit for every house or every room. Here are scenarios where they really work:
- The wood is too far gone to look good stained
Deep pet stains, burn marks, water stains, or past patchwork can still show through stain, even after sanding. Paint hides that. - You have multiple wood species or board widths
Old homes often have oak in one room, pine in another, patches of plywood in closets. Paint unifies that. - You want a big design change without big money
A white or charcoal painted floor can flip the mood of a room faster than almost anything else, short of replacing the floor. - The floor is already thin from past sandings
If a pro tells you the floor cannot handle another full sand, paint is one way to refresh without removing more material. - You like a more relaxed, lived-in visual
Painted floors get chips and scuffs. Some people love that. It reads as casual, coastal, or studio-like.
When you should not paint your hardwood
There are times when paint is not a good choice:
- The house is historic, and the original floors are a selling feature.
- You already know you want to sell soon and your buyers tend to love traditional finishes.
- The floor moves a lot (wide gaps, major cupping) and you live in a place with big humidity swings.
- You want a totally maintenance-free floor that always looks new.
Once you paint, you are making a statement. Buyers either love it or discount the price in their head.
Painted hardwood vs refinishing vs replacement
It helps to see this as one option in a group of three: refinish, paint, or replace.
| Option | Average Cost (per sq ft) | DIY-Friendly | Look | Long-term Flexibility |
|---|---|---|---|---|
| Refinish (sand + stain + clear coat) | $3 to $8 (pro) | Medium / Hard | Natural wood grain | Can change stain later |
| Paint hardwood | $1 to $4 (DIY) | Medium | Solid color or pattern | Can go back to wood, but with effort |
| Replace with new flooring | $5 to $15+ | Hard | Anything you want | Depends on product |
If your budget is tight, painting usually gives the most visual impact per dollar, especially if you are willing to do the work yourself.
Choosing the right rooms for painted floors
Not every room sees the same abuse. That changes how well paint holds up.
Rooms that tend to work well
- Bedrooms
Lower traffic, often softer footwear, less grit. Painted floors last longer here. - Home offices / studios
You get that creative, loft look. Rolling chairs can mark the finish, so chair pads help. - Attics, sunrooms, enclosed porches
Often you are dealing with mismatched, old boards already. Paint makes them look intentional. - Low-traffic hallways or sitting rooms
Spaces where people pass through in socks, not boots.
Rooms that are more risky
- Kitchens
Great visual payoff, but you get dropped knives, hot pans, constant crumbs, and water. Expect frequent touch-ups. - Entryways and mudrooms
Salt, sand, and wet shoes shorten the life of any floor finish. - Bathrooms
Humidity swings, standing water around tubs, and product spills can cause peeling faster.
If you want to paint a high-traffic area, plan for more durable products and more maintenance, not perfection.
Think of painted floors like a good pair of white sneakers. They can look great, but they do not stay perfect without effort.
What kind of paint and primer you actually need
This part trips people up. Wall paint on a floor will fail. Sometimes fast.
Primer for hardwood floors
You want a bonding primer that grips both wood and old finishes.
- Type: High-adhesion, stain-blocking primer. Many pros like oil-based or shellac-based for serious stain blocking, but strong water-based bonding primers have improved a lot.
- Why it matters: It helps paint stick, reduces tannin bleed-through, and gives a uniform base, especially over different wood tones or old stain.
Paint for hardwood floors
Look on the can for something like “porch & floor enamel” or “floor enamel.”
- Sheen: Satin or low sheen hides scratches better than gloss. Gloss can be slippery and shows every mark.
- Base: Water-based is easier for DIY: lower odor, faster dry, easier cleanup. Oil-based can be tougher, but smells stronger and often has more restrictions now.
- Color: Mid-tones hide dust better than pure white or very dark shades. Bright white floors look great in photos, but they show dirt fast.
Topcoat or no topcoat?
Some floor enamels are made to be the final layer. Others can be topcoated with a clear polyurethane.
- Without topcoat: Easier to touch up since you can spot-paint.
- With topcoat: More protection, especially in kitchens or entries, but touch-ups may require repainting and recoating an area.
If the product label says “no topcoat needed,” follow that. Do not mix systems randomly.
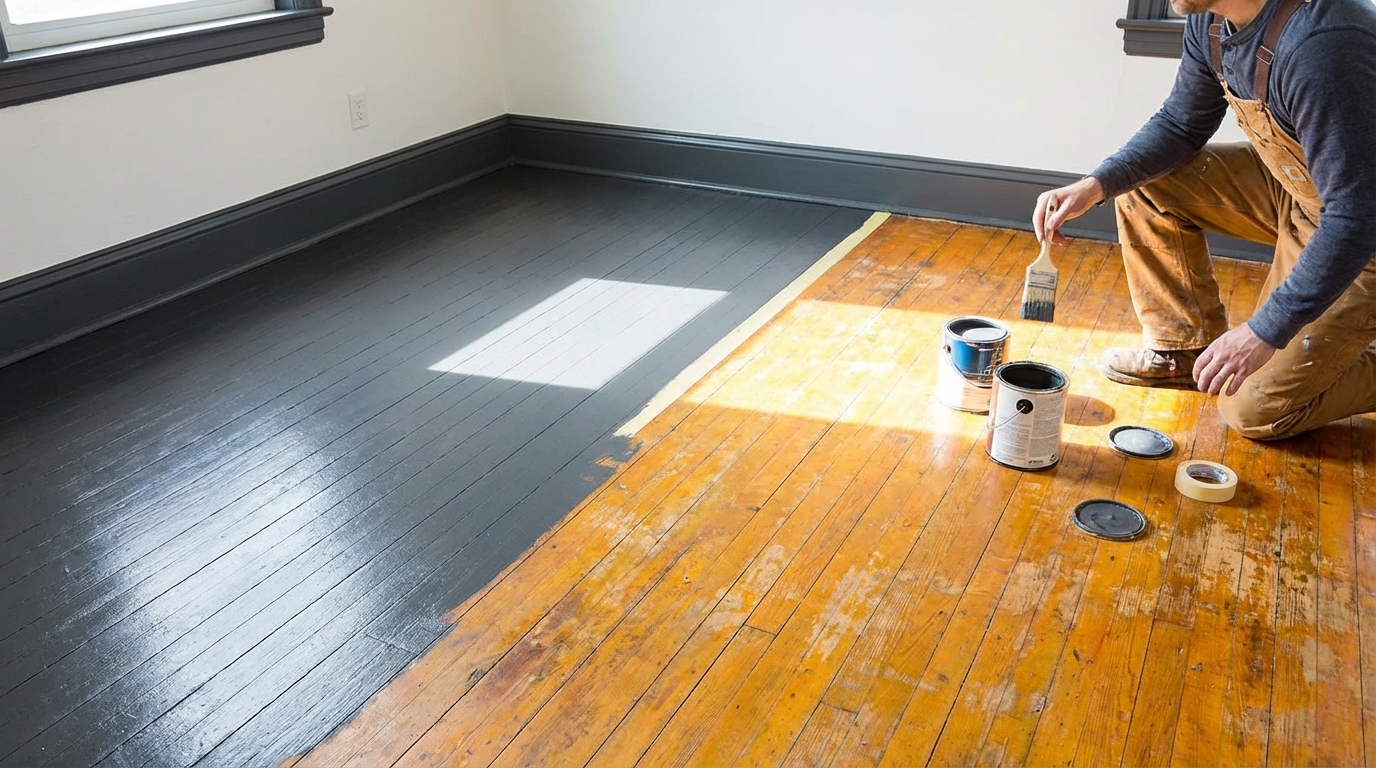
How to prep old hardwood for paint (step by step)
This is where the project is won or lost. The actual painting is simple. Prep takes the time.
Step 1: Clear the room completely
Remove everything: furniture, rugs, floor vents if possible, and base shoe molding if you want a cleaner line.
- Take off doors if they swing into the room and will get in your way.
- Cover built-ins and openings with plastic to control dust.
Step 2: Deep clean the floor
You want to remove wax, grease, and dirt so the primer can bond.
- Vacuum thoroughly, including along baseboards and between boards.
- Mop with a degreasing cleaner compatible with hardwood. Avoid products that leave a residue.
- If there is old wax, you might need a wax remover or mineral spirits and lots of rags.
Let the floor dry fully before moving on.
Step 3: Light sanding (or heavier sanding if needed)
You are not always doing a full sand-down to bare wood. Often, you are just scuffing the surface.
- Light scuff sand: Use a pole sander with 120-150 grit, or a rented floor buffer with a sanding screen.
- Heavier sand: If there is a thick, glossy finish or peeling varnish, you might need a drum sander or a random orbit floor sander. This is louder and dustier but gives better results.
You are giving the primer something to grab, not trying to make it flawless like a full refinishing job.
After sanding, vacuum again carefully and tack cloth or damp-mop to remove all dust.
Step 4: Fix gaps, holes, and damaged boards
Look around with a bright light.
- Fill nail holes and small gaps with wood filler that can be sanded and painted.
- Replace or screw down any loose boards that squeak badly.
- Sand patched spots smooth after they dry so they do not telegraph through the paint.
If there are wide seasonal gaps between boards, paint will crack along those lines over time. That can be part of the look.
Step 5: Mask edges and plan your “exit path”
Use painter’s tape along baseboards if you are not removing trim. Think about how you will paint and still get out of the room without stepping on wet paint.
Walk through the job in your head from the doorway inward before you open any can of primer.
Priming and painting: the actual process
Once prep is complete, the painting part goes faster than you would expect. The main mistake here is rushing cure times.
Step 6: Prime the floor
Stir the primer well. Do not shake the can; that adds bubbles.
- Cut in the edges with a brush, working in small sections.
- Use a 3/8″ or 1/2″ nap roller for the field of the floor.
- Roll with the grain of the boards for a cleaner look.
Let primer dry as long as the label recommends. If the wood is very stained or the old color is strong, you might need a second coat of primer.
Step 7: Sand lightly between coats
Once the primer is dry, very lightly sand with a fine sanding pad or 220 grit paper to knock down any raised grain or debris. Vacuum again.
Step 8: First coat of floor paint
Stir the paint thoroughly.
- Start by cutting in edges and corners with a brush.
- Roll the paint in long, even strokes, keeping a “wet edge” so you do not get lap marks.
- Do not overwork it. If you keep going back with the roller, you can create ridges.
Let this coat dry for the time listed on the can. Longer is usually safer, especially in humid conditions.
Step 9: Second coat (and maybe a third)
Most floors need at least two coats. Light colors over dark stain may need three.
- Do another light scuff sand.
- Vacuum and tack cloth.
- Apply the second coat the same way.
If coverage is still uneven, do not panic. A third coat fixes most of that.
Step 10: Curing time
This is the part many homeowners ignore. Paint can be “dry to the touch” in a few hours but still soft inside.
- Try to wait at least 24-48 hours before light use with socks.
- Hold off on placing furniture for 3-7 days, depending on product and conditions.
- Do not drag furniture; lift it, and use felt pads from day one.
Some paints take up to 30 days to fully harden. During that time, be gentle. No area rugs for the first couple of weeks so the finish can breathe.
Patterns and designs: going beyond a solid color
This is where painted floors can look more custom and less like a quick cover-up.
Simple solid color
A single color from wall to wall is the easiest and still has impact.
- Excellent for small rooms; it stretches the space visually.
- Go with something that works with your trim, doors, and furniture long term.
Checkerboard floors
Classic, especially in kitchens, entries, or dining rooms.
- Use two contrasting colors (for example, warm white and soft gray).
- Snap chalk lines to lay out 18″ or 24″ squares, then tape along the lines.
- Paint one color first over the whole floor. Then tape and paint the second color.
You can also rotate the squares 45 degrees for a diamond pattern.
Stripes or borders
These can draw the eye and hide irregularities.
- Wide stripes can make a room look bigger.
- A painted border around the room with a “rug” of a different color in the center can frame seating nicely.
Stencils
If you want pattern but not a full checkerboard, stencils give a tiled look without grout.
- Paint the base color and let it cure.
- Use a stencil and a dense foam roller or stencil brush with a small amount of paint.
- Align carefully so the pattern repeats cleanly.
Patterns also help hide future small chips and scuffs since there is already visual movement.
Painted floors that look expensive usually have either perfect simplicity or a very clear pattern. The “almost” designs tend to feel messy.
How long painted floors last in real life
Longevity can vary a lot. The range is usually 3 to 10 years before you think about a full refresh, but that depends on usage and product.
What affects durability
- Traffic level: More feet, pets, kids, and dragged chairs shorten lifespan.
- Surface grit: Sand and dirt act like sandpaper on finish.
- Sunlight: Some colors fade or yellow under UV.
- Moisture: Repeated wet-mopping or leaks can cause peeling.
- Number of coats and cure time: Thicker, fully cured films hold up longer.
You also have the floor movement factor. Old hardwood expands and contracts. Over time, you can see fine hairline cracks in paint along board edges. Many people accept that as part of the look.
Maintenance to keep them looking good
Painted floors are not set-and-forget. But the maintenance is simple.
- Sweep or vacuum often with a soft-brush attachment.
- Spot clean spills quickly with a damp cloth and mild cleaner.
- Use felt pads on furniture legs; skip metal caps that can scratch through paint.
- Place washable rugs at entries and under chairs that slide a lot.
For small chips, you can touch up by dabbing matching paint with a small artist brush and feathering the edges.
Resale, regret, and reversing course
This is where your question about “bold” really sits. What will you think in three or five years?
How buyers tend to react
Reactions vary by market and style.
- In modern, cottage, or coastal-style homes, painted floors can feel intentional and on-brand.
- In houses where original wood is a key feature, painted floors can read as “damage” to some buyers.
If you are in a neighborhood where buyers pay a premium for original hardwood, talk with a local agent first. Ask direct questions, not “What do you think?” but “Would this lower offers by 5 to 10 percent in our area?”
Can you go back to natural wood later?
Yes, but it is not fun.
- You will need a full sanding down to bare wood. Paint gums up sandpaper more than clear finish.
- Deep color pigments can settle into grain and may require extra passes.
- Very thin floors might not have enough depth left to sand that far.
So you should treat painted floors as a serious commitment. Not totally permanent, but not something you reverse casually.
Common mistakes to avoid
If you read one section twice, read this one.
Skipping or rushing prep
This is the big one.
- Painting over wax, oil, or greasy buildup leads to peeling.
- Painting over glossy finish without sanding causes poor adhesion.
If you see peeling or lifting in test spots, stop and fix the substrate rather than adding more paint.
Choosing the wrong product
Using interior wall paint because it is on hand seems cheap, but it will not hold up to foot traffic.
Stick with products labeled for floors or porches. They have harder resins and better abrasion resistance.
Ignoring climate and humidity
Painting when your space is too cold or too humid slows cure time. That leads to prints, marks, and early wear.
Putting furniture back too soon
A heavy couch on semi-cured paint can stick, then rip off a chunk when you move it. Same with rubber-backed rugs, which can bond to fresh paint.
Real-world examples and ideas to steal
Looking at real projects helps you decide what fits your home.
Example 1: Small bedroom with damaged pine boards
An older home with wide pine boards had dark pet stains near the door and random patches from past repairs. Sanding to natural did not fully hide the black marks.
The owner:
- Filled gaps and knots.
- Used a shellac-based primer to block stains.
- Painted the floor a soft warm white in satin.
The walls stayed a neutral tone, furniture was simple, and the painted floor made the room feel larger and brighter. Wear from the bed and nightstands has been minor over a few years, mainly small marks that blend into the light color.
Example 2: Checkerboard kitchen over old oak
The kitchen had oak floors with a dated orange stain and heavy scratches from old appliances. Full refinishing would have required moving cabinets and counters.
Instead, they:
- Degreased heavily around the stove and sink.
- Did a serious scuff sand with a floor buffer.
- Primed and painted a base coat of light gray.
- Taped off and painted larger squares of deeper gray for a checkerboard.
In photos, the room looks intentional, almost like a European country kitchen. In real life, they do touch up certain tiles every year in front of the sink where most wear happens.
Example 3: Home office with nearly white floors
A dark home office with one small window was updated by painting the floors almost white and the walls a muted green.
Details:
- Used a water-based porch and floor enamel in off-white.
- Added area rugs under the desk and main chair zone.
The floor shows more dust than a darker color would, but the trade-off in brightness and focus is worth it for the owner.
When you pick a color, think less about “Is this trending?” and more about “Can I live with this for five years of daily cleaning?”
Tech gear that can help with the project
Since your site is about technology, let us tie this back to tools that make the job smoother. You can borrow ideas here if you create content or product roundups.
Moisture meters
A simple wood moisture meter lets you check if the floor is too damp to paint. High moisture levels lead to poor adhesion and more movement.
Laser lines and digital measuring tools
If you are doing checkerboard or stripes, a laser line tool helps keep everything straight without endless chalk line adjustments. Digital laser distance meters help you map out pattern repeats exactly.
HEPA vacuums and dust extractors
Connecting sanders or buffers to a HEPA vacuum cuts dust dramatically. That is not just comfort; it also keeps your primer and paint cleaner.
Painting apps and AR tools
Some paint brands have apps that let you “see” floor colors in your room through your phone. They are not perfect, but they help avoid picking a color that clashes with trim, cabinets, or furniture.
How to test before you commit
If you still feel unsure, run a small experiment.
Test patch method
- Pick a closet or a hidden corner of the room.
- Do full prep on just that section: clean, sand, prime, and apply your chosen paint.
- Live with it for a few weeks: walk on it, scuff it, move a chair across it.
You will learn:
- How the color looks in morning and evening light.
- How fast it cures in your exact space.
- How it feels under bare feet or socks.
If you hate it, sanding a tiny area back is easy. If you like it, you already worked through the steps once and can scale up with more confidence.
Practical planning: time, budget, and energy
At this point, you know the basic process. Before you start, plan the project like a mini campaign.
Time estimate for a typical room
For a 10′ x 12′ bedroom:
- Day 1: Move furniture, clean, light sand, patch, and prime.
- Day 2: First coat of paint.
- Day 3: Second coat.
- Day 4-5: Light use, no furniture; then bring furniture back carefully.
You can compress or stretch that schedule, but the key is leaving enough drying and curing time between steps.
Basic budget breakdown
Approximate DIY costs:
- Primer: $30-$50 per gallon.
- Floor paint: $40-$80 per gallon.
- Rollers, brushes, trays, tape, sanding screens: $40-$100.
- Floor buffer or sander rental (if needed): $50-$80 per day.
For one typical room, you might spend in the range of $150-$300 depending on tools you already own.
Energy and skill level
Physically, this is more about patience and repeated motions than finesse.
You need to be comfortable:
- Working on your knees and standing for long periods.
- Following product directions on dry and cure times.
- Living without that room for a few days.
If you like projects with clear steps and visible payoff, painting floors fits well.
Treat the project as a series of checkpoints: clean, sand, prime, paint, cure. Finish one fully before you rush into the next.
One last practical tip before you start taping
Buy an extra quart of your floor paint and label it with the room name and date. Store it in a cool, dry place. Touch-ups in one or two years will be much easier, and you will not waste time trying to color-match a custom shade that has already aged on your floor.