So, you are trying to improve curb appeal with exterior tiling and porch renovations, and you want to know what actually works and what is a waste of money.
The direct answer: focus on durable outdoor tile, a solid subfloor, simple lines, and better lighting, and you will bump your home’s value and how it feels every time you walk up to the door.
You are not just fixing a porch. You are redesigning the first five seconds of every visitor’s experience. That first look at your entry influences how buyers judge the rest of the home and how you feel about coming back after a long day. Done with the right materials and layout, exterior tiling and a porch upgrade can give you a cleaner, safer, lower‑maintenance entrance that pays you back when you sell.
Things you need to know:
- Your tile choice has to match your climate, not just your color palette.
- Subfloor prep and waterproofing matter more than the tile brand.
- Porch steps, railings, and lighting are as important as the tile itself.
- Small layout mistakes at the door threshold can cause water damage.
- Most buyers judge the porch as a signal of how well the whole home is cared for.
- Invest more in structure and safety than in decorative patterns.
- Keep cleaning and maintenance in mind from day one.
Why curb appeal starts at your porch, not your driveway
A lot of homeowners spend on landscaping, paint the garage door, maybe update the mailbox. Then they leave a cracked concrete porch with loose tiles and a rusty railing.
That is a mismatch.
When people walk up to your door, their eyes move in a predictable way:
- First, the big shapes: roofline, porch structure, steps.
- Then the textures under their feet: tile, concrete, wood.
- Then the details: door hardware, house numbers, planters, lights.
If the tile feels uneven, or there is water pooling near the door, they do not consciously say “this porch is failing.” They think: “What else did they skip inside?”
> Think about your porch as the cover of a book. You do not need fancy art. You need clean, clear, and solid.
From a numbers angle, exterior projects tend to hold value pretty well. Data from sources like Remodeling Magazine’s Cost vs. Value reports show that entry and exterior upgrades often recoup 60 to 80 percent of their cost at resale, with front entry projects usually near the high end. You also gain perceived value, which tends to move asking prices and days on market more than a new water heater will.
Step 1: Decide the role of your porch
Before you choose a single tile sample, you need clarity on what you want the porch to do for you.
Ask yourself:
- Is this a small stoop that just needs to look clean and safe?
- Or is it a sitting porch where people will spend time?
- Do you get a lot of rain, snow, or dust where you live?
- Is the porch fully covered, partly covered, or completely exposed?
- How much direct sun hits the tile during the day?
- Do you have kids, pets, or older family members using these steps?
Those answers push you toward certain tile types, colors, and slip resistance.
For example:
| Porch type | Exposure | Better tile choice | Key priorities |
|---|---|---|---|
| Small entry stoop | Mostly covered | Porcelain tile with textured finish | Slip resistance, simple layout, easy cleaning |
| Large sitting porch | Partly covered | Porcelain or dense natural stone (like granite) | Durability, UV resistance, consistent look across larger area |
| Steps only | Exposed | High-grip porcelain, concrete tile, or stone treads | Safety on wet days, visible stair edges, strong nosing |
> A porch is not just a slab with tiles. It is a small outdoor room, even if you only stand there 30 seconds at a time.
Once you think of it that way, choices around color, tile size, and railings make more sense.
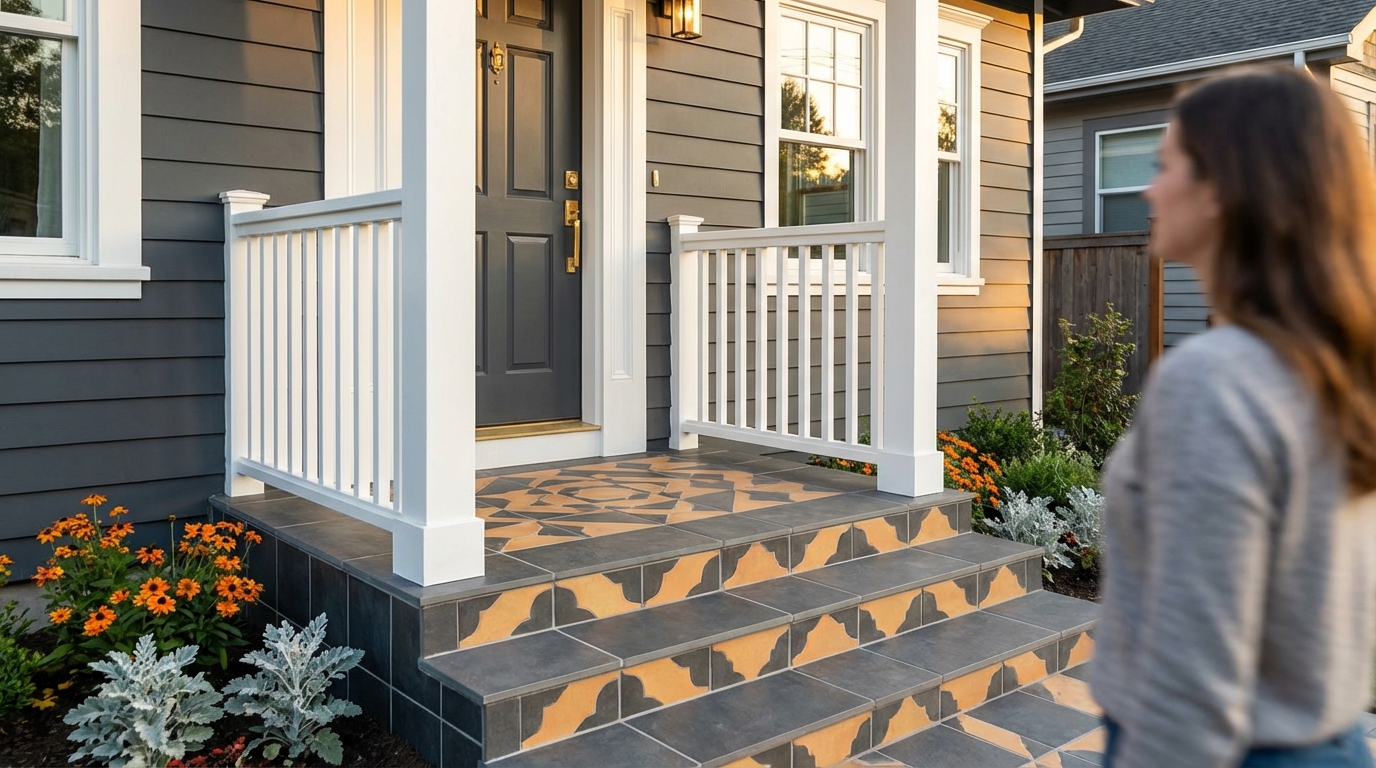
Step 2: Choose the right exterior tile
Porcelain vs ceramic vs stone outside
For exterior use, porcelain tile usually wins.
Here is why:
- Porcelain tile has very low water absorption. That means fewer freeze/thaw cracks and better long‑term performance outdoors.
- Ceramic tile can be fine if it is rated for exterior use, but many ceramic tiles soak up water and chip faster when exposed.
- Natural stone can look great, yet some stones stain, fade, or spall if you do not seal them on a regular schedule.
A simple way to narrow choices:
| Material | Pros | Cons | Good for |
|---|---|---|---|
| Porcelain | Strong, low water absorption, many styles, lower maintenance | Harder to cut, needs proper mortar and substrate | Most exterior porches and steps |
| Exterior-rated ceramic | Often cheaper, lighter weight | Not all options handle harsh winters or heavy use | Mild climates, covered porches |
| Natural stone (granite, slate, etc.) | Real texture, distinct character | Needs sealing, some stones are slippery or soft | High‑end projects, covered porches, warmer climates |
If you live in a place with freezing winters, check the tile spec sheet for:
- Water absorption rating (look for very low percentage).
- Frost resistance or freeze/thaw cycle rating.
- Slip resistance rating (often given as a coefficient of friction or R‑rating).
Slip resistance is not optional
Many people fall in love with a polished tile sample inside a showroom. Then they install it outdoors and regret that choice the first rainy day.
You want a tile surface with texture.
Look for:
- Textured finish tiles labeled for exterior or pool deck use.
- Matte or grip finishes, not glossy.
- Patterns that do not hide puddles completely, so you can see water.
> A good test: take a sample home, wet it, step on it with a shoe, then with bare feet. If you hesitate, do not buy it.
Color and pattern choices that help curb appeal
You are designing the path to your front door, so your tile should support the house, not fight with it.
Here is a simple way to think about color:
- If your house exterior is busy (brick with strong pattern, heavy trim), go with simple, solid or subtle pattern tiles.
- If your house is plain (simple siding, single color), you can add interest with a soft pattern, like stone‑look porcelain.
- Pick a tile color that sits between your wall color and roof color in terms of light/dark, so the eye reads it as part of the whole.
For pattern:
- Large format tiles (like 24×24) can make a small porch feel wider, but you need a very flat base.
- Smaller tiles or patterns, like 12×24, handle slopes and edges better.
- Busy patterns near the door can make steps harder to see, so use restraint.
Step 3: Get the base and structure right
The porch substructure is the part buyers do not see, yet it shapes how the porch holds up over years.
Common base types:
- Concrete slab porch or stoop.
- Masonry or block with concrete top.
- Framed wood porch with a cement board or mud bed on top.
The rules are similar across them:
- Tile demands a solid, stable, crack‑controlled surface.
- Water must be able to drain away from the house.
- Freeze/thaw movement has to be managed.
Slope and drainage
Water is serious here. You want:
- A slight slope away from the door, usually around 1/8 to 1/4 inch per foot.
- No low spots where water can sit under or on top of tiles.
- Drip edges at the outside perimeter so water leaves the porch, not your walls.
> Porches often fail first right at the door threshold. If water tilts toward the house, you are inviting leaks.
If you have a covered porch with columns, you also want to plan how water moves around the columns and rail posts. Leaving gaps or weep paths near those elements can prevent water from getting trapped.
Crack control and uncoupling
Exterior concrete moves with temperature. If you bond tile straight to a slab that has existing cracks, those cracks can show up in your tile.
Solutions many tile pros use:
- Uncoupling membranes between slab and tile.
- Expansion joints where the porch meets the house and at regular intervals on large surfaces.
- Flexible sealant in those joints instead of rigid grout.
If the porch is small, you might not need many joints, but you do want some separation where tile meets the house wall.
Waterproofing layers
On a slab sitting on grade, you focus mostly on shedding surface water away from the house. On a raised porch over living space or a finished area, you need a full waterproofing assembly.
That usually looks like:
- Sloped base (mud bed or sloped deck).
- Waterproof membrane over the entire area.
- Tile on top with grout and careful edge detailing.
- Flashing at all transitions to walls and posts.
If you are not sure what is under your porch, have a contractor open a small area and check. It is cheaper to correct a slope or membrane issue now than to chase leaks later.
Step 4: Design the steps for safety and style
Steps are where most porch accidents happen. You can make them safer and better looking at the same time.
Riser heights and tread depth
You want consistent riser heights. Small differences, like 1/4 inch, can trip someone because their body expects a rhythm.
Common dimensions:
- Riser height: around 7 to 7.75 inches.
- Tread depth: around 10 to 11 inches.
If tile adds height to the porch, you might need to adjust framing or slab at the bottom step so the top and bottom risers stay consistent.
Nosings and visibility
The nose of each step should be clear and not slippery.
Ideas that work:
- Use a tile with built‑in bullnose for the ledge.
- Add a contrasting strip of tile or a nosing piece at the edge.
- Keep grout joints at edges tight and even.
> A simple color difference on the stair edge can prevent a fall much better than an extra coat of sealant ever will.
You can also pair tiled steps with metal or composite nosing for higher wear and better grip.
Step 5: Railings, posts, and trim
Your tile can look great but the whole porch still feels tired if the railings and posts are old or mismatched.
Think in layers:
- Structure layer: posts, beam, joists, concrete or masonry.
- Finish layer: tile, trim boards, skirting, stair stringers.
- Safety layer: railings, handrails, lighting.
Choosing railing styles
Railing style should match your home’s architecture and your tile.
Some simple matches:
| House style | Good railing type | Tile pairing |
|---|---|---|
| Traditional / colonial | Simple wood or composite balusters, square posts | Neutral porcelain in stone look, subtle pattern |
| Modern / contemporary | Horizontal metal, cable, or glass panels | Large format porcelain, concrete look |
| Bungalow / craftsman | Chunky posts, simple rail with fewer, thicker pickets | Warmer stone‑look porcelain, smaller tiles on steps |
Material choices:
- Wood needs periodic painting or staining.
- Metal (powder‑coated steel or aluminum) resists weather better.
- Composite resists rot but can feel bulky if overused.
Where railings connect to tiled surfaces
Plan connection points before tile goes down.
Options:
- Mount posts to the structure below, then tile around them with flashing sleeves.
- Use surface‑mount post bases designed for tile, sealed around their base.
- Avoid drilling random holes through finished tile without sealing properly.
Water loves post bases. If those bases sit directly through tile into wood without sealing, you will get rot.
Step 6: Lighting your porch and steps
Lighting can change the entire feel of your porch at night and improve safety.
Layer your lighting:
- Ambient: a ceiling light or wall sconce near the door.
- Task: lights at the lockset or keypad, mail slot, or doorbell.
- Guidance: small step lights or side lights along the path to the door.
> Buyers remember homes where they felt safe walking up in the evening. Your lighting is a big part of that memory.
Practical tips:
- Use warm color temperature bulbs around 2700K to 3000K for a welcoming feel.
- Pick fixtures scaled to the door width; many people choose fixtures that are too small.
- Consider motion sensors or dusk‑to‑dawn settings so lights actually stay on when needed.
If you are running new wiring during a porch renovation, think about adding:
- An outlet for seasonal lights or a pressure washer.
- Low‑voltage wiring for step lights embedded into risers or side walls.
Step 7: Porch layout and tile pattern planning
Tile layout has more impact on perceived quality than most people expect.
Key layout rules:
- Center tiles where your eye goes first: usually the line from the sidewalk to the front door.
- Avoid tiny slivers of tile at edges and around posts.
- Align grout joints with door thresholds and step edges when possible.
Grid, brick, or diagonal patterns
Common patterns:
- Straight grid: simple, clean, easier to install. Works well for modern or minimal homes.
- Brick / running bond: hides slight size variations and looks natural with rectangular tiles.
- Diagonal: can make small areas feel wider but creates more cuts and waste.
On steps and small landings, simpler is usually better. Complex patterns can make edges hard to read.
> Do a dry layout with a few tiles on the actual porch before committing. What looks good on paper may feel crowded at the threshold.
Door thresholds and transitions
Where tile meets your front door is a high‑stress area.
You want:
- A clear break between exterior tile and interior flooring with a threshold piece.
- Enough height difference to keep water out but not so high that it becomes a trip edge.
- Flashing and sealant under the threshold to block wind‑driven rain.
If you are planning to change both door and porch, coordinate door installation height and tile thickness early.
Step 8: Weather, climate, and regional choices
Your climate shapes almost every porch decision.
Cold and freeze/thaw regions
Priorities:
- Frost‑resistant porcelain tile only.
- Good slope and drainage away from doors and walls.
- De‑icing methods that do not destroy your grout or tile.
Try to avoid:
- Using salt constantly on natural stone or some grouts.
- Leaving snow piled up right at the door threshold.
- Tiles with deep grooves that collect water and freeze.
Sealers can help some stones, yet they do not solve structural slope issues.
Hot, sunny climates
Here, sun and heat matter:
- Choose lighter tile colors to reduce heat under bare feet.
- Look for UV‑stable colors, especially on some stones and grout.
- Allow for some movement joints because surfaces can expand.
Porches in hot climates often become sitting spaces. In that case, think about fan placement, shade, and how your tile color feels when you are barefoot.
Rainy or coastal zones
Moisture is constant, so you focus on:
- Strong slip resistance, even with algae or fine sand on the surface.
- Corrosion‑resistant fasteners and railings.
- Sealed edges at siding to prevent wind‑driven rain intrusion.
> If you are near the coast, every fastener and bracket should be chosen as if it will see salt spray, because many do over time.
Step 9: Budgeting and where to spend vs save
Exterior tiling and porch renovations can range from a few hundred dollars for a small refresh to tens of thousands for a full rebuild.
Think about your budget in buckets:
- Structure and waterproofing.
- Tile and setting materials.
- Railings, posts, and trim.
- Lighting and electrical.
- Decor: furniture, planters, mats.
Where to spend more
- Tile rated for exterior use; do not downgrade there.
- Waterproofing and membranes on raised porches or over living space.
- Quality thin‑set mortar and grout designed for outdoor conditions.
- Proper railings and non‑slip stair nosings.
Where you can save
- Tile pattern simplicity (straight lay uses less labor than complex patterns).
- Standard sized tiles instead of custom cuts or mosaics.
- Painting existing posts and trim instead of replacing all of them.
- Simple, clean light fixtures instead of designer pieces.
> Buyers see clean lines and sturdy materials much more than they see the difference between a $6 tile and a $12 tile.
Step 10: DIY vs hiring a pro
Tiling a small, flat, concrete stoop is one kind of project. Rebuilding a sagging porch and adding new steps and railings is a very different level of work.
Ask yourself:
- Are there existing cracks or structural issues in the porch?
- Will this work change the porch footprint or structure?
- Do you need permits for railings, steps, or structural changes?
- Are you comfortable handling slope, waterproofing, and layout?
DIY might be reasonable if:
- The porch is small and structurally sound.
- You are only upgrading tile and maybe the railing.
- You are willing to follow manufacturer instructions on preparation and mortars closely.
Hiring a contractor is smart if:
- The porch has visible movement, rot, or major cracks.
- You are adding roofs, columns, or enlarging the structure.
- You live in a climate that punishes outdoor tile and want a warranty.
You can also mix it:
- Hire a pro for structure, slope, and waterproofing.
- Install the tile and finish work yourself once the base is ready.
Step 11: Maintenance and long‑term care
Once your new exterior tile and porch are in place, the way you care for them will shape how long they look good.
Routine tasks:
- Sweep or blow off gravel, sand, and leaves that can scratch or stain.
- Wash with mild detergent and water now and then; avoid harsh acids unless approved.
- Inspect grout lines and expansion joints once or twice a year.
If you used natural stone:
- Seal according to the stone and sealer manufacturer’s schedule.
- Watch for darkening, flaking, or surface changes.
Watch edges:
- Check stair nosings and rail posts for movement.
- Look for cracks around post bases and seal them quickly.
- Clear any debris clogging drainage paths or weep areas.
> A five‑minute check at the start and end of each season keeps small issues from turning into full porch rebuilds.
Boosting curb appeal with simple additions
Once the heavy work is done, a few finishing touches can push your curb appeal much higher.
Ideas:
- A door mat that fits the new tile scale, not too tiny.
- House numbers visible from the street, lit at night.
- Two planters flanking the door, sized so they do not crowd the walkway.
- A bench or a single chair on a larger porch, with enough room to walk past.
- A mailbox or door hardware that matches your railing finish.
Try to keep sightlines clean:
- Leave at least 36 inches of clear walking space from steps to door.
- Do not block stair edges with tall plants or decor.
- Keep decor off the top step so people can stand comfortably while unlocking the door.
If you want a simple, practical move today, walk out to your porch at three times:
- Morning light.
- Midday sun.
- After dark with exterior lights on.
Take photos each time, standing where a visitor would. Look for cracks, shadows, confusing steps, or clutter. Mark what bothers your eye first in each photo. That short list often tells you exactly where your exterior tiling and porch renovation should start.