So, you are trying to insulate your floors to reduce energy bills and you want to know if it is worth the time and money.
Yes, insulating your floors can cut your heating and cooling costs, boost comfort, and make your home feel less drafty, especially in winter.
Most people focus on walls, windows, or the attic and forget the floor. Bad idea. A cold floor pulls heat out of your body and out of your rooms. You end up turning the thermostat up, your HVAC runs longer, and your bills climb. The good news: floor insulation is usually a one‑time project that pays you back every month for years.
Things you need to know:
- Floor insulation can save around 5-15 percent on heating bills, depending on your home and climate.
- The biggest gains usually come from insulating floors above unheated spaces (crawl spaces, basements, garages).
- Material choice (fiberglass, mineral wool, rigid foam, spray foam) depends on access, moisture, and budget.
- Air sealing is as important as the insulation itself for comfort and performance.
- Moisture control under the floor is critical so you do not create mold or rot problems.
- DIY is realistic for many homes with open joists; enclosed floors often require a pro.
- Tech like smart thermostats and thermal cameras helps you track actual savings.
Why floor insulation affects your energy bill more than you think
If your feet are cold, your brain says the whole room is cold, even if the thermostat reads 70°F. So you bump it to 72 or 73. That 2-3 degree difference can add roughly 3-7 percent to your heating use.
Now, look at this simple comparison:
| Floor situation | Typical surface temp on a 30°F day | Comfort impact | Bill impact |
|---|---|---|---|
| Uninsulated floor over crawl space | 55-60°F | Feet feel cold; strong drafts at ankles | Higher thermostat settings, longer runtimes |
| Lightly insulated but leaky floor | 60-65°F | Still cool; some drafts | Moderate savings vs uninsulated |
| Well‑insulated and air‑sealed floor | 67-72°F | Comfortable barefoot; fewer drafts | Noticeable drop in gas/electric usage |
The key point: you are not just insulating to trap heat in the air. You are insulating so your surfaces, including the floor, line up closer to your air temperature. That is where comfort and bill savings meet.
How much can you actually save by insulating your floors?
No two houses are the same, but we can anchor this with rough numbers.
Imagine:
- Single‑story home with 1,500 sq ft of floor.
- Floor sits above a vented crawl space or unheated basement.
- Heating bill is 1,500 dollars per year (gas, oil, or electric, combined or separate).
If you add proper subfloor insulation and air sealing, typical savings range:
- Cold climates: 10-15 percent of heating usage.
- Mild climates: 5-10 percent of heating usage.
So a 1,500 dollar annual heating bill might drop by:
- 150 to 225 dollars a year in colder regions.
- 75 to 150 dollars a year in warmer regions.
If the project runs 2,000 to 3,500 dollars (material + labor), simple payback could be:
- Roughly 8-15 years in colder areas.
- Roughly 12-20 years in milder areas.
That sounds long on paper, but insulation does not have a subscription fee. It just sits there and keeps working.
> Energy experts often quote 5-15 percent heating savings for floor insulation over unconditioned spaces, and real utility bills tend to line up with that range when the work is done right.
If you have electric resistance heat, or expensive propane, or a lot of air leaks, the savings can be higher because each wasted unit of heat costs more.
Step one: know what kind of floor you have
You cannot plan a solid insulation project until you know what you are insulating.
Common floor setups
- Floor over a vented crawl space
Joists open from below, often with dirt or thin concrete on the ground, vents in the crawl walls. This is one of the biggest winners for insulation. - Floor over an unheated basement
Basement is below, usually some storage, maybe laundry. Sometimes people condition the basement, sometimes not. Approach changes based on that. - Floor over a garage
Bedrooms or living room above a garage. These rooms tend to be cold in winter and hot in summer because the garage is outside your insulated shell. - Slab‑on‑grade floor
Floor is directly on concrete. No joists to fill from below. Here, “floor insulation” usually means perimeter slab insulation or adding material above the slab during a remodel. - Upper floors inside the heated space
Second floor over first floor. For energy savings, these floors are less critical because both spaces are heated. You might still insulate for sound, though.
> If your floor separates a heated space from an unheated or outdoor‑like space, you have a strong candidate for insulation.
Choosing the right insulation material for your floors
There is no single “best” material. It depends more on your access, moisture level, and budget.
Here is a simple comparison:
| Material | Typical R‑value per inch | Good for | Watch out for |
|---|---|---|---|
| Fiberglass batts | R‑2.9 to R‑3.5 | Open joists you can reach; lower cost DIY | Needs good air sealing; sags if not supported |
| Mineral wool batts | R‑3.7 to R‑4.2 | Higher temp resistance; moisture tolerant; sound control | Higher price than fiberglass |
| Rigid foam (XPS, EPS, polyiso) | R‑4 to R‑6.5 | Continuous layer across joists or on basement ceilings | Seams must be sealed; code limits in some garages |
| Closed‑cell spray foam | R‑6 to R‑7 | Hard‑to‑reach spaces; air + vapor control in one step | Higher up‑front cost; pro install; ventilation during work |
| Blown‑in cellulose/fiberglass | R‑3 to R‑3.7 | Enclosed floor cavities with access holes | Needs dense packing to avoid settling |
Fiberglass vs mineral wool batts
For a typical crawl space or garage ceiling where joists are visible, batts are common because the install is fairly straightforward.
- Fiberglass is cheaper and widely available. It works fine if you air seal gaps and support it with netting or wires so it touches the subfloor.
- Mineral wool has better fire resistance, better sound control, and handles moisture swings better. Handy over garages or noisy spaces.
Rigid foam for continuous coverage
Rigid foam makes sense when you want a smooth, continuous layer:
- On the underside of a basement ceiling instead of between joists.
- On the exterior side of a slab during major remodeling.
The benefit: fewer gaps, fewer thermal bridges. The drawback: you need to seal seams with tape or foam, and local codes can require a fire barrier like drywall over foam.
Spray foam for tricky areas
Closed‑cell spray foam pulls double duty:
- High R‑value in limited space.
- Strong air sealing where batts are hard to fit.
- Useful for rim joists and irregular joists over a crawl space or garage.
> Many contractors use a hybrid approach: spray foam at the rim joists and small gaps, then batts in the larger joist bays to control cost.
Do not skip air sealing under the floor
You can stack R‑30 batts all day and still feel drafts if air can move freely around them.
Air leaks usually show up:
- At the rim joist (where floor meets exterior wall).
- Around plumbing and electrical penetrations.
- At gaps in subfloor sheathing.
- Where ducts or vents pass through the floor.
Before installing insulation:
- Use caulk or foam to seal gaps and cracks.
- Seal large openings around pipes with cut foam board plus foam around edges.
- Close unused vents in crawl spaces if you are converting them to conditioned or sealed spaces, following moisture guidance.
> Insulation slows heat transfer, air sealing blocks drafts; you need both for comfort and lower bills.
Dealing with moisture under your floors
Moisture is the part most people do not want to think about, but it is the part that can cause the biggest headaches.
Signs you have a moisture problem
- Musty smell coming from floors or lower rooms.
- Visible mold spots on joists or subfloor.
- Condensation on pipes in the crawl space.
- Standing water or damp soil under the house.
- Insulation that has fallen or looks heavy and saggy from water.
If you see any of this, fix moisture before you add insulation.
Basic moisture control steps for crawl spaces
- Grade soil outside so water flows away from the foundation.
- Install or repair gutters and downspouts with proper extensions.
- Lay down a ground vapor barrier (for example, 6-20 mil plastic sheeting) over bare soil, sealing overlaps.
- Address any chronic water entry with drains or sump pumps if needed.
You have two main strategies for crawl spaces:
- Insulate the floor above and keep the crawl vented.
In this case, the insulation lives in the floor joists. You leave vents open (where allowed by code) so moisture can leave, but you separate the home from the crawl with insulation and air sealing. - Condition or seal the crawl space and insulate the crawl walls.
Here, the crawl becomes part of your “inside” area. You air seal and insulate the perimeter walls, close vents, and usually connect a small amount of HVAC or dehumidification.
For pure floor insulation projects, most homeowners go with the first route unless they are already planning major work.
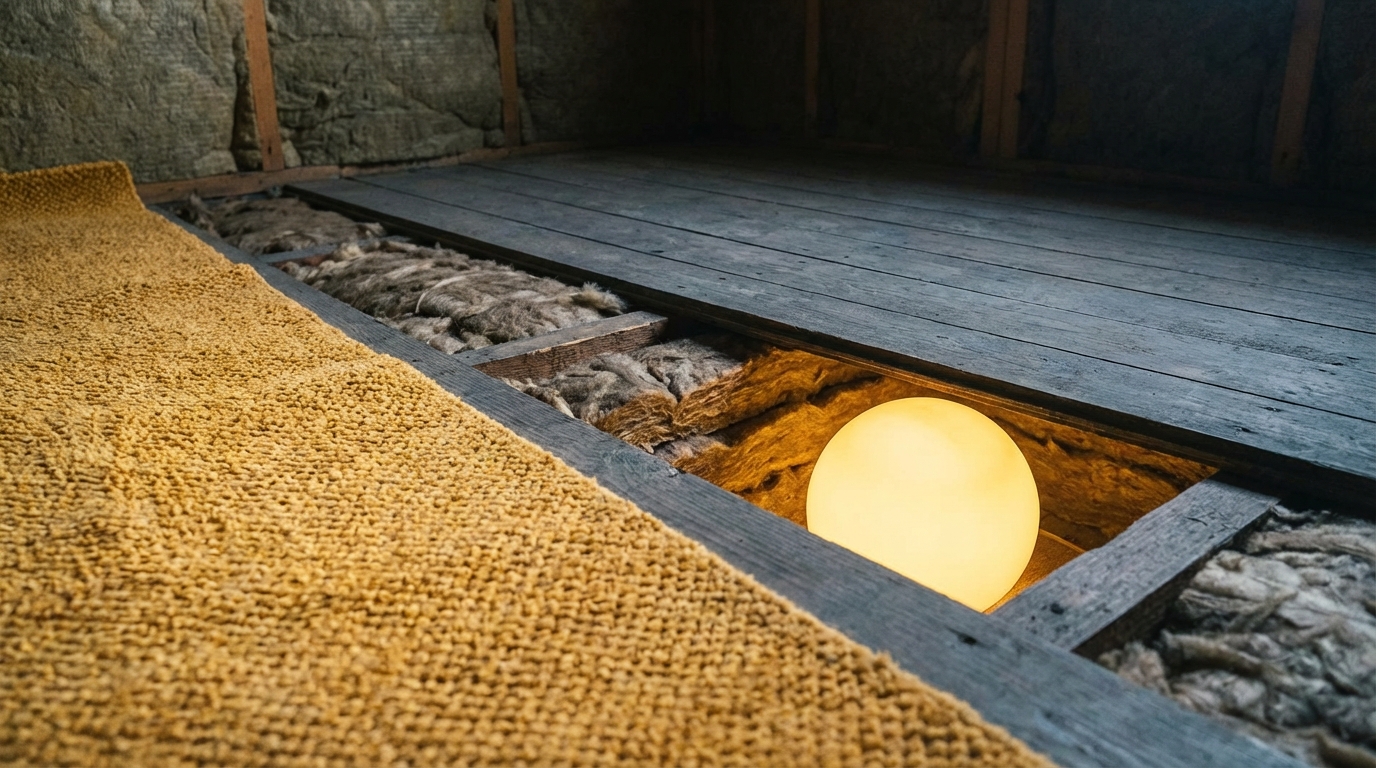
How to insulate a floor over a crawl space (step by step)
This is one of the highest impact projects for comfort and bills. Here is a realistic sequence.
1. Inspect and prepare the crawl space
- Check for standing water or saturated soil.
- Look for signs of pests (droppings, nesting material).
- Check joists and subfloor for rot or damage.
- Measure joist depth and spacing (for example, 2×8 at 16 inches on center).
If structure or water looks serious, bring in a contractor first.
2. Plan R‑value and material
Energy codes give targets by climate zone. A rough guide:
- Colder zones (4-7): aim for at least R‑25 to R‑30 in floors.
- Mild zones (2-3): R‑13 to R‑19 can still help.
Pick batts sized for your joist depth:
- 2×8 joists: often fit R‑25 (about 8 inches) with compression trade‑offs.
- 2×10 joists: can hold R‑30 batts more comfortably.
3. Air seal before insulation
- Seal gaps at rim joists with rigid foam pieces + spray foam around the edges.
- Foam or caulk small cracks between subfloor panels that are visible from below.
- Seal gaps around pipes, wires, and ducts.
This is the less glamorous part but it is where a lot of comfort improvement comes from.
4. Install batts correctly
- Cut batts to length so they fit snugly between joists, without compression or big gaps.
- Press batts up so they contact the underside of the subfloor fully. No air space above them.
- Support batts with wire supports, thin wood lath, or plastic netting stapled to joists.
A common mistake is leaving batts hanging an inch or more below the floor. That extra air pocket can reduce performance and invite air movement.
5. Protect the insulation
In some crawl spaces you may add:
- Housewrap or fabric facing on the underside to help hold insulation in place.
- A proper vapor strategy, depending on climate. Often the ground vapor barrier plus air sealing is enough.
> If the crawl space is damp or tight, think safety: wear a mask or respirator, eye protection, and coveralls, and have someone check on you periodically.
Insulating floors over garages
Rooms over garages get a lot of complaints in cold and hot months. You have cold air under the room in winter and hot garage air in summer.
Key steps:
- Seal the joint where the floor meets exterior walls above the garage.
- Insulate joist cavities with batts or dense‑packed material.
- Consider a continuous layer of rigid foam below the joists, covered with fire‑rated drywall (check code).
- Seal the garage ceiling drywall, light fixture penetrations, and any gaps to keep garage fumes out.
Section of code and safety:
- Garage ceilings often have stricter fire resistance requirements.
- Some foam products need a thermal barrier like 1/2 inch drywall underneath.
If that room is still uncomfortable after insulation:
- Check for duct leaks or undersized HVAC vents.
- Look at window quality and shading in that room.
Floors over basements: insulate the floor or the basement walls?
With an unheated basement, you have a choice:
- Insulate the floor above and keep the basement colder.
- Insulate the basement walls and bring the basement closer to indoor temperature.
Quick comparison:
| Approach | Pros | Cons |
|---|---|---|
| Insulate floor above basement | Cheaper for small areas; targets living space directly | Basement stays cold; harder for pipes and mechanicals; more surfaces to air seal |
| Insulate basement walls | Brings whole basement into conditioned space; protects pipes; fewer cold surfaces | Higher cost up front; requires moisture control on walls |
> If you plan to use the basement more in the future, wall insulation often pays off better for comfort and can also help with long‑term energy use.
If you only ever go into the basement to change filters and reset a breaker, floor insulation might be the simpler path.
Slab floors: what are your options?
Slab‑on‑grade floors can feel cold even in moderate climates because concrete conducts heat well.
If you already have a finished slab floor and you are not doing a remodel, your options are limited:
- Add area rugs or insulated underlayment under new flooring.
- Use insulated panels or raised subfloor systems in specific rooms.
During new construction or major renovation:
- Add rigid foam under the slab (done before the pour).
- Install vertical rigid foam at the slab perimeter (where most heat leaves).
Here, your floor “insulation” and your comfort come largely from the materials above the slab (like cork or engineered wood over foam underlayment) and what is under or around the concrete.
DIY vs hiring a pro
You can do a big chunk of floor insulation yourself if:
- You have safe access to joists from below.
- You are comfortable with cutting, fitting, and working in tight spaces.
- You are willing to spend time on air sealing, not just stuffing batts.
DIY is usually reasonable for:
- Crawl spaces with enough height to move safely.
- Open basement ceilings.
- Small garage ceilings where you can work from a stable platform.
You might want a pro when:
- Floor cavities are enclosed and need dense‑pack or spray foam.
- There are wiring, plumbing, or structural concerns.
- You want to combine floor work with a broader energy upgrade plan.
> A home energy audit that includes a blower door test and thermal imaging can show clearly how big your floor losses are compared to your attic and walls.
Sometimes, that audit changes priorities: if your attic is bare and your floor has some insulation, starting at the top can give a better return.
How tech can help you track real savings
This is where the “technology” angle comes in. You can treat your floor insulation as an experiment and measure actual impact.
Use a thermal camera or IR thermometer
Before and after the project:
- Take thermal images of your floors from above on a cold morning.
- Scan the underside from the crawl space or basement if you can.
- Log temperature differences between floor surfaces and indoor air.
Many smartphones now support thermal imaging attachments. Even a simple IR thermometer lets you capture floor temps in different rooms.
Analyze smart thermostat data
If you have a smart thermostat, you often get:
- Run‑time history for your heating system.
- Temperature and humidity logs by day and hour.
- Energy use estimates in kWh or gas usage in therms, depending on model and utility links.
After insulating floors, compare:
- Heating run‑time on days with similar outdoor temperatures before and after.
- Average setpoint you feel comfortable using. Many people find they can drop 1-2°F and still feel fine.
Use utility data portals
Many utilities provide online dashboards where you can:
- See your usage by day or hour with smart meters.
- Compare year‑over‑year usage normalized for weather (heating degree days).
> Combining smart thermostat logs and utility data gives you a realistic picture of what floor insulation did for you, instead of guessing.
Cost breakdown and ways to lower it
Let us look at a ballpark breakdown for a 1,000 sq ft floor over a crawl space:
| Item | DIY cost range | Pro install range |
|---|---|---|
| Fiberglass or mineral wool batts | $500 – $1,000 | Included in labor/material bundle |
| Air sealing (caulk, foam, tapes) | $100 – $250 | Often $300 – $800 extra, depending on scope |
| Vapor barrier for crawl soil | $150 – $400 | $500 – $1,500 |
| Labor | Your time | $1,000 – $3,000+ |
| Total | $750 – $1,650 | $2,000 – $5,000+ |
Ways to cut cost:
- Do your own air sealing and prep, then have a pro install spray foam or batts where needed.
- Focus on the worst zones first, such as rooms over garages or the coldest section of the floor.
- Look for rebates from local utilities for insulation or weatherization projects.
Some regions offer low‑interest loans or partial grants if you get an energy audit and verify the work.
Common mistakes that kill performance
If you are going to spend time and money, avoid these:
- Leaving gaps and compression
Gaps, voids, and crushed insulation reduce R‑value. Cut pieces carefully and do not jam them into place. - Ignoring air leaks
Skipping air sealing around rim joists and penetrations makes your insulation work harder than it should. - Covering active moisture problems
Insulation can hide mold and rot, and can trap moisture against wood. Solve water entry and humidity before installation. - Using the wrong vapor control in the wrong climate
Heavy plastic stapled to the underside of joists in humid climates can cause condensation on the wood. Get local guidance or a contractor opinion on vapor strategies. - Not supporting batts
Gravity wins. Un‑supported batts sag and fall, sometimes within a few years.
> If you can see bare subfloor from the crawl space in multiple spots when you are done, assume performance will be closer to “somewhat better” than “strong improvement.”
Where floor insulation fits in your whole‑home plan
Floor insulation is one piece of the bigger energy picture. You get the best overall results when you think of your home as a connected system.
Rough priority order many energy auditors use:
- Seal big air leaks (attic, around chimneys, big gaps).
- Add attic insulation to meet or exceed modern code.
- Seal and insulate ducts in attics and crawl spaces.
- Address floor insulation over unconditioned spaces.
- Improve wall insulation during siding or interior work.
- Upgrade windows, then HVAC, then possibly add smart controls.
The reason floors are not always first: heat rises, and many houses leak more at the top than at the bottom. That said, if your floors are painfully cold, it is still a strong target for comfort and long‑term savings.
One practical way to start this week
Before you spend a dollar on insulation material, grab a simple IR thermometer or borrow one, pick a cold or cool morning, and do a quick survey:
- Measure floor temperatures in different rooms, 5-6 spots per room.
- Note which areas are 5°F or more colder than your thermostat setting.
- Mark rooms directly over crawl spaces, garages, or unheated basements.
Those readings will show you where your floor project should start and give you baseline numbers you can compare against after your insulation upgrade.