So, you want to bring reclaimed wood into your home and “source history” without getting junk, warped boards, or greenwashed marketing.
You can do it, but you need to know where to buy, what to inspect, and how to match the right wood to the right project.
Most reclaimed wood problems come from poor sourcing: not knowing where the wood came from, its moisture level, whether it was treated with chemicals, or if it is structurally sound. Once you fix that, reclaimed wood becomes one of the most character-rich, practical materials you can use in a home.
Here is what you need to know before you spend a single dollar or pull a single nail.
- Reclaimed wood is not all the same: it can be from barns, factories, shipping pallets, old homes, or even rivers.
- You need to ask for proof of origin, treatment history, and moisture content.
- Hidden nails and metal are your biggest risk for tools and safety.
- Old wood may have lead paint, pesticides, or creosote you do not want inside your house.
- True reclaimed wood costs more than new lumber, but it often performs better and looks deeper and richer.
- Good suppliers will kiln-dry, de-nail, and surface the boards while still leaving character.
- Not every reclaimed board should become a structural beam; some are best as cladding or decor.
What reclaimed wood really is (and what it is not)
So, you want to source “reclaimed wood.” That phrase gets used loosely, so lets clean it up first.
Reclaimed wood is lumber taken out of an older use and put back into service. That means:
- Old barns and agricultural buildings
- Factories, warehouses, and mills
- Old homes, schools, and offices being demolished
- Railroad structures, docks, or bridges
- River or lake “sinker” logs pulled from waterways
It is not just:
- New wood that is wire-brushed to look old
- New boards that are distressed or colored to feel vintage
- Composites with a printed “reclaimed” texture
Those can look nice, and they have their place, but they do not carry the same story or performance.
> Real reclaimed wood starts with a prior life, not just a rough surface.
Common sources and what they are good for
You will usually see a few big categories in any supplier catalog.
| Source | Typical Species | Common Uses | Watch Out For |
|---|---|---|---|
| Barn wood | Pine, fir, hemlock, oak | Wall cladding, ceilings, furniture, mantels | Insect damage, weather checking, old finishes |
| Industrial / factory beams | Douglas fir, oak, maple | Structural beams, stair treads, tables | Heavy metal fasteners, oil stains, embedded hardware |
| Old flooring | Oak, maple, heart pine | New floors, accent walls, furniture panels | Nail holes, tongue-and-groove damage, finish removal |
| Shipping pallets / crates | Mixed hardwoods and softwoods | Small projects, decor, shelves | Chemical treatments, low quality, inconsistent sizes |
| River / lake “sinker” logs | Cypress, pine, oak, others | High-end furniture, paneling, custom millwork | Premium pricing, needs expert milling, limited supply |
If you know where the wood came from, you can roughly guess:
- How durable it might be
- What contaminants you might face
- Where in your home it belongs
Why reclaimed wood is worth the effort
You are not just buying “old boards.” You are buying three things at once: story, performance, and sustainability.
1. Story and character you cannot fake
Old nail holes, saw marks, small cracks, color variation, and patina come from decades of use and exposure. You can mimic some of that with tools and stains, but it usually looks uniform. Real wear never looks uniform.
> The small imperfections are what stop a room from feeling flat and generic.
Think of:
- A dining table from factory beams that saw thousands of workers walk under them
- A mantel made from a barn beam where animals were kept for decades
- Flooring milled from old schoolhouse boards
When guests ask about it, you have an actual story instead of “I got it at a big-box store.”
2. Performance: why old wood can be better wood
A lot of reclaimed lumber comes from older, slow-growth trees. That often means:
- Tighter grain
- Higher density
- Better stability once dried correctly
Modern lumber is usually from faster-grown trees. That is not always bad, but it can mean wider growth rings, more movement, and more inconsistencies.
There is also the fact that older boards have already done much of their shrinking and swelling over time. If they are milled and dried correctly today, they can be quite stable indoors.
3. Environmental benefits with some caveats
You are taking a material that has already had one life and giving it another, instead of sending it to landfill or burning it. That usually means:
- Less demand for new logging
- Lower embodied energy than manufacturing new products
- More use out of a tree that was cut decades ago
You do need to factor in transport, milling, and drying. Long-distance shipping chips away at the benefit. So local or regional sourcing tends to be more responsible.
> The closer the wood is to your project, the more honest the “green” claim usually is.
Where to source reclaimed wood (and how to vet each channel)
You have several options, and each one comes with a different mix of cost, risk, and time.
Architectural salvage yards
These are often the sweet spot for homeowners.
You get:
- Boards, beams, doors, and trim from older buildings
- Some level of sorting and basic prep
- Staff who usually know where the materials came from
Questions to ask:
- “Do you know the original building or site?”
- “Was this wood indoors or outdoors originally?”
- “Has it been kiln-dried?”
- “Did it have any paint or coatings removed?”
If they can point to local teardown projects or show photos, that is a good sign. If they shrug and say “old wood from somewhere,” treat it as decor, not structure.
Specialized reclaimed wood suppliers
These are companies that focus only on reclaimed lumber. Pricing is higher, but in return they often offer:
- Detailed sourcing info
- Grading (for structure vs appearance)
- De-nailed, kiln-dried, milled boards ready to install
- Prefinished options for flooring and wall planks
Here, you want to ask:
- “What moisture content do you dry to?” (Aim for 6 to 9 percent for indoor use.)
- “Do you metal-detect and de-nail every board?”
- “Do you test for lead paint and other coatings?”
- “Can you provide species identification and grading info?”
> A good reclaimed supplier talks about moisture content, grading, and metal detection all day long.
If they do not talk about those topics, they are more of a trader than a specialist.
Local contractors and demo crews
Some of the best deals come from:
- Builders doing historic renovations
- Demolition companies with a reuse mindset
- Small contractors who hate wasting good wood
You might find:
- House framing lumber
- Old flooring
- Trim, doors, beams
The trade-off is you will probably need to:
- Remove nails and hardware yourself
- Sort through mixed quality
- Pay for milling and drying afterward
This route is great if you enjoy the process and want to save money. Just be extra careful about contaminants and moisture.
Online marketplaces
Sites like Craigslist, Facebook Marketplace, and local buy/sell apps can have hidden gems: barn clean-outs, leftover flooring, or beams.
Risks:
- No guarantee of species
- No moisture testing
- No history on chemicals or paint
This can still work if:
- You use it for small, non-structural projects
- You are willing to invest in cleaning, testing, and drying
Just treat big claims like “100-year-old barn wood from 1800s” with caution unless they can back it up.
DIY salvaging
If you have access to old sheds, barns, or even your own renovation, you can pull the wood out yourself.
Pros:
- Lowest material cost
- Deep personal story behind the wood
- Full control over which boards you keep
Cons:
- Time and labor heavy
- Need basic tools and safety gear
- Still must handle drying, de-nailing, and milling
Here you are trading money for time and sweat.
How to evaluate reclaimed wood before you buy
Think of buying reclaimed wood like inspecting a used car. You do not just look at the paint; you check the engine, mileage, and history.
There are six key checks you want to run.
1. Moisture content
Wood movement is your biggest enemy in a finished interior.
Ideal moisture content for indoor projects is usually around 6 to 9 percent. For many climates, 8 percent is a common target.
Ask:
- “What is the current moisture content?”
- “Was this kiln-dried or air-dried only?”
If they cannot answer, bring a handheld moisture meter. They are not expensive, and they tell you quickly if you are buying trouble.
> If the wood is too wet, it will cup, warp, or crack once it sits in your home.
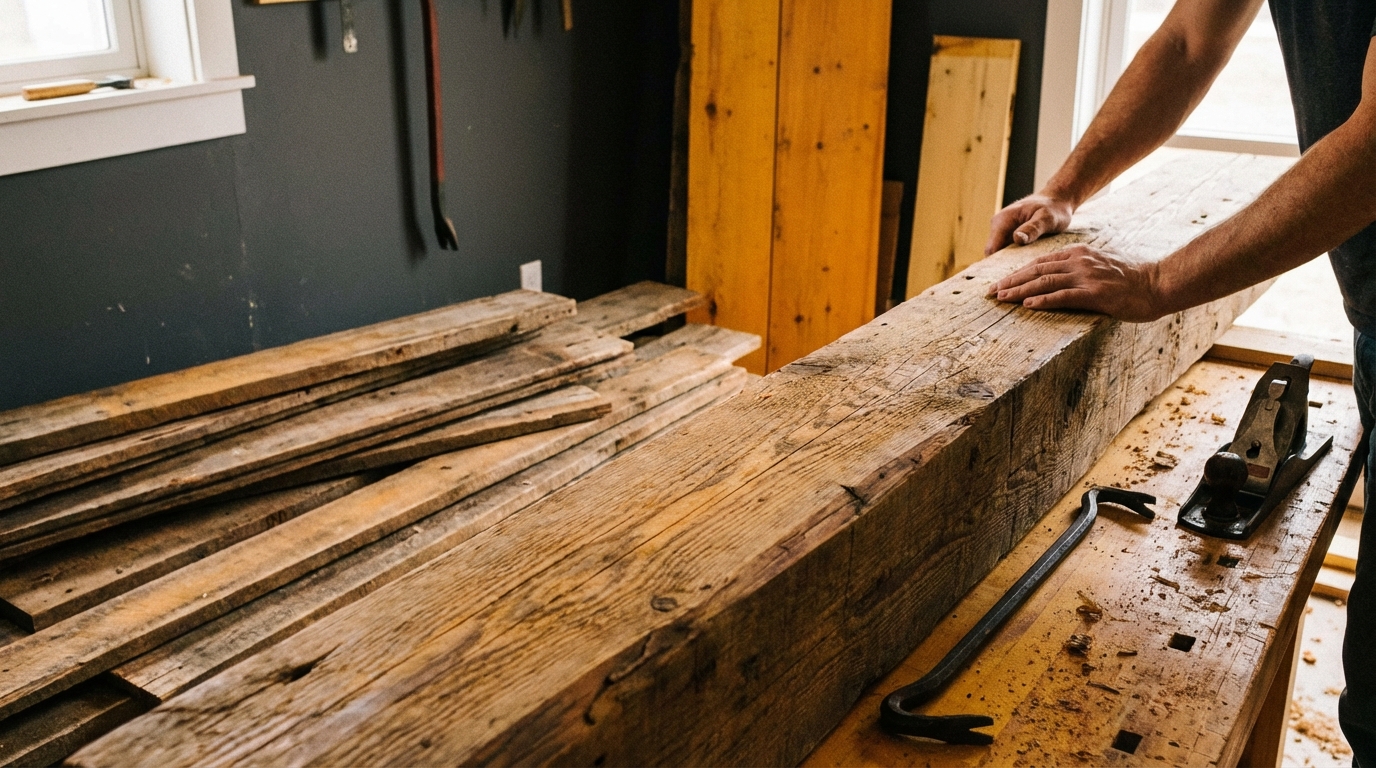
2. Metal and fasteners
Nails, screws, bolts, staples, and bits of wire hide inside old boards. They can:
- Destroy saw blades
- Cause kickback on table saws
- Present hazards when cutting or sanding
Look for:
- Nail holes along edges and faces
- Rusted stains (often signal hidden metal)
- Small bulges or ridges that feel harder than the wood
Better suppliers pass every board under a metal detector and remove what they find. If you are working with raw salvaged wood, plan on spending real time with:
- A metal detector wand
- Pry bars
- Nail pullers
3. Structural soundness
Not all reclaimed wood should carry loads. That is fine. Some of it is perfect for surfaces.
Things to check:
- Deep rot: poke with an awl or screwdriver. If it sinks easily, that area is weak.
- Insect damage: look for tunnels, small holes, or frass (fine dust) in and around the wood.
- Severe checking and splits: some checking is normal; deep splits that go through the board reduce strength.
For anything structural, ask the supplier for graded material. Some will carry reclaimed beams that are re-graded by an engineer or grading agency.
4. Previous finishes and chemicals
Here is where health and safety come in.
Common concerns:
- Lead paint on older trim, siding, or doors
- Pesticides or fumigants used on pallets
- Creosote or heavy oils on timbers from industrial sites, railroads, or docks
Ask:
- “Has this wood ever been painted or coated?”
- “Do you test for lead?”
- “Were these pallets stamped with any treatment codes?”
For pallets, look for markings like:
- “HT” (heat treated) is usually safer.
- “MB” (methyl bromide) is a red flag; avoid for indoor use.
If you suspect lead or other coatings, do not sand aggressively without testing. Lead test swabs are easy to pick up at hardware stores.
> Never bring mystery chemicals into a living room and then sand them into dust.
5. Species identification
You might not need to know the exact species, but it helps to understand:
- Hardness (especially for floors and stairs)
- Workability (hand tools vs power tools)
- Color and how it will take finish
Suppliers will often list:
- Oak
- Maple
- Heart pine
- Douglas fir
- Mixed softwoods or mixed hardwoods
If you are doing a large project, ask for a couple of offcuts to test:
- Stain colors
- Clear finish options
- How the grain pops after sanding
6. Quantity and consistency
Reclaimed stock is finite by nature. When it is gone, it is gone.
Before you design, confirm:
- Total square footage available (for flooring or cladding)
- Total linear footage and dimension range (for beams, trim, or mantels)
- Thickness and width range, including expected waste during milling
You do not want to run out with one wall left to cover.
Matching reclaimed wood to the right project
Not every board should be everywhere. The trick is to match the material to where it shines.
Best uses for reclaimed wood in a home
Here are common and effective uses:
- Accent walls and ceilings: Barn boards or mixed species planks bring visual depth without structural risk.
- Flooring: Reclaimed oak or heart pine flooring gives warmth and can be resurfaced in the future.
- Beams and mantels: Old structural beams from barns or factories work well as exposed elements.
- Stairs and railings: Treads from thicker stock, railings from milled beams.
- Furniture: Tables, benches, shelves, bed frames, and cabinets.
- Doors: Sliding barn doors or solid panel doors from older homes.
Where you want to be careful:
- Wet areas like showers: keep reclaimed wood out or use it only where it does not get direct water.
- High-abuse zones like commercial kitchens: use harder species and tough finishes.
Finish choices that keep the history visible
The finish you pick will change the mood a lot.
Common options:
- Clear matte polyurethane or polyurea: Protects the surface while keeping a natural look.
- Hardwax oils: Penetrates the wood, enhances grain, and is easier to touch up later.
- Penetrating oils: Simple, natural appearance but less mechanical protection.
- Tinted stains: Adjust color tone if you want more uniformity.
For most people who love reclaimed, the goal is to protect, not to hide.
> If your final finish makes the boards look like generic new lumber, you went too far.
Test finishes on offcuts before you commit. That one step can save a lot of regret.
Cost: what reclaimed wood really costs compared to new
There is a myth that reclaimed wood is a budget shortcut because it is “old.” In practice, you often pay more per board foot than new lumber.
Here is why:
- Labor to remove it from buildings
- Sorting, de-nailing, and metal detection
- Transport from teardown sites to mills
- Drying, milling, and grading
A simple, rough comparison:
| Material | Typical Use | Relative Cost vs Standard New Wood |
|---|---|---|
| Standard new construction lumber | Framing, basic projects | Baseline (1x) |
| New hardwood flooring (oak) | Floors | About 1.5x to 2x baseline |
| Reclaimed hardwood flooring (oak, heart pine) | Floors, feature areas | About 2x to 4x baseline, depending on grade |
| Reclaimed beams | Decorative beams, mantels | Wide range; often similar to or above new large timbers |
The gain is not just price per board. It is longevity, appearance, and story. For many people, that trade is worth it, especially in key areas like living rooms, entryways, and kitchens.
How to avoid common reclaimed wood mistakes
You can avoid most issues if you learn from what others already ran into.
Mistake 1: Treating all reclaimed wood as safe by default
“Old” does not automatically mean safe or healthy.
Avoid:
- Using chemically treated pallets for indoor furniture
- Sanding unknown finishes in closed spaces
- Bringing in oily or creosote-treated timbers
Simple fix: test, ask for history, and keep suspect materials in non-living areas or outside.
Mistake 2: Skipping proper drying
If the wood was stored in a barn or yard, it may feel dry but still carry too much internal moisture.
Common outcomes:
- Cupping or twisting after installation
- Gaps opening between floorboards
- Cracks widening as it acclimates
The safe path:
- Buy kiln-dried stock for anything you install permanently indoors.
- Acclimate the wood in your home for at least 1 to 2 weeks before installation.
Mistake 3: Over-sanding away all the character
It is tempting to “make it perfect.” Once you sand too far, you cannot bring the patina back.
A better workflow:
- Clean the surface gently first (brush, vacuum, mild soap if needed).
- Spot-sand rough or sharp areas only.
- Lightly sand the whole surface with higher grits, just enough for finish adhesion.
Leave some saw marks, color variation, and minor scars. That is why you picked reclaimed in the first place.
Mistake 4: Using reclaimed wood structurally without grading
A beam that held a barn roof 70 years ago may still be strong, but you cannot assume.
If you want reclaimed wood to carry loads:
- Work with a supplier that can provide grading or engineering data.
- Ask your contractor or engineer to inspect and sign off on the design.
For many people, the happier compromise is:
- Use new graded lumber for hidden structure.
- Wrap it or pair it with reclaimed wood for the visible surfaces.
Mistake 5: Underestimating prep time
Even well-processed reclaimed wood often needs more touch work than new boards.
Plan extra time for:
- Sorting boards for color and character
- Fitting random widths
- Filling old nail holes where needed
- Custom milling when dimensions vary
If you are hiring a contractor, talk through this so they can bid realistically.
Making reclaimed wood work with your home’s style
You might worry reclaimed wood only fits rustic or farmhouse styles. That is not the case. The key is in how much you use and where.
Modern and minimalist spaces
Use reclaimed wood as a controlled accent:
- One feature wall in a living room
- A slab dining table with clean lines
- Floating shelves on smooth, painted walls
Keep:
- Edges crisp and straight
- Finishes more matte than glossy
- Color range somewhat limited (pick similar tones)
This gives warmth without visual clutter.
Traditional or classic interiors
Reclaimed wood fits especially well here.
You can go heavier:
- Exposed ceiling beams
- Wide-plank flooring
- Built-in bookcases from old stock
Pair with:
- Neutral paint colors
- Textiles with texture but not loud patterns
The wood becomes a quiet but strong anchor.
Industrial or loft style
This is where factory beams, old flooring, and rougher textures shine.
Think:
- Steel + reclaimed wood furniture
- Mixed metal and wood railings
- Concrete or brick plus wood surfaces
You can let the patina stay bolder, including more variation, saw marks, and heavier grain.
How technology helps you source better reclaimed wood
Since your site is about technology, lets talk about how tech intersects with something as old as wood.
Digital marketplaces with traceability
Some reclaimed wood suppliers now:
- Track each batch with QR codes or IDs
- Provide digital “passports” with origin, species, and drying data
- Share demolition project details and dates online
You can scan a code and see:
- Which warehouse or barn it came from
- When it was de-nailed and milled
- What treatments it went through
This is useful when you want more than “old wood from somewhere.”
Moisture meters and sensors
Affordable pin and pinless moisture meters let you:
- Check boards at the yard before buying
- Monitor wood during acclimation at home
If you are doing a large install, your contractor may also use monitoring sensors in subfloors or behind wall cladding to track humidity over time.
Metal detection and scanning
Reclaimed-focused mills often use:
- Bench-top metal detectors
- Walk-through scanners for beams
- Handheld wands for final checks
You can buy a simple handheld detector yourself for relatively little. It saves blades and keeps your tools in better shape.
3D visualization and planning tools
Design software and AR tools let you:
- Visualize reclaimed wood walls or floors in your actual rooms using photos and overlays
- Test different plank widths and color mixes virtually
- Plan board layouts for minimal waste
Some flooring and cladding brands provide digital samples so you can see how a pattern might read in your lighting.
> The more you see it in context before you buy, the less likely you are to regret the pattern, tone, or coverage.
Step-by-step: bringing reclaimed wood into your home
Let us pull this into a practical flow you can follow.
Step 1: Decide where reclaimed wood fits
Pick one or two areas to start, for example:
- Living room feature wall
- Dining table
- Entryway bench and coat rack
- Kitchen shelves
Start smaller rather than covering every surface at once. You can always add more later.
Step 2: Choose your source channel
Based on your budget and time:
- Use a specialized supplier for large projects or when you want fewer surprises.
- Use salvage yards or demo contacts if you like the hunt and want to save money.
- Use online options or DIY salvage for small or non-critical pieces.
Make one decision: are you buying “ready to install” or “raw to process”?
Step 3: Inspect and ask the right questions
When you visit or talk to a supplier, bring this short question list:
- “Where did this wood come from?”
- “Was it kiln-dried? If so, to what moisture content?”
- “Has it been metal-detected and de-nailed?”
- “Any prior coatings or treatments I should know about?”
- “What species is it, and do you have enough quantity for my project size?”
If they are open and specific with answers, that is a good sign. If they are vague, treat the wood as decorative rather than structural or heavy-use.
Step 4: Plan milling and finishing
Work out:
- Do you need a local mill or shop to plane, joint, and cut boards to size?
- Will you or your contractor handle sanding and finishing on-site?
- What finish system will you use (poly, oil, wax, etc.)?
Think about dust control and safety during sanding, especially for any boards with unknown past finishes.
Step 5: Acclimate and install
Once the wood arrives:
- Store it in the space (or a very similar one) where it will live.
- Stack with spacers for airflow.
- Let it sit for 7 to 14 days while you monitor humidity and moisture content.
For installation:
- Use techniques suited to your climate and home (for example, nailed vs glued floors, expansion gaps).
- Follow any supplier guidelines carefully; they often know their stock very well.
Step 6: Live with it and adjust
Reclaimed wood will change a little with seasons. That is normal.
If you see:
- Small hairline cracks
- Minor seasonal gaps
Those can add to the character. Repair or refinish only if you see major movement or finish failure.
One simple, practical tip to finish with:
Before you commit to a full wall, floor, or big piece of furniture, buy a small batch of reclaimed boards from your chosen source and build one small object, like a shelf or side table. That “trial run” will show you how the wood behaves, how it sands, how it finishes, and how it looks in your light, so your big project goes smoother and with fewer surprises.